
Voor de Nederlandse versie, klik hier!
Before you go on to this amazing free design series, let me ask you: Do you want to learn more about crochet design, pattern writing or running your own crochet design business?

Did you like this free blog series and want to achieve your crochet designer dream? I have great news for you, because you can now also follow my crochet design coaching account: Christina Crochet Coach. Here, you will get HIGH QUALITY tips and advice, tailored specifically to crochet designers (to-be)! So you can take your crochet designs to the next level <3
I also host LIVE Instagram Q&A’s every other week where you can ask all your crochet design related questions. And I have a bi-weekly newsletter where you get the BEST crochet designer tips, Q&A updates and special offers and discounts!
Website: www.christinacrochetcoach.com
Newsletter: Sign up for the newsletter
Instagram: @Christinacrochetcoach
Facebook: Christina Crochet Coach
Intro
Do you have yarn picked out already in anticipation of these series? Maybe you already have a thousand design ideas floating in your head? Share your progress on social media with #ASOYcrochetsweater. I’d love to see your yarn choices and design ideas!
Welcome to the first part of the crochet sweater design series! In this part we talk design, yarn options and gauge squares! When I started with my own design, I really did not know where to start and what information I needed to get started on the pattern. Needless to say, my process wasn’t as organized as this post is. Now you will have this information beforehand and I hope it will be very useful to you. Let’s get started 🙂
Making design decisions
Inspiration
Without inspiration there’s no design. Without a design there’s no sweater. A little seed grows into a big flower. That’s usually how my ‘inspiration-curve’ progresses. Look on Pinterest; find a cute stitch, an interesting pattern, and suddenly a seed is planted in your head. Feathery trees along the side of the road, thick clouds in the sky, moss on the forest floor, flowers in a big meadow. Beautiful passages in a book, gripping music in a movie. Each of these little seeds could take root and grow into something beautiful; your design. Look actively for inspiration and you might not find it. But if you will just listen and really take notice of your surroundings, it will come to you effortlessly.
When we have found our inspiration it’s time to make a few decisions for the design. Maybe you already have a general idea, but the devil is in the details as they say.
Sweater fit
You need to decide how you want your sweater to fit and how you want it to look (more about shapes in part 3);
- Body: Oversized vs close fitted (and everything in between) cropped vs long
- Sleeve length: Short, 3/4th or long sleeve
- Sleeve fit: wide, fitted, flared (from fitted to wide) etc.
- Neckline: wide, close fitted, turtleneck, lowered or raised (how deep your neckline will be), square, round, V-neck etc.
- Hem: no hem, wide hem, short hem, split hem (splits at the sides of the sweater)
The design process is an ever evolving one. You might not eventually make what you had in your mind and change a lot along the way. However, making a sketch of what you have in your head and making notes beside it, gets you up to a good starting point to work from. Sketching and making notes also gets your creative juices flowing. It is also very fun to make a (private) Pinterest board where you can have all your sweater ideas in one place or make a collage with all your favorite stitches and sweaters!
Top-down vs Bottom-up
Most of the crochet sweaters are made top down. This means that you begin with the shoulders and neckline and gradually work your way down. This is a good option for two reasons;
- the beginning chain is always a little tighter than the rest of your work. If you work bottom up, this means that your hem will be tighter and will not look good.
- Also, it is easier to add length to the sweater this way, for yourself and for the person that will make your sweater.
The instructions and examples are therefore all based on a top-down construction. If you are keen on making a bottom-up sweater, my advise would be to start with a foundation stitch, so the hem of your sweater will still have enough stretch.

Choosing yarn
What is the purpose of your sweater? Will it be light for the summer, warm for the winter or versatile for every season? Do you want to show off a gorgeous variegated hand dyed wool, or a simple cotton yarn? Do you want to make it lacy or bulky? Or perhaps you have yarn stashed already that inspires you for your sweater design? The questions you need to answer;
- Which yarn fibre? : cotton, silk, wool, acrylic, blends of different fibres etc.
- Which yarn weight? : lace, fingering, sport, DK, bulky etc.
- How the yarn is dyed? : variegated, short or long color changes, (semi-)solid
- Which yarn color?: to match the story of your design or just what you like best
Some yarns will stretch a lot (wool and silk) and some will not (cotton, acrylic, linen), so you should keep that in mind for your design. It is also good to try which stitch combinations work with certain yarns and how different yarns behave. For a sweater I like to use wool, a wool/silk blend (like my Picking flowers sweater) or another wool blend. The main reason is that it will hold its shape very well, blocks really nicely and it does not sag under its own weight (like cotton will often do). You can read more about fibre properties here.
How different fibres react takes us to the next part: making a gauge swatch.
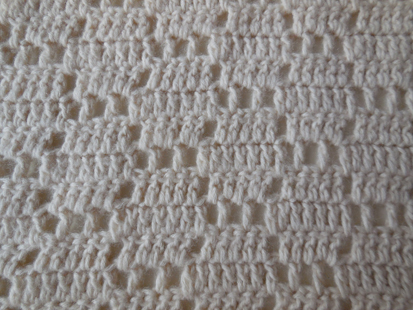
Choosing a stitch (combination) and making a swatch
Choosing hook size
Now that you have chosen your yarn, you can finally play with it! The hook you will use with your yarn depends on how you want your sweater to drape. If you want a nice warm sweater, you can choose to use the hook size recommended on the yarn’s ball band or smaller. Make a swatch and see what you like best. Maybe you would like a nicely draped sweater, so you can choose a bigger hook size.
Choosing a stitch (combination)
As you have chosen the purpose of the sweater, you might also have thought about which stitch to use to match that purpose. Do you want to make an all dc sweater, which will drape nicely, or maybe use moss stitch (sc, ch1) to get a nice knitted look?
Do you want to incorporate lace (panels) for a more interesting design or keep it simple and elegant?
Choose your stitch (combination) based on the purpose of your sweater and how you would like it to look. You can search on Pinterest and Ravelry for inspiration. With so many choices there, it is impossible not to get inspired!
Swatching and measuring gauge
The foundation of your whole sweater: your gauge square.
Make several swatches with different stitch combinations. Change to different hook sizes to see what that will do. See what you like best, it is your sweater, be creative! After you have chosen the hook size and stitch combination that you really like, measure the gauge with a measuring tape. Make your gauge square big enough to accurately measure the gauge. The bigger, the better! The measured gauge can not only be for a number of separate stitches, but also for stitch repeats and special stitches (like 10 V-stitches or 5 lace repeats).
IMPORTANT: when you measure your gauge, measure it accurately! This can also mean half stitches or rows. This might not sound like much, but when you are making a sweater of 200 stitches wide, the difference between 20 stitches per 10 cm or 20,5 stitches per cm can accumulate fast!
Washing versus blocking your swatch
Now that you know your unblocked gauge, we have two options depending on your used stitches:
- Blocking: In the case that you are working with lacy patterns, you need to block the swatch to measure up the blocked gauge, by washing it and then pining it down so the lace opens up nicely.
- Washing and just laying flat to dry without stretching: In the case that you like the stitch pattern as is and it doesn’t need stretch, you can just wash your swatch and lay it flat to dry without stretching it. Just pull it gently into shape and let time do the rest.
What’s the point of washing then? Like you will do with your sweater, you need to wash your square, to see how your chosen yarn fibres behave and how the stitches will look. For example: cotton can shrink after washing and merino wool can grow exponentially when you don’t handle it with care!
Only measure your blocked/washed gauge after it is completely dry and after removing the pins (when applicable)! You can read more about gauge squares here.
We will use the blocked/washed gauge to calculate stitch amounts, because the blocked/washed gauge will give our sweater the size it eventually will be. Make a note of both gauges, since this is very important for your calculations (I can’t stress this enough) and for the people that will eventually crochet your sweater.
You can give the blocked gauge in your pattern so the makers will know what the final gauge will be and if they can get that gauge when they block/wash their own gauge square. You can also state the unblocked gauge, so they can check their unblocked gauge first.
That is part 1 of the series finished! As I’m sure you’ve noticed, this first part of the series is all about making decisions. You do not have to make all your decisions beforehand. And it doesn’t have to be in this order. Sometimes it is all the more fun to just ‘wing’ it and see where the design takes you. That is all up to you! Just know that these are the general questions you will need to answer somewhere along the process. I do hope that this first post has been useful to you and that you now know a bit more about what you need to keep in mind before you start your sweater 🙂
I’d love to see your sketches and swatches! Please share your progress with the hashtag: #ASOYcrochetsweater (ASOY is short for A Spoonful of Yarn)
In part 2 we will discuss determining measurements, converting those into stitches and the necessary evil of every sweater design: calculations. Click HERE for part 2.
Before you go on to part two, let me ask you: Do you want to learn more about crochet design, pattern writing or running your own crochet design business?
Did you like this free blog series and want to achieve your crochet designer dream? I have great news for you, because you can now also follow my crochet design coaching account: Christina Crochet Coach. Here, you will get HIGH QUALITY tips and advice, tailored specifically to crochet designers (to-be)! So you can take your crochet designs to the next level <3
I also host LIVE Instagram Q&A’s every other week where you can ask all your crochet design related questions. And I have a bi-weekly newsletter where you get the BEST crochet designer tips, Q&A updates and special offers and discounts!
Website: www.christinacrochetcoach.com
Newsletter: Sign up for the newsletter
Instagram: @Christinacrochetcoach
Facebook: Christina Crochet Coach