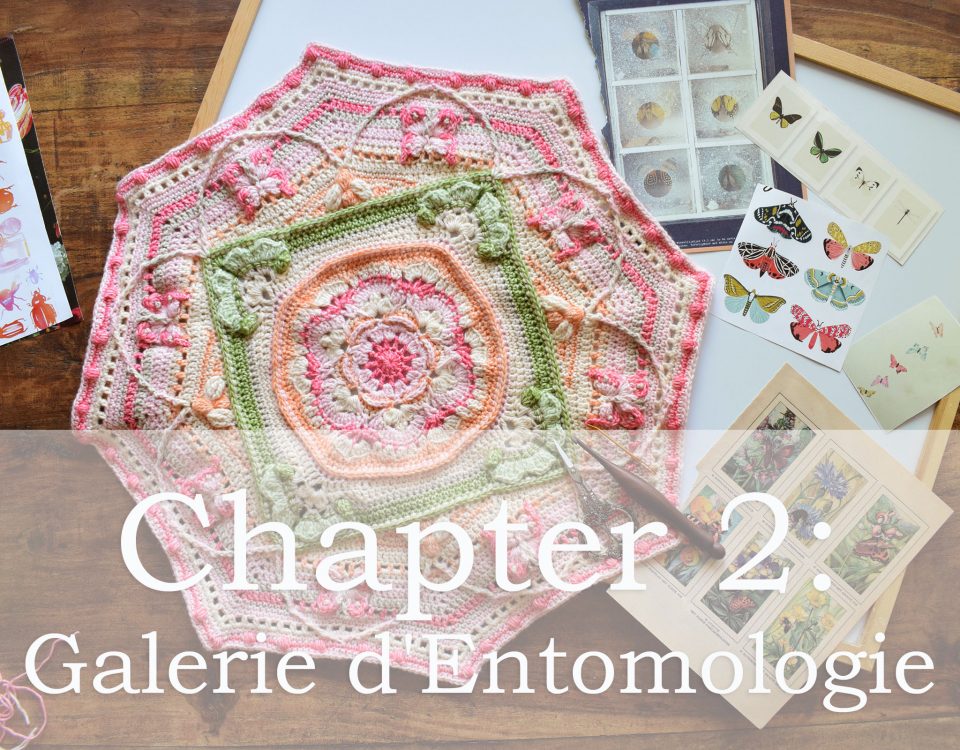
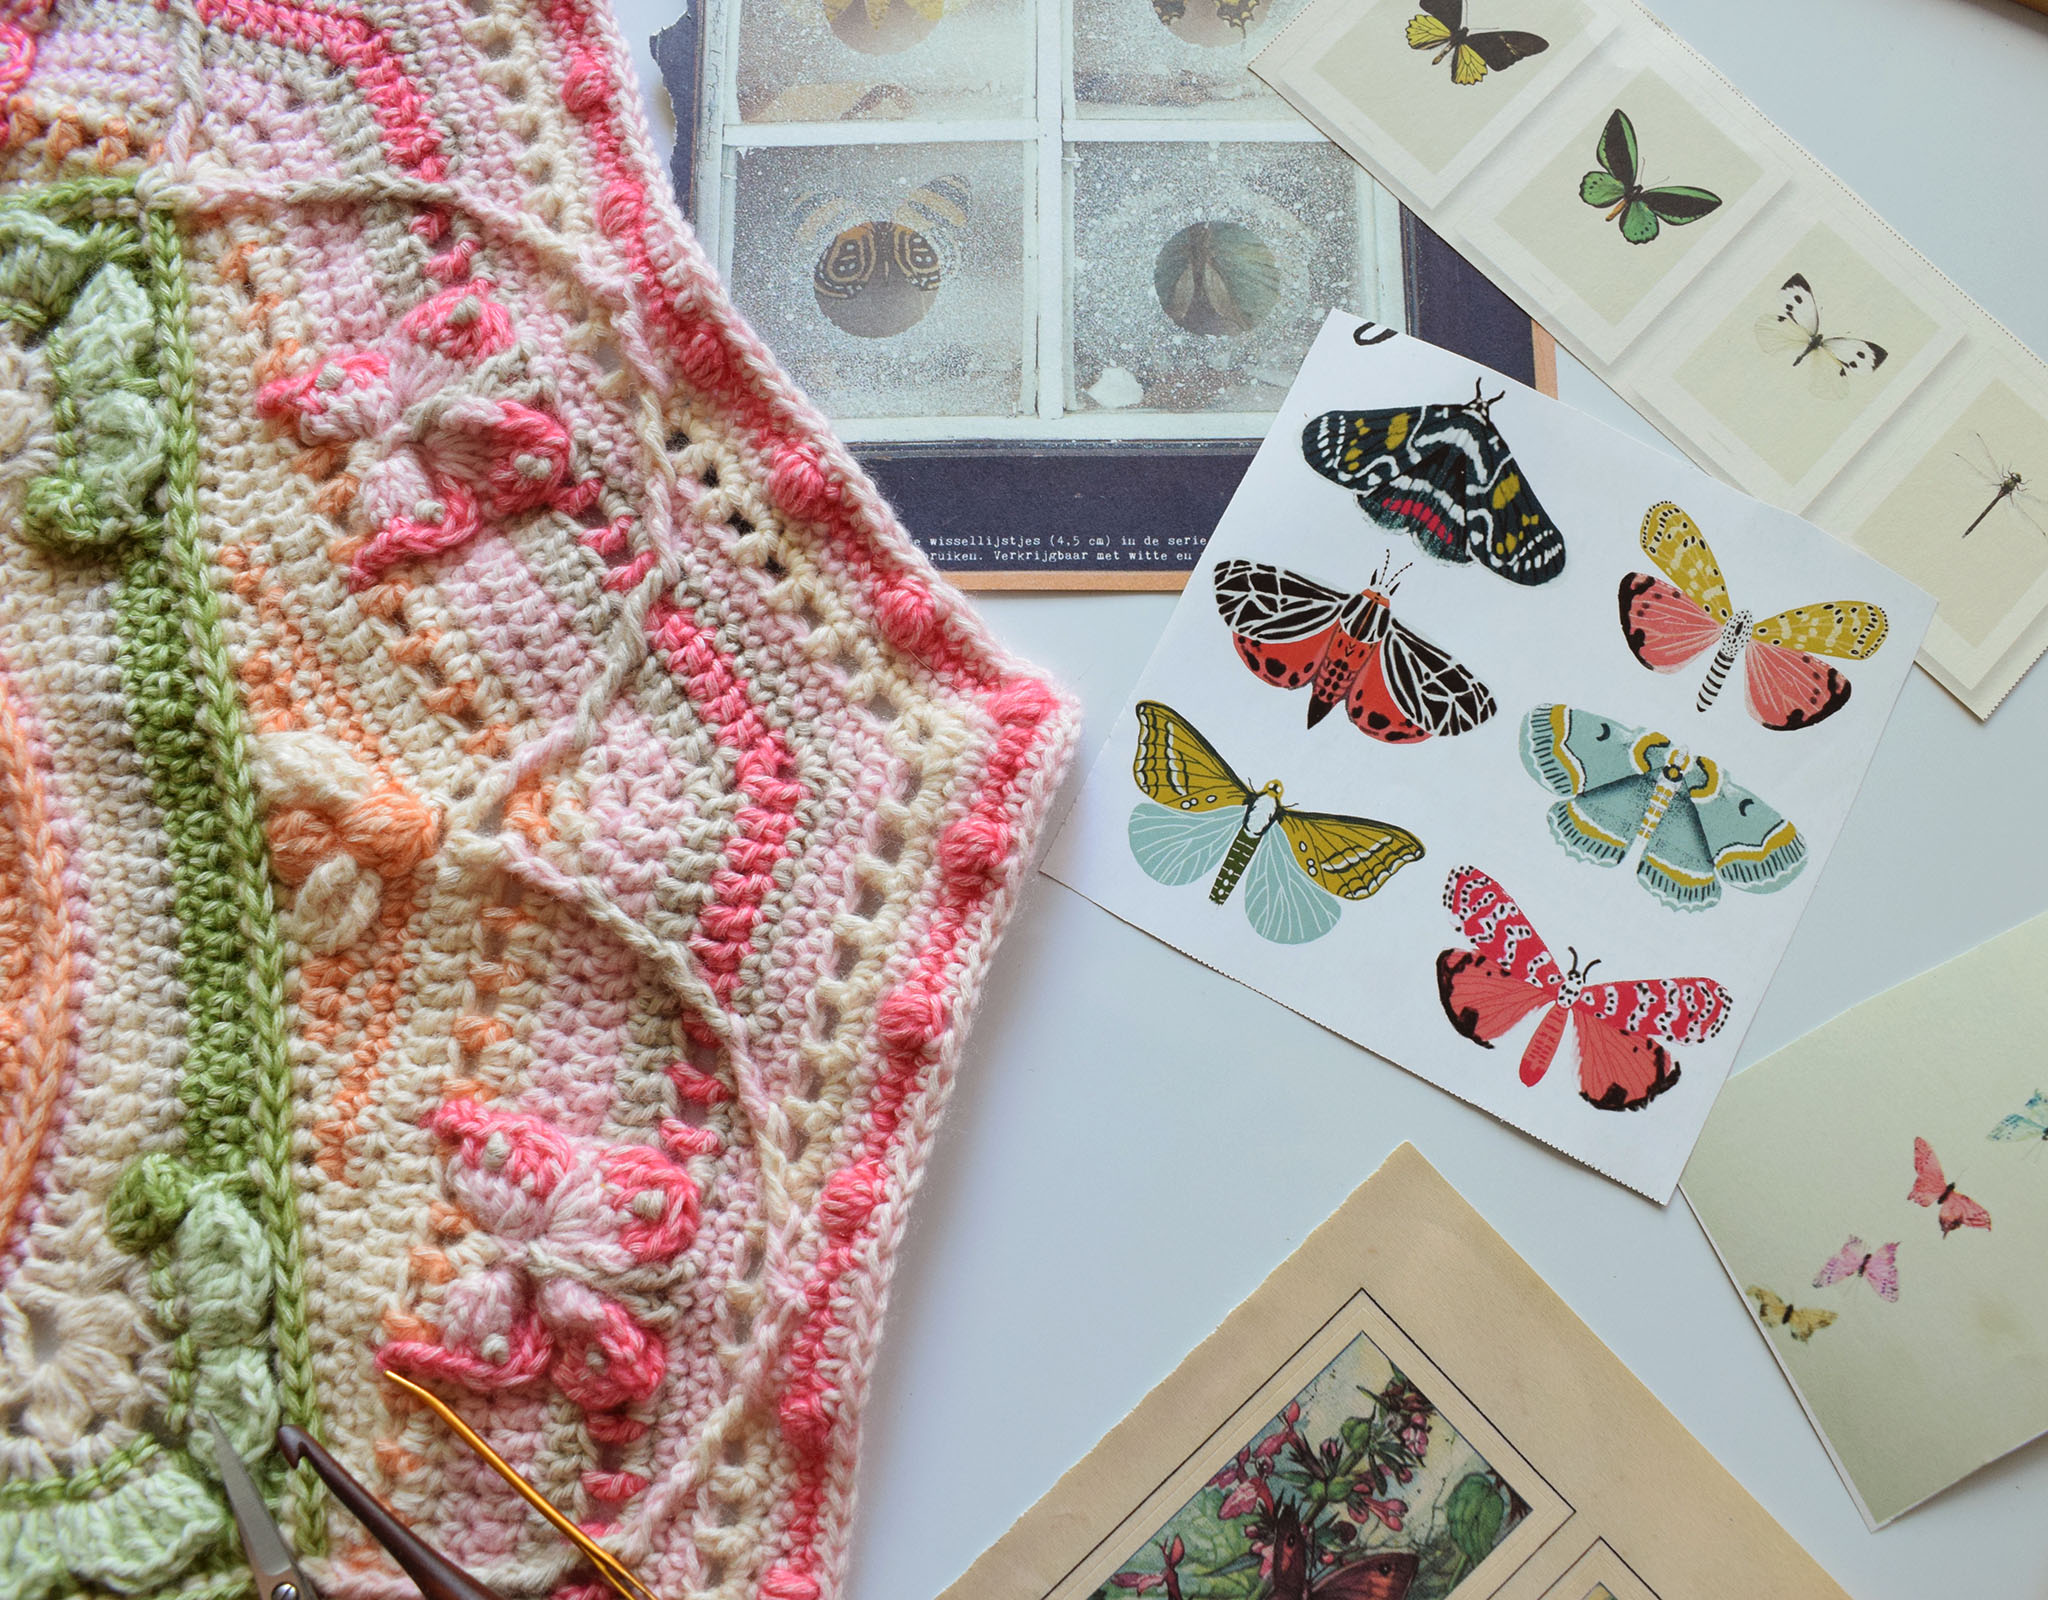
Welcome to the second blog post of the official 2020 Scheepjes CAL – d’Histoire Naturelle. Are you ready to continue our museum adventure from the Jardin des Plantes to visit the Galerie d’Entomologie? Below you will find more info regarding the inspiration for this part and some tutorial photo’s to help you in your crochet journey!
Welkom bij de tweede blogpost van de officiële 2020 Scheepjes CAL – d’Histoire Naturelle. Ben je er klaar voor om ons museum avontuur te vervolgen van de Jardin des Plantes naar de Galerie d’Entomologie? Hieronder vind je wat meer info over de inspiratie voor dit deel en een aantal tutorial foto’s om je te helpen in je haakavontuur!
Links
- Main CAL page / CAL Hoofdpagina
- Get pattern support through the Scheepjes Facebook group / Stel vragen over het patroon via de Scheepjes Facebook groep
- Tips & Tricks
- The PDF pattern in UK/US and other languages / Het PDF patroon (NL)
- CAL video ENG UK terms part 2 / CAL video NL deel 2
- Interview videos with the author of All The Light We Cannot See / Interview videos met de auteur van Als Je Het Licht Niet Kunt Zien
The Story / Het Verhaal
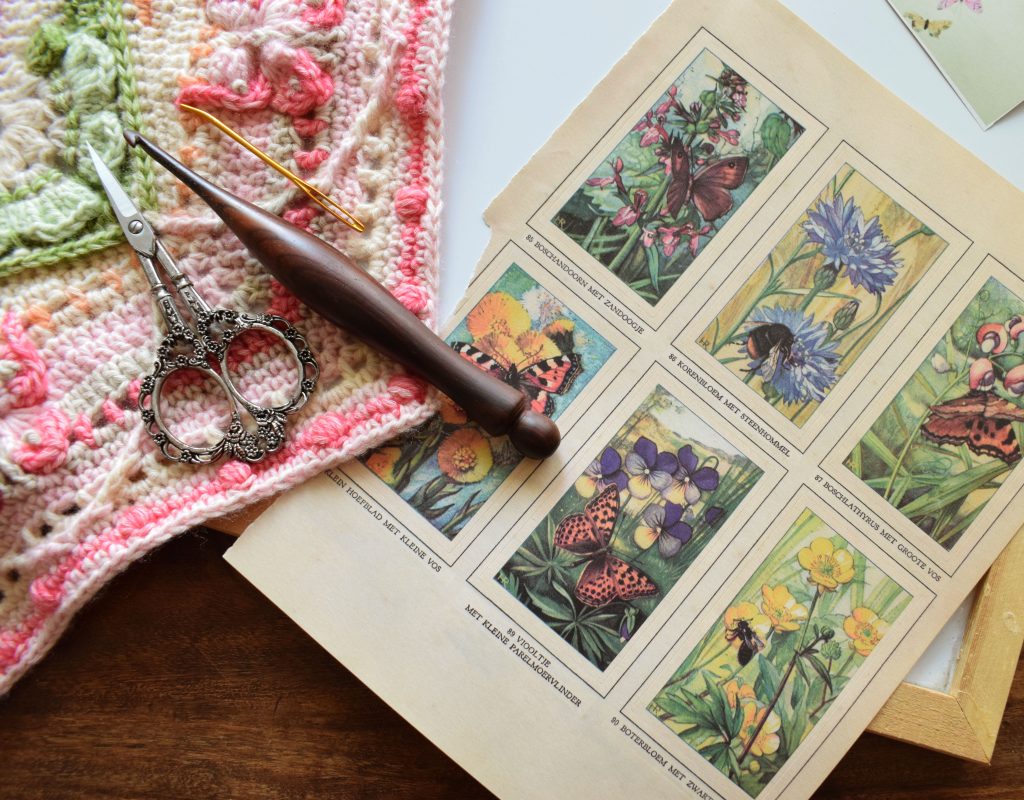
In real life, the Galerie d’ Entomologie is sadly no longer open for public. It closed for renovation in 1996, but due to lack of funding it remained closed ever since. However, from 1960 to 1996 it housed more than half of the worlds total biodiversity regarding insects, such as beetles, butterflies and bees. Envision cabinet after cabinet full of drawers with insects from all over the world, their iridescent wings and mind blowing colors <3
In the book, insects also play a part in the shape of the Hotel of Bees, a hotel once owned by a wealthy man who was obsessed with bees and had queens, workers and drones painted on the bathroom ceilings, woodcarvings of bees on the doorframes and an ornamental beehive-shaped fountain in the courtyard.
In het echte leven is de Galerie d’Entomolgie helaas niet meer open voor publiek. Het ging dicht voor renovatie in 1996, maar door gebrek aan financiering is het gesloten gebleven. Desalniettemin heeft het van 1960 tot 1996 meer dan de helft van de biodiversiteit aan insecten gehuisvest, zoals kevers, vlinders en bijen. Stel je eens voor, kast na kast vol met lades van insecten van over de hele wereld, met hun prachtige iriserende vleugels en verbluffende kleuren.
In het boek spelen insecten ook een rol in de vorm van het Bijenhotel. Een hotel die eens eigendom was van een rijke man die geobsedeerd was door bijen, die koninginnen, werksters en darren op het plafond had laten schilderen, houtsnijwerk van bijen in de deurposten had laten maken en die een prachtige fontein op de binnenplaats had in de vorm van een bijenkorf.
The Galerie / De Galerie

The Blanket / De Deken
The square of the blanket will be turned into an octagonal shape, using four precious bees. After that the shape will be expanded, using eight gorgeous butterflies, encased in a flower with eight petals, which is created by using front post stitches.
Het vierkant van de deken wordt omgetoverd naar een achthoek, met vier mooie bijtjes erop. Daarna wordt de achthoek uitgebreid, met acht prachtige vlinders die gevangen zijn in een bloem met acht blaadjes, die gemaakt worden met reliëf steken.

Shop the yarn / Bestel het garen
If you haven’t bought your kit yet and you don’t have a Scheepjes retailer nearby, please consider buying your Scheepjes kit via one of the links below. It will give me a small commission, but it won’t cost you anything extra. That way I can keep making free patterns : )
Als je nog geen kit hebt gekocht en geen Scheepjes verkooppunt dichtbij hebt, overweeg dan je Scheepjes kit via één van onderstaande links te kopen. Hiervoor krijg ik een kleine commissie, terwijl het jou niks extra’s kost. Op die manier kan ik gratis patronen blijven maken : )
UK/International: Wool Warehouse, Black Sheep Wools or The Knitting Network
Benelux: Caro’s Atelier
List of all / Lijst van alle Scheepjes retailers:Scheepjes website
The Pattern / Het Patroon
You can find the pattern for this chapter on the Scheepjes Website or in the Scheepjes Facebook group. In the group you can also share your progress or ask questions. Me and the admin/mods of Scheepjes are there to assist you.
Esther from It’s All in a Nutshell has made a tutorial video, which you can find here. Below you can find a few tips and photos for some (but not all) of the rounds for the possibly tricky bits, which can help you in your journey. But please note it is not a substitute for the written pattern. While the written pattern is also available in US terms, the English terms below are UK terminology, as the original Scheepjes pattern terminology is also UK terms.
Happy crocheting! : )
Je kunt het patroon voor dit hoofdstuk op de Scheepjes website vinden of in de Scheepjes Facebook groep. Daar kun je ook je voortgang delen of vragen stellen. Ik en de admin/mods van Scheepjes staan daar voor je klaar om je te helpen.
Esther van It’s All in a Nutshell heeft een tutorial video gemaakt die je hier kunt vinden. Hieronder vind je wat tips en foto’s voor sommige (niet alle) rondes die misschien wat lastiger zijn, om je te helpen in dit haakavontuur. Maar let op dat dit geen vervanging is voor het geschreven patroon.
Veel haakplezier! : )
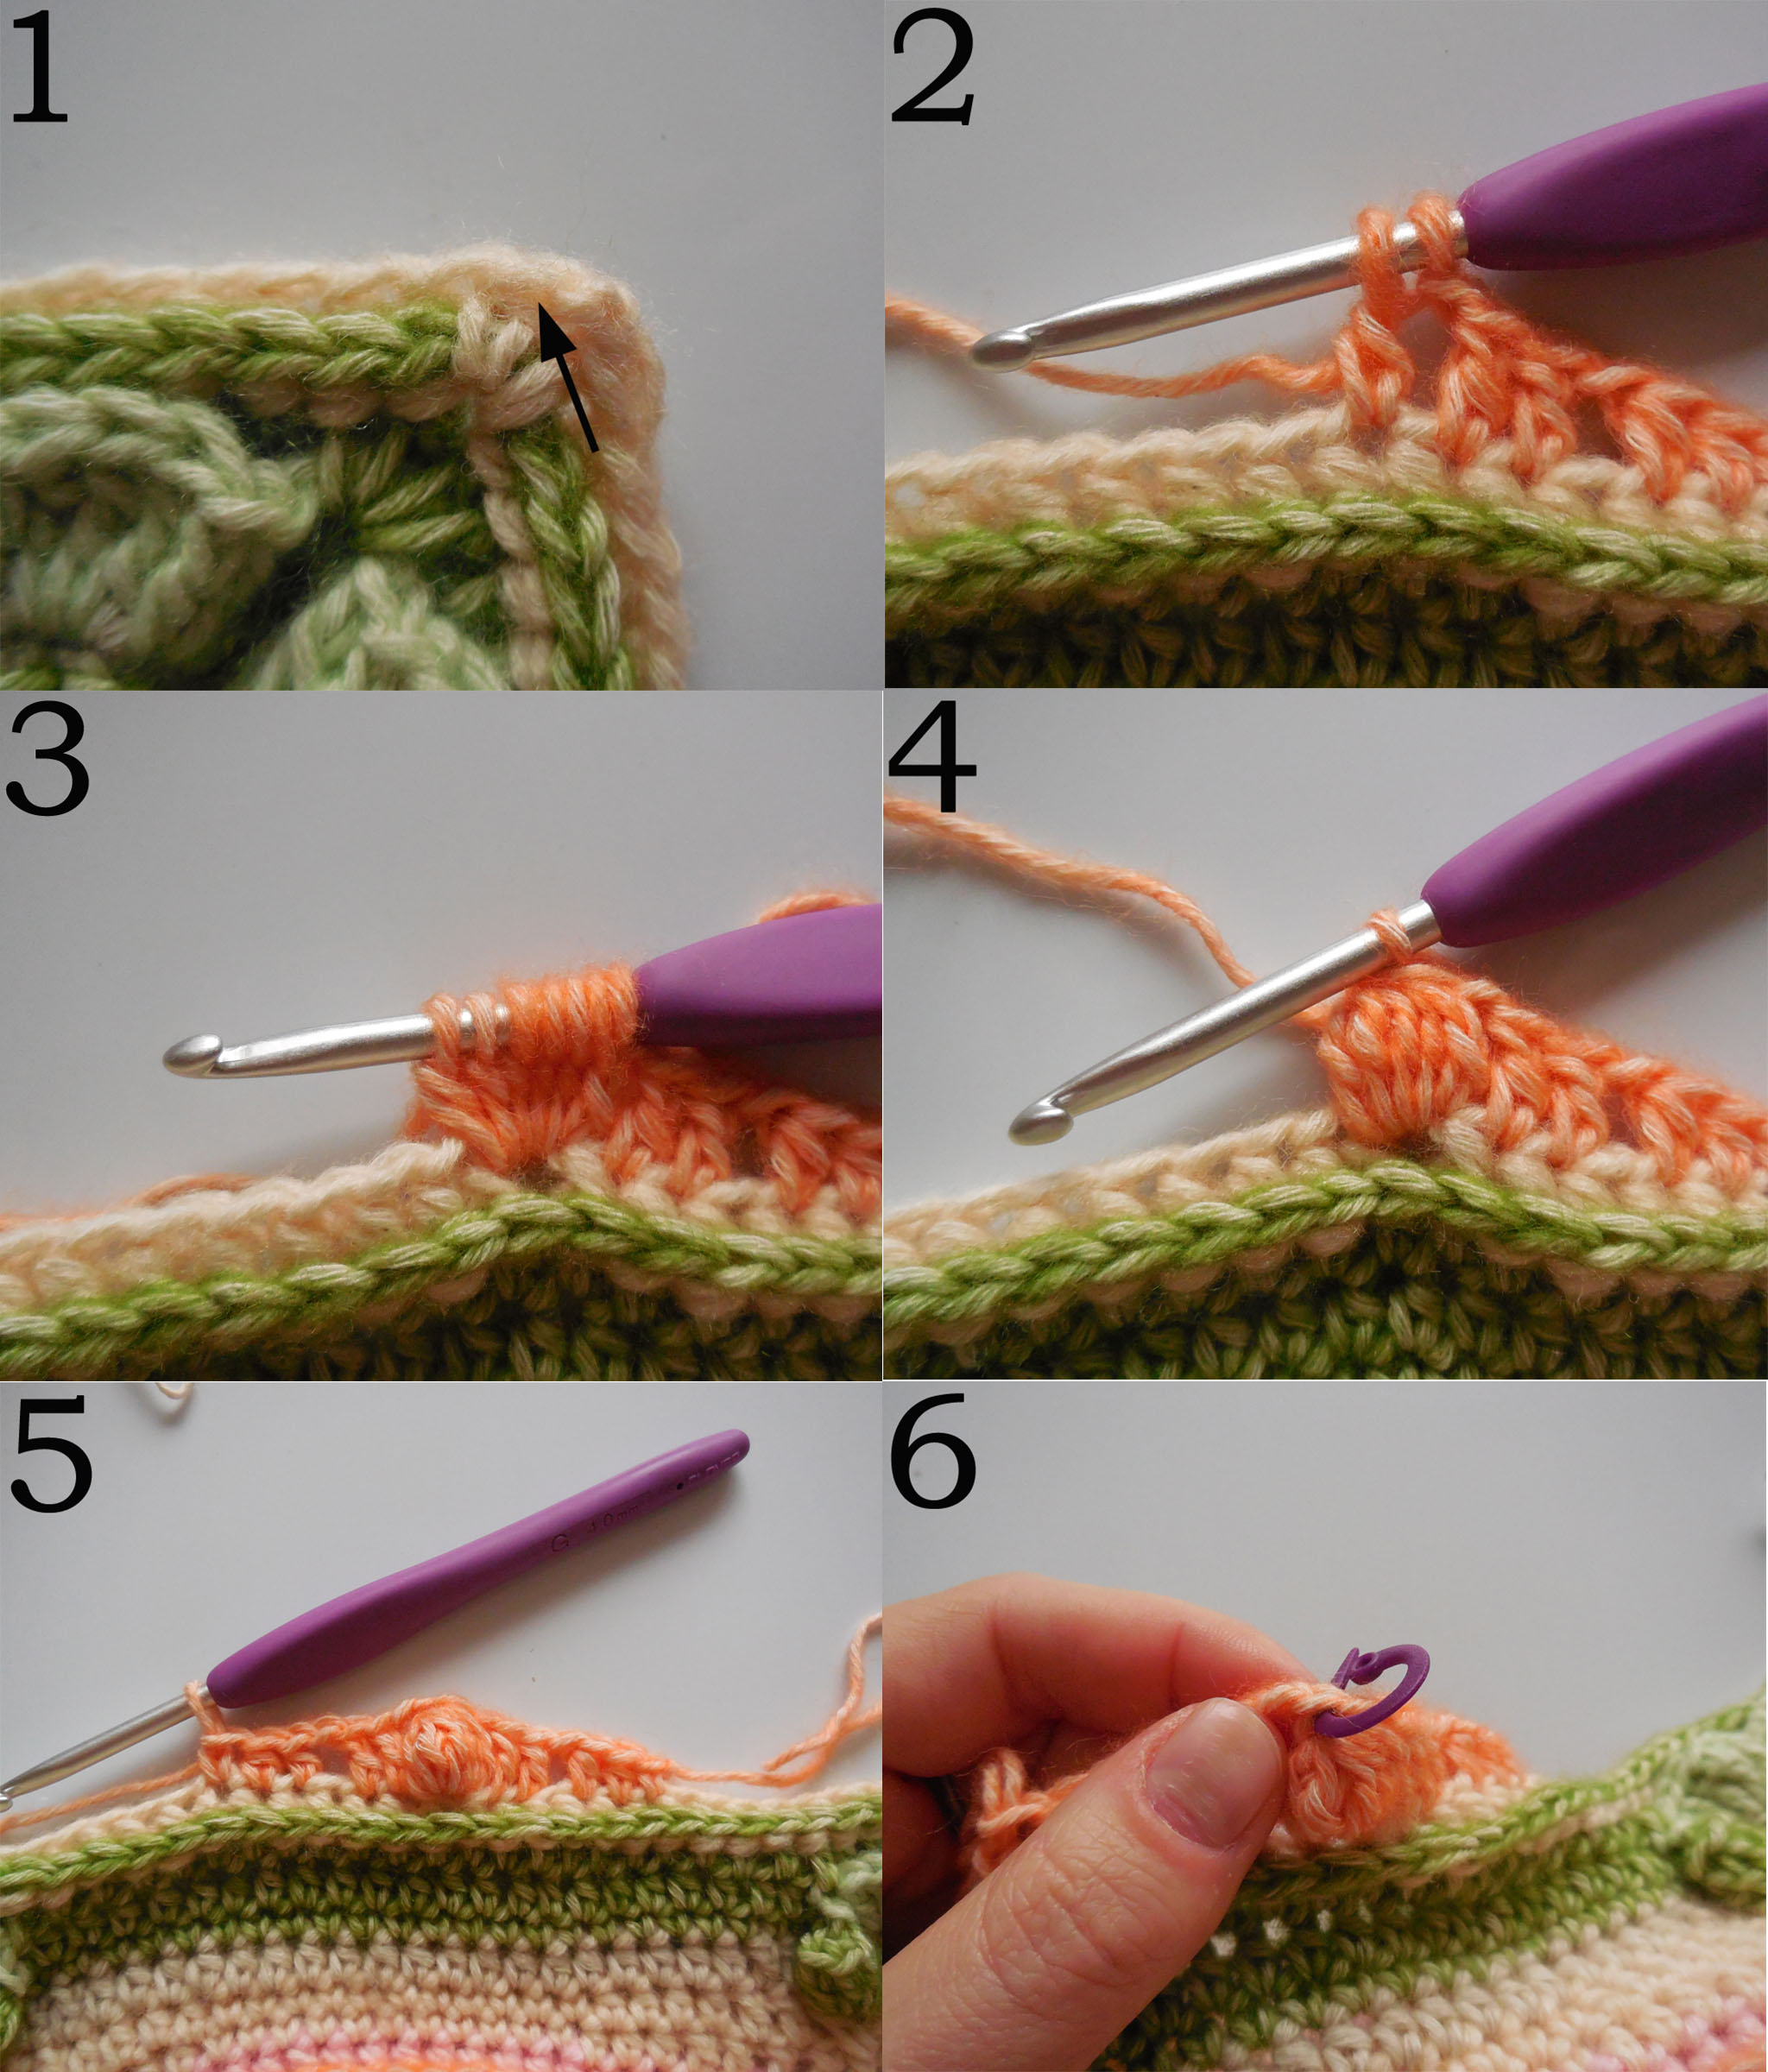
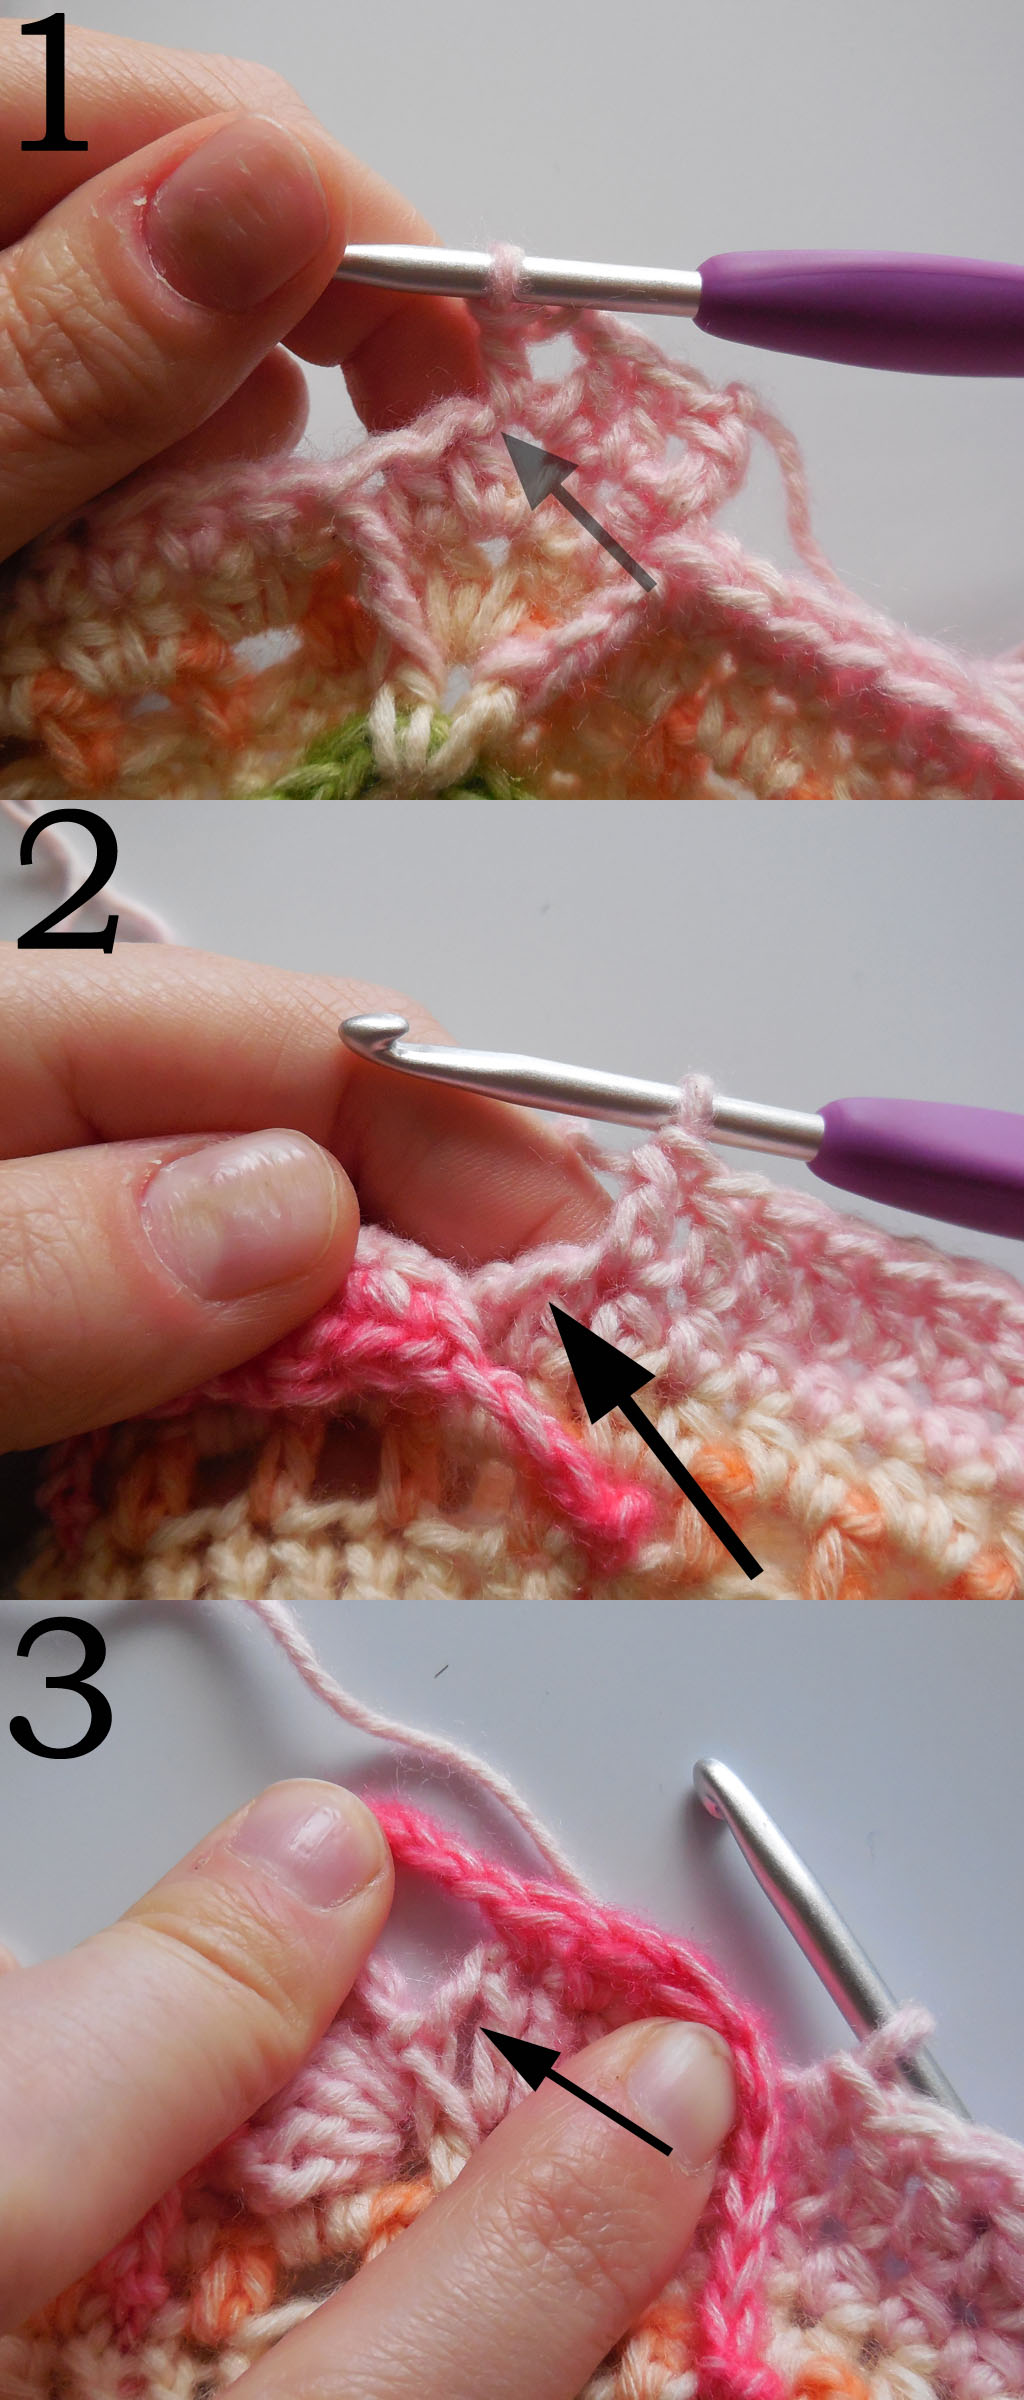
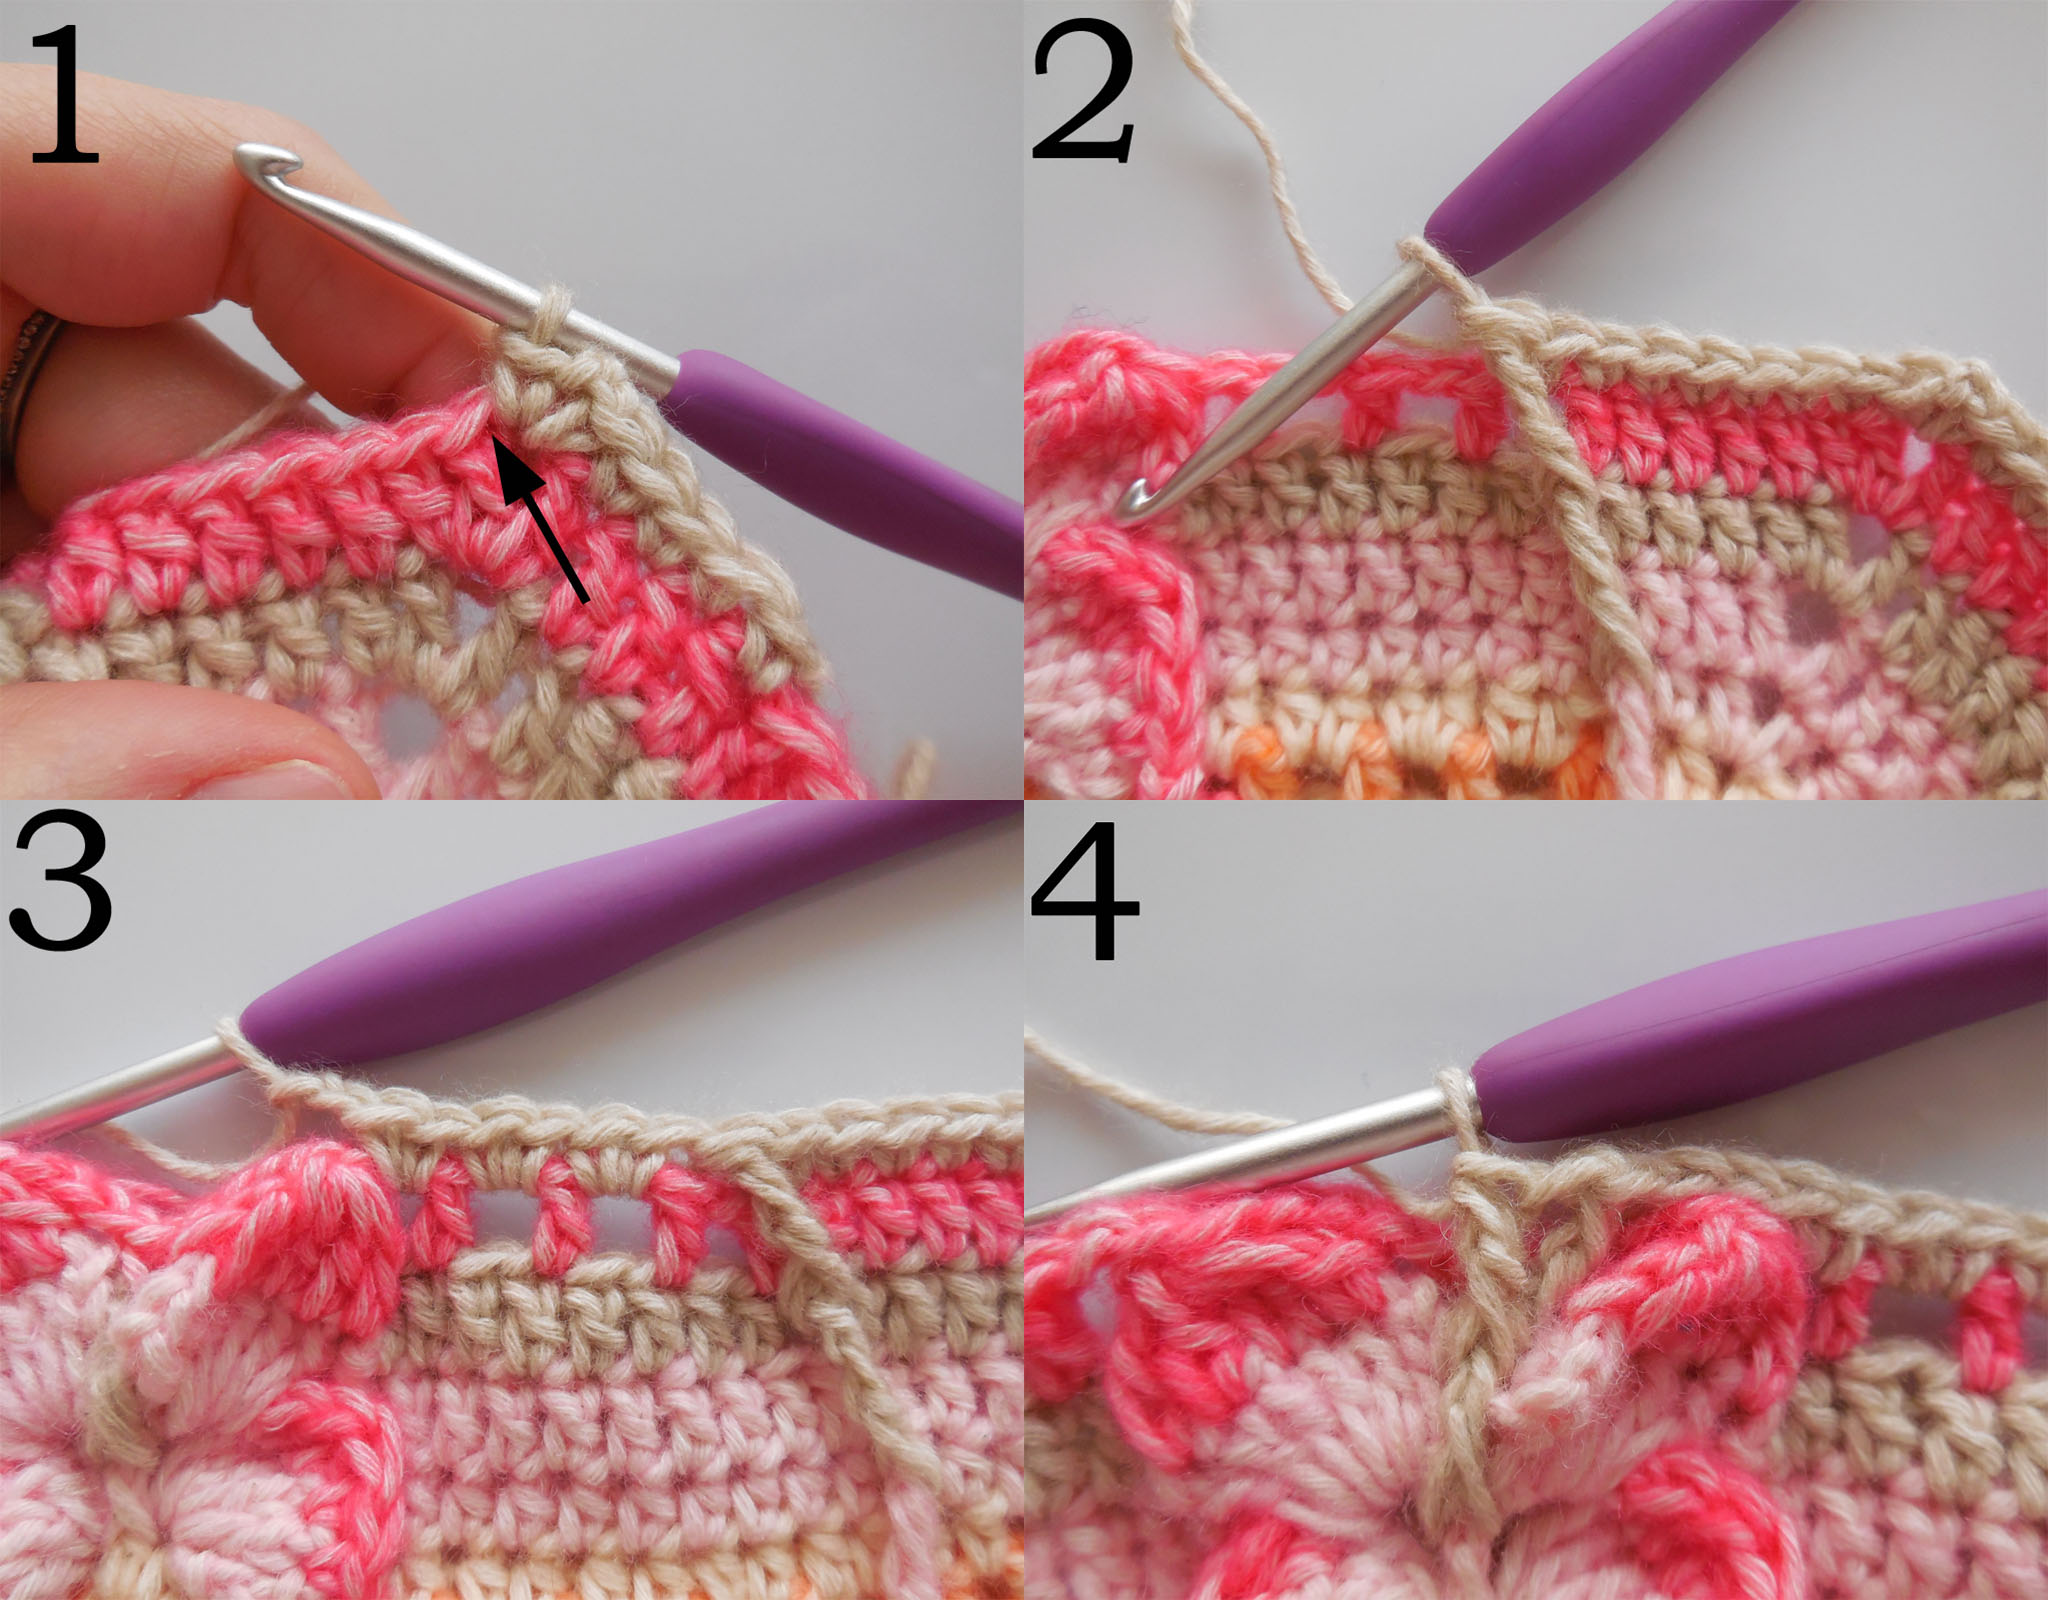
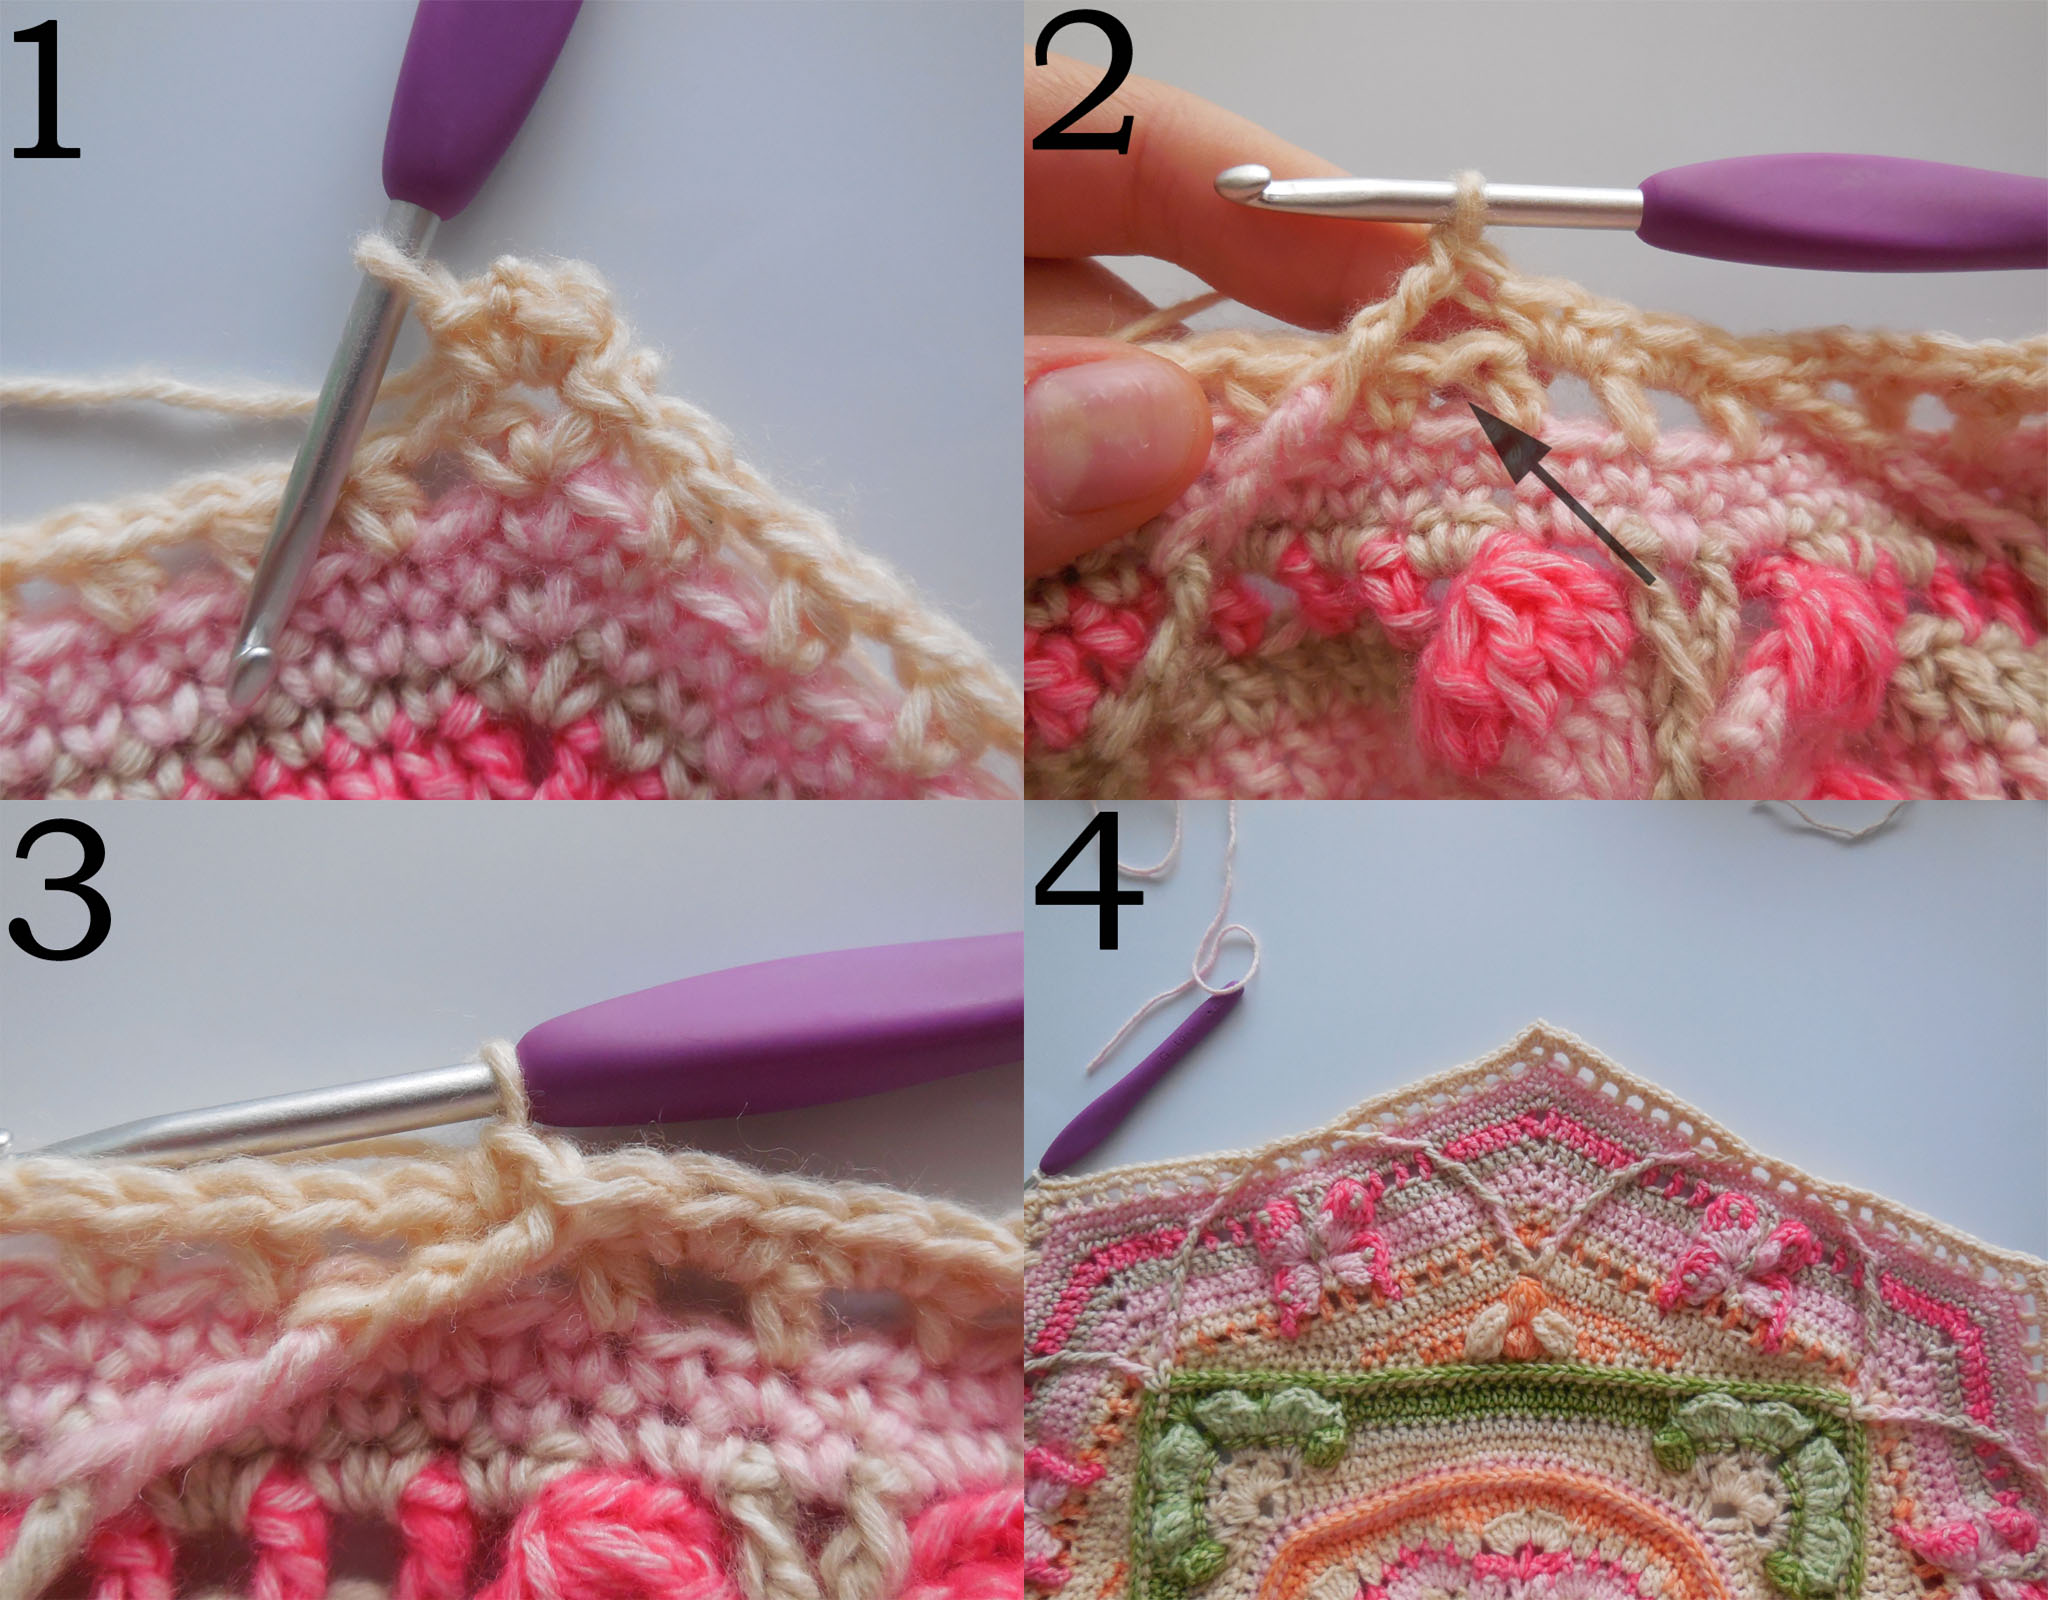
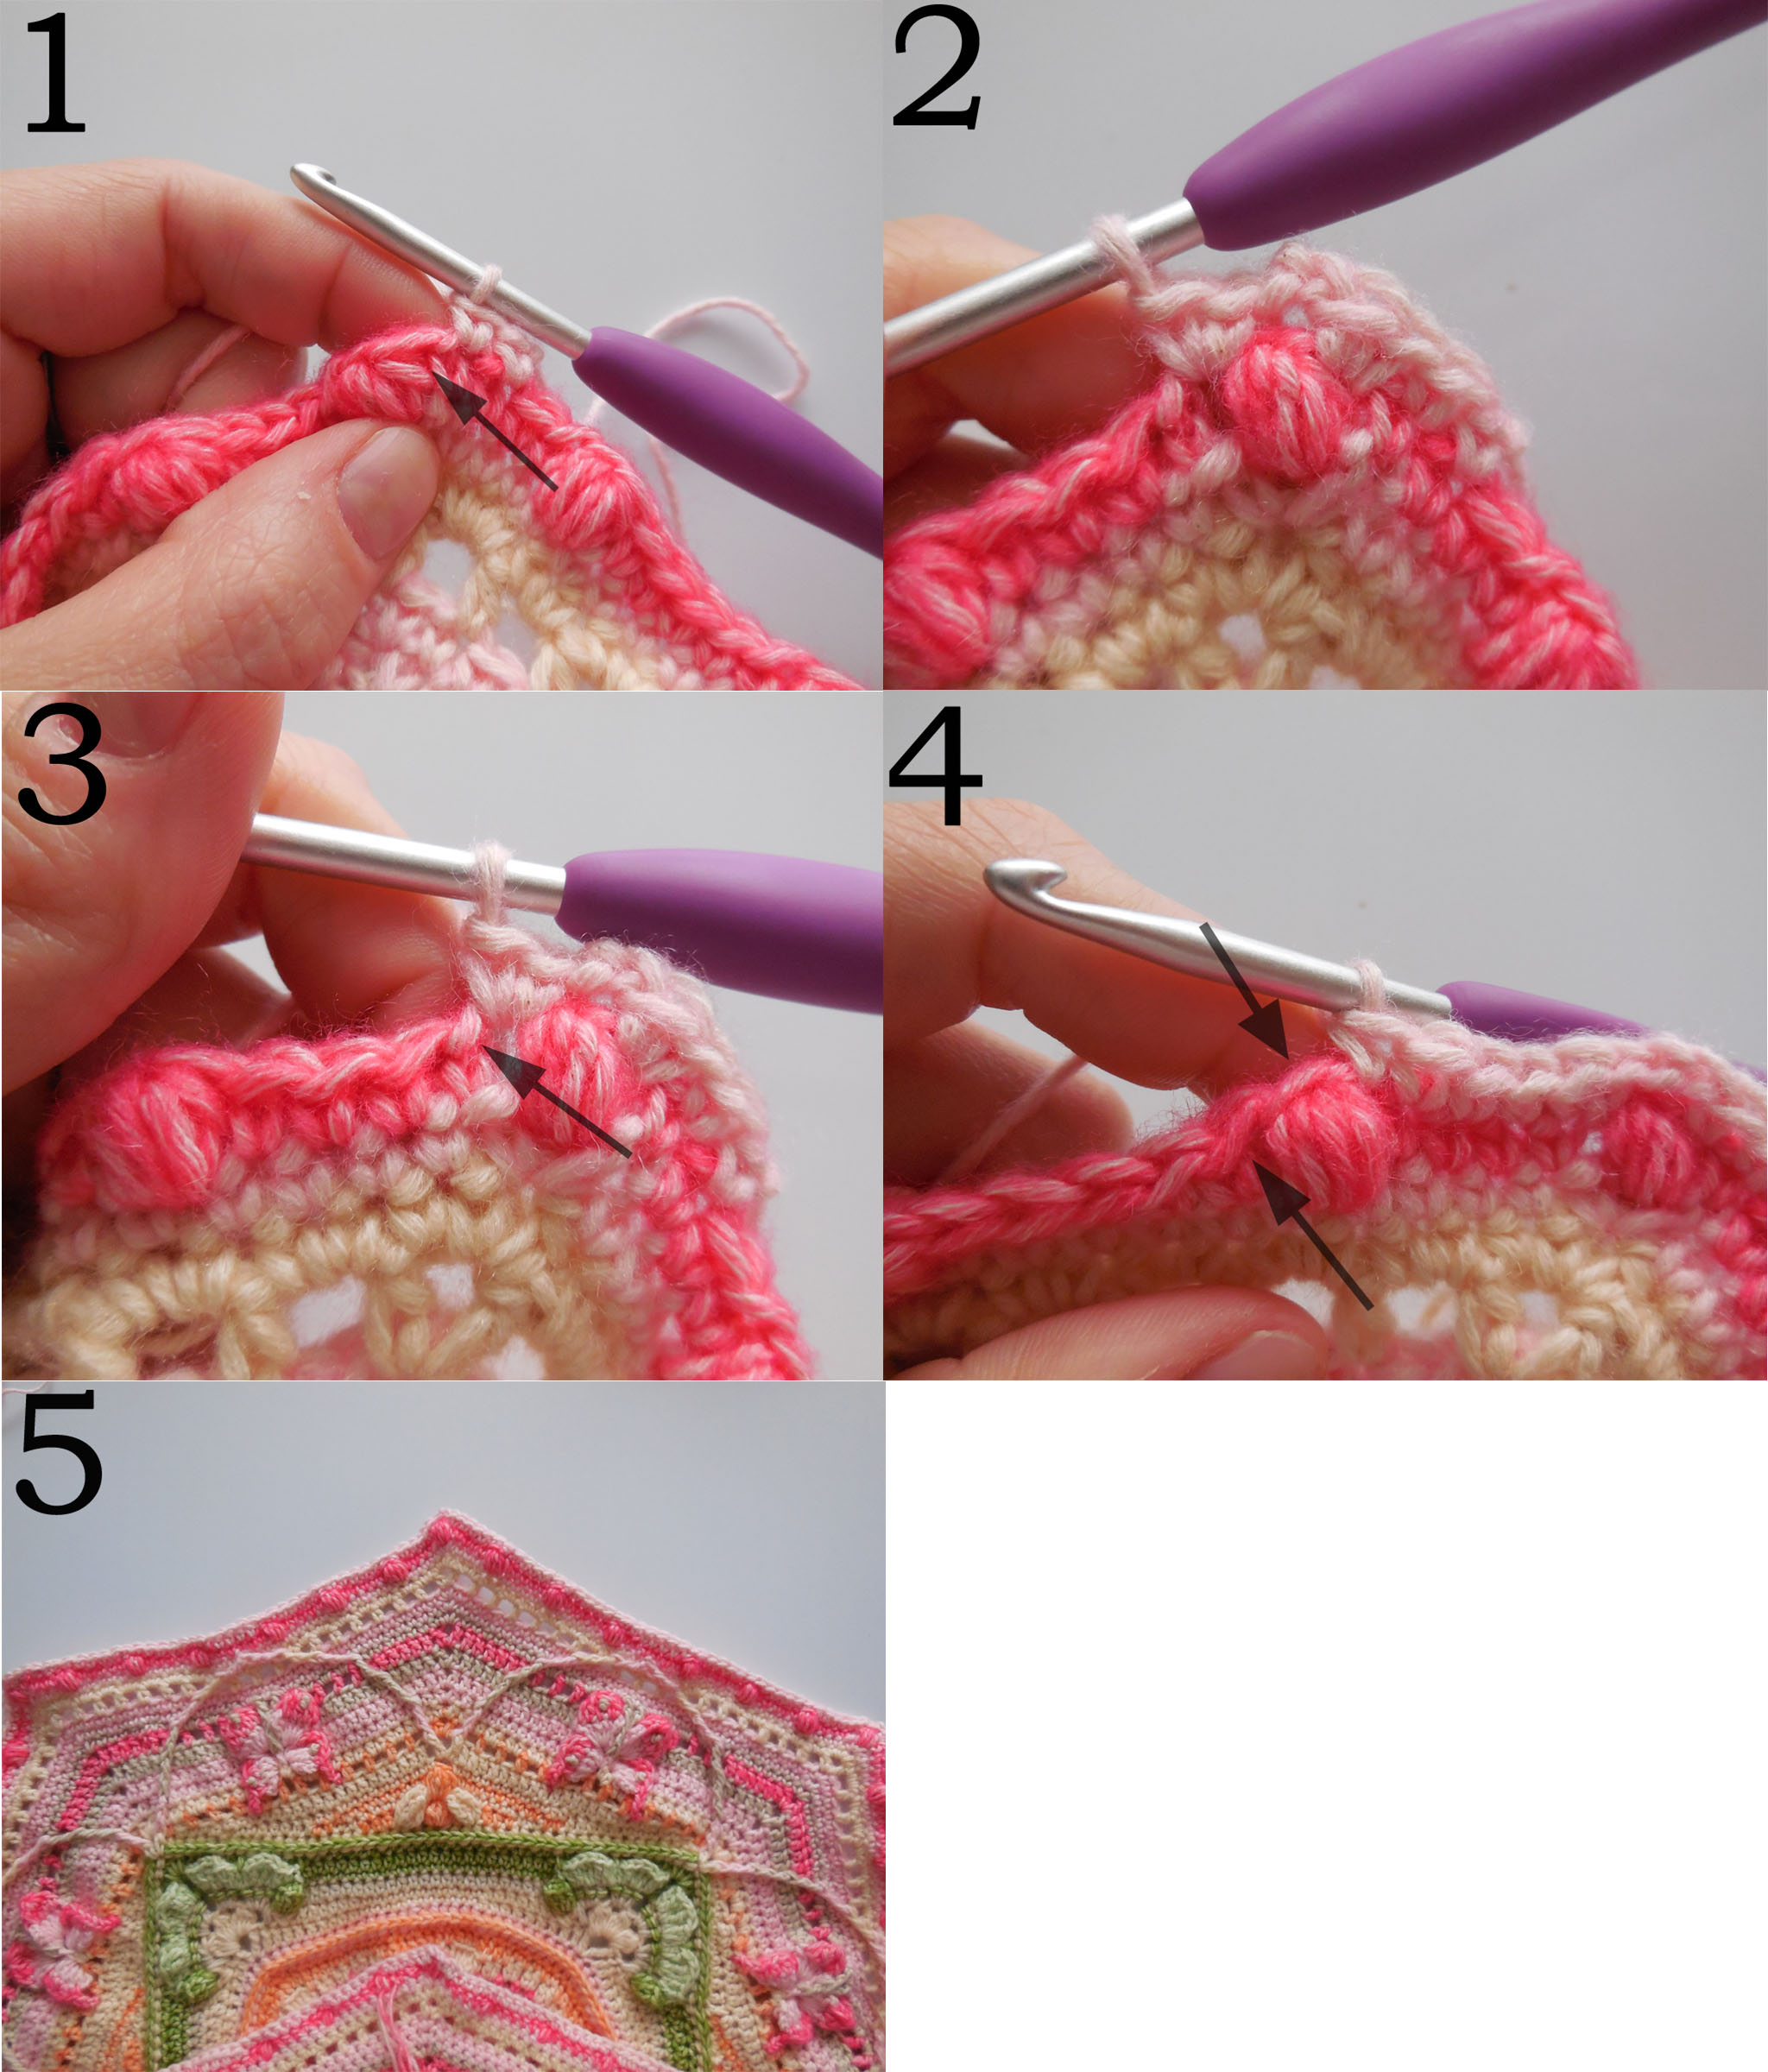
R20
TIP: before you begin, check your stitch count at each side of your square.
TIP: Voordat je begint, check eerst je stekenaantal aan elke zijde van je vierkant.
1: When you count the 19 st to start, don’t forget to count the first htr, which can look hidden due to the corner-sp before it.
Als je de 19 steken telt, vergeet het eerste hst niet, want die kan verstopt lijken door de hoek-ruimte.
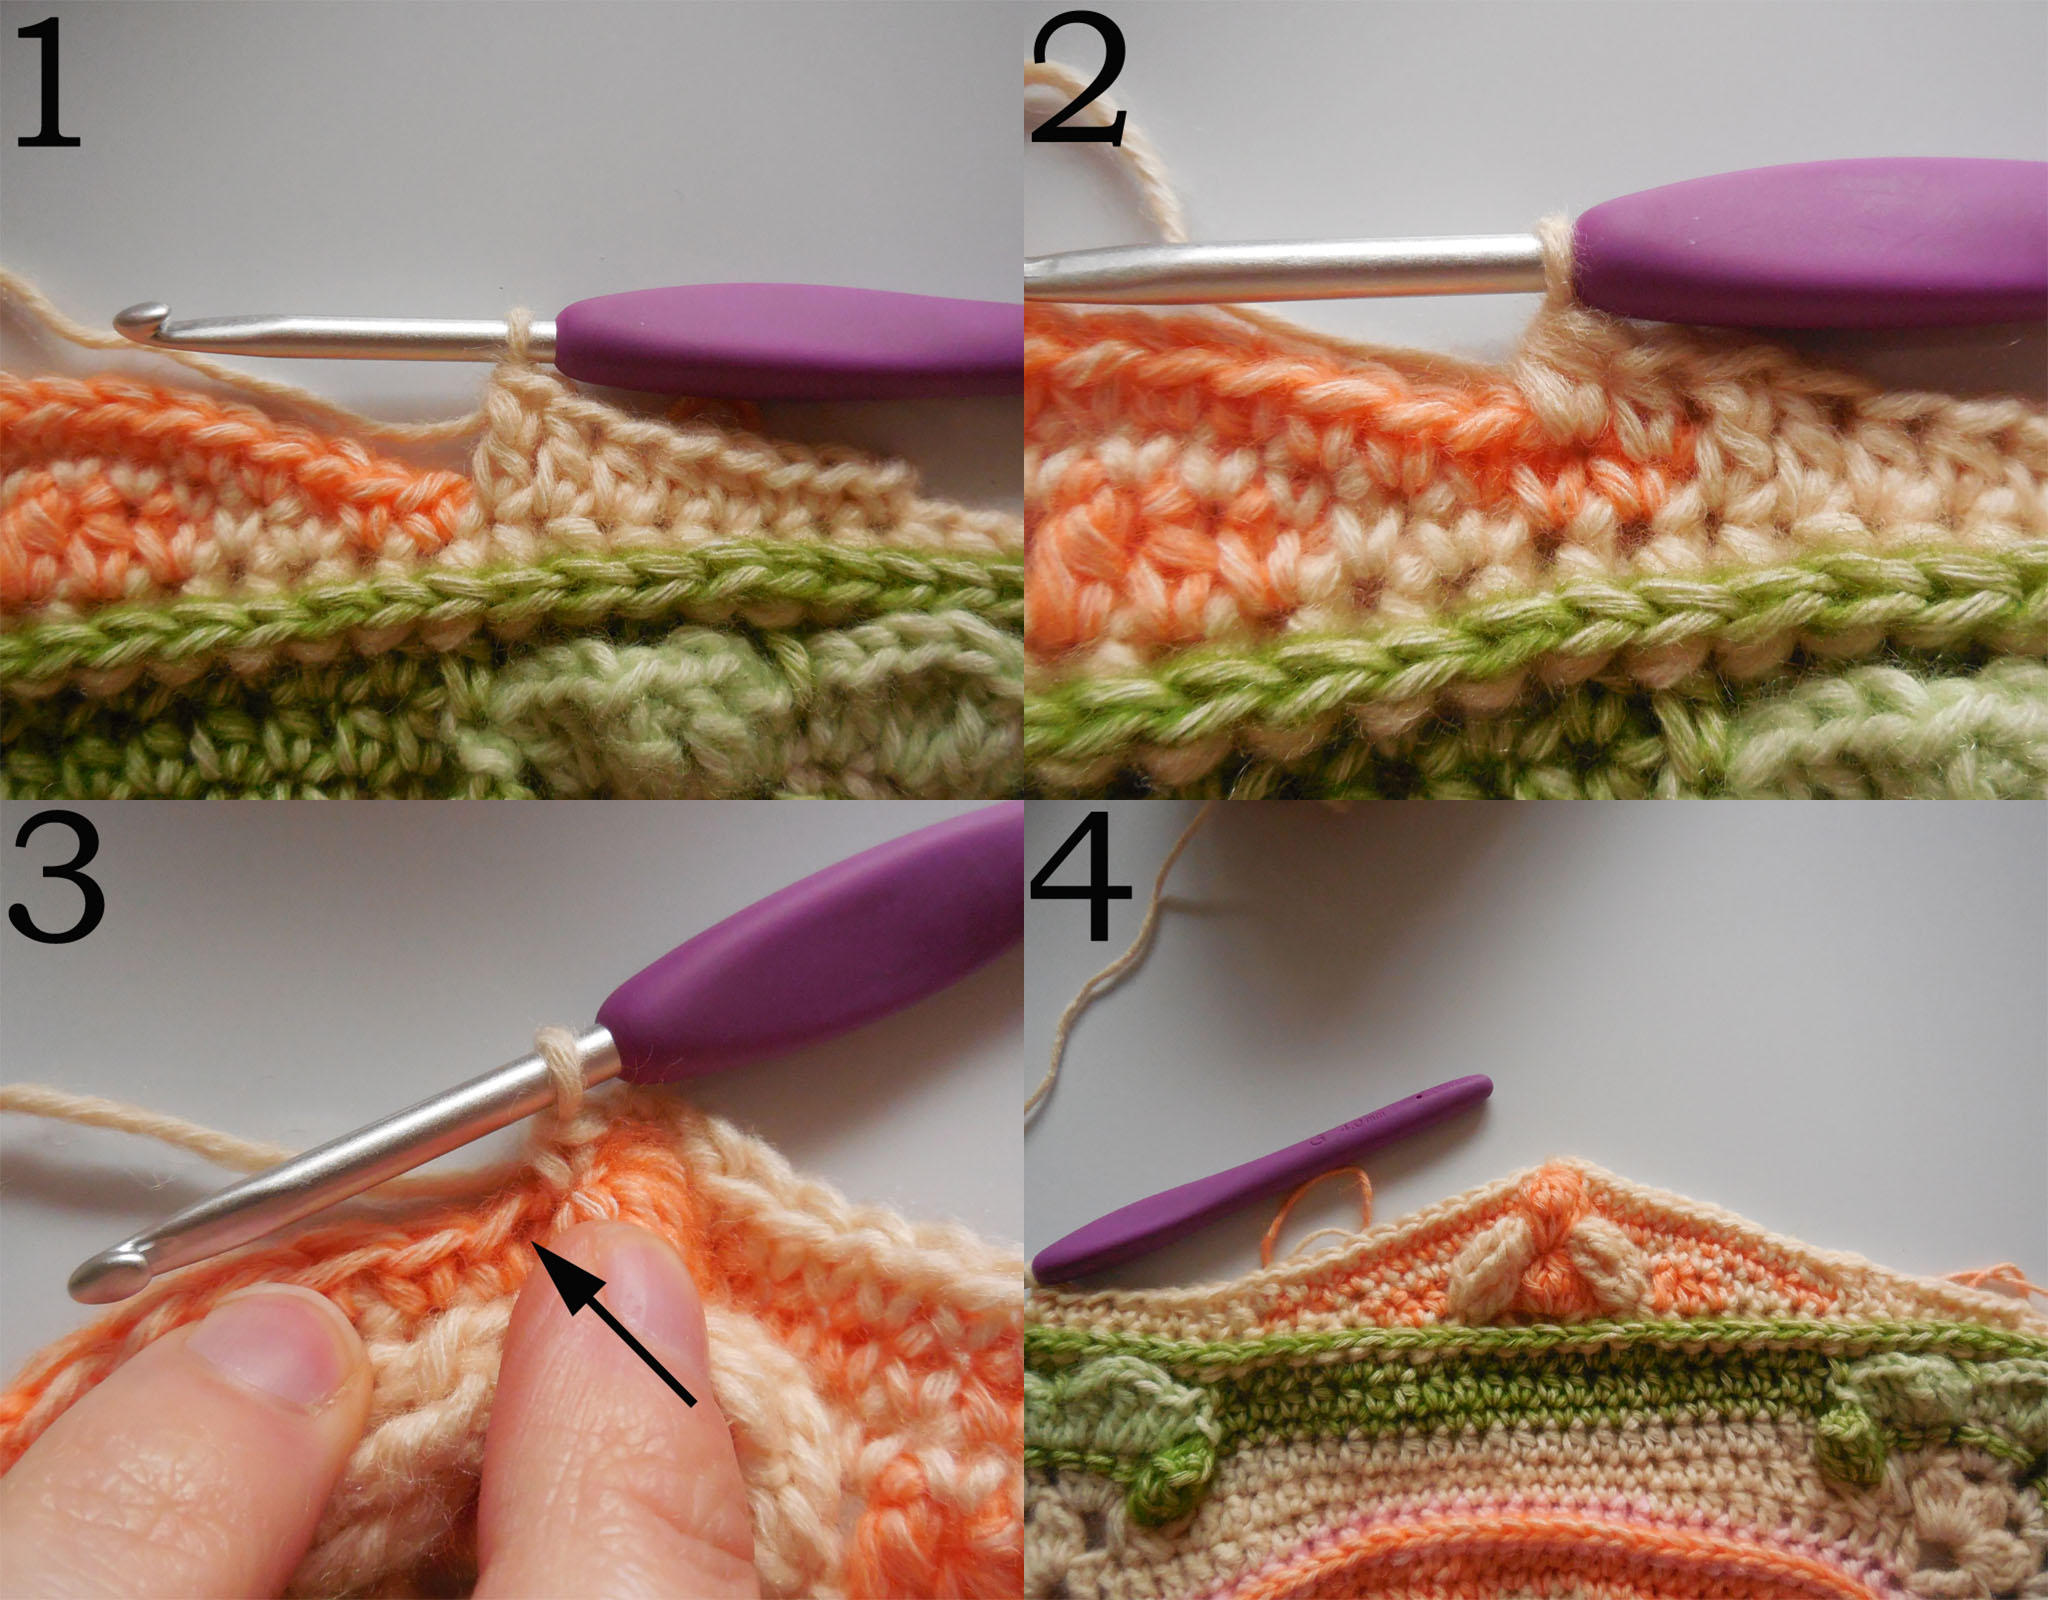
2-4: How to make the 6tr-bobble. / Hoe de 6st-bobbel te haken.
5: R20 finished (on one side). / R20 is klaar (aan één zijde).
6: Place marker in first ch after 6tr-bobble.
Plaats markeerders in eerste l na de 6st-bobbel.
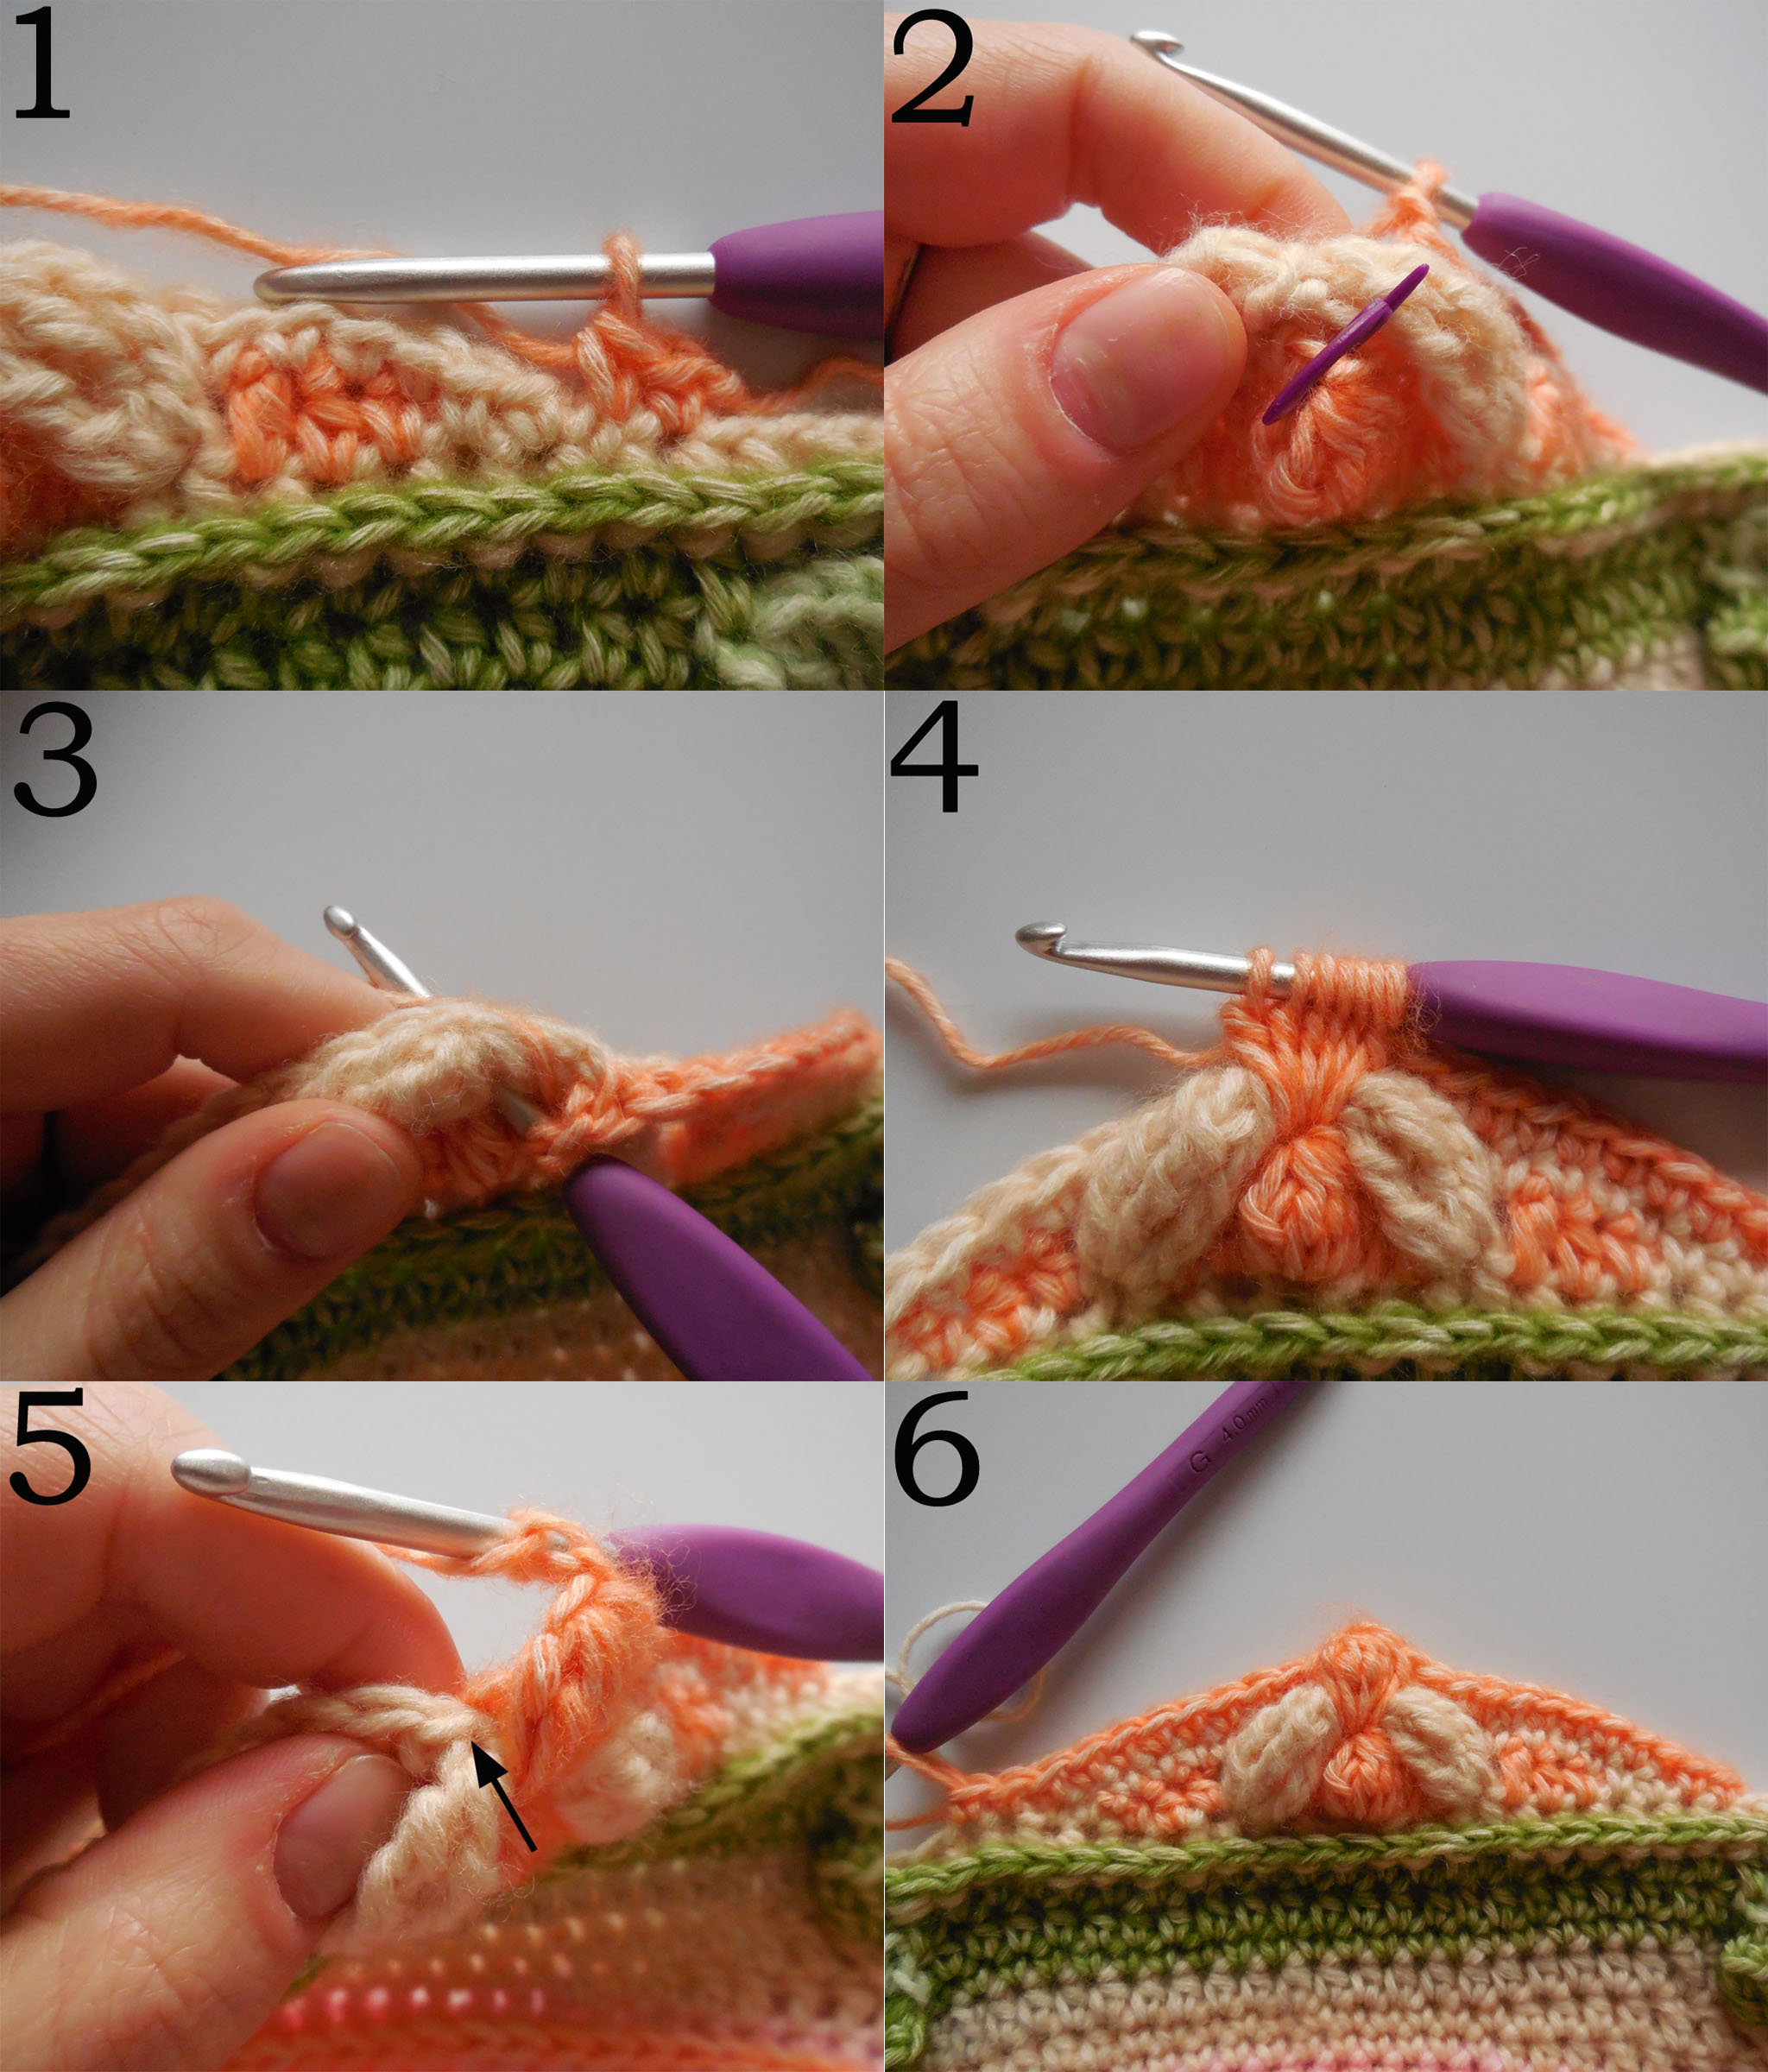
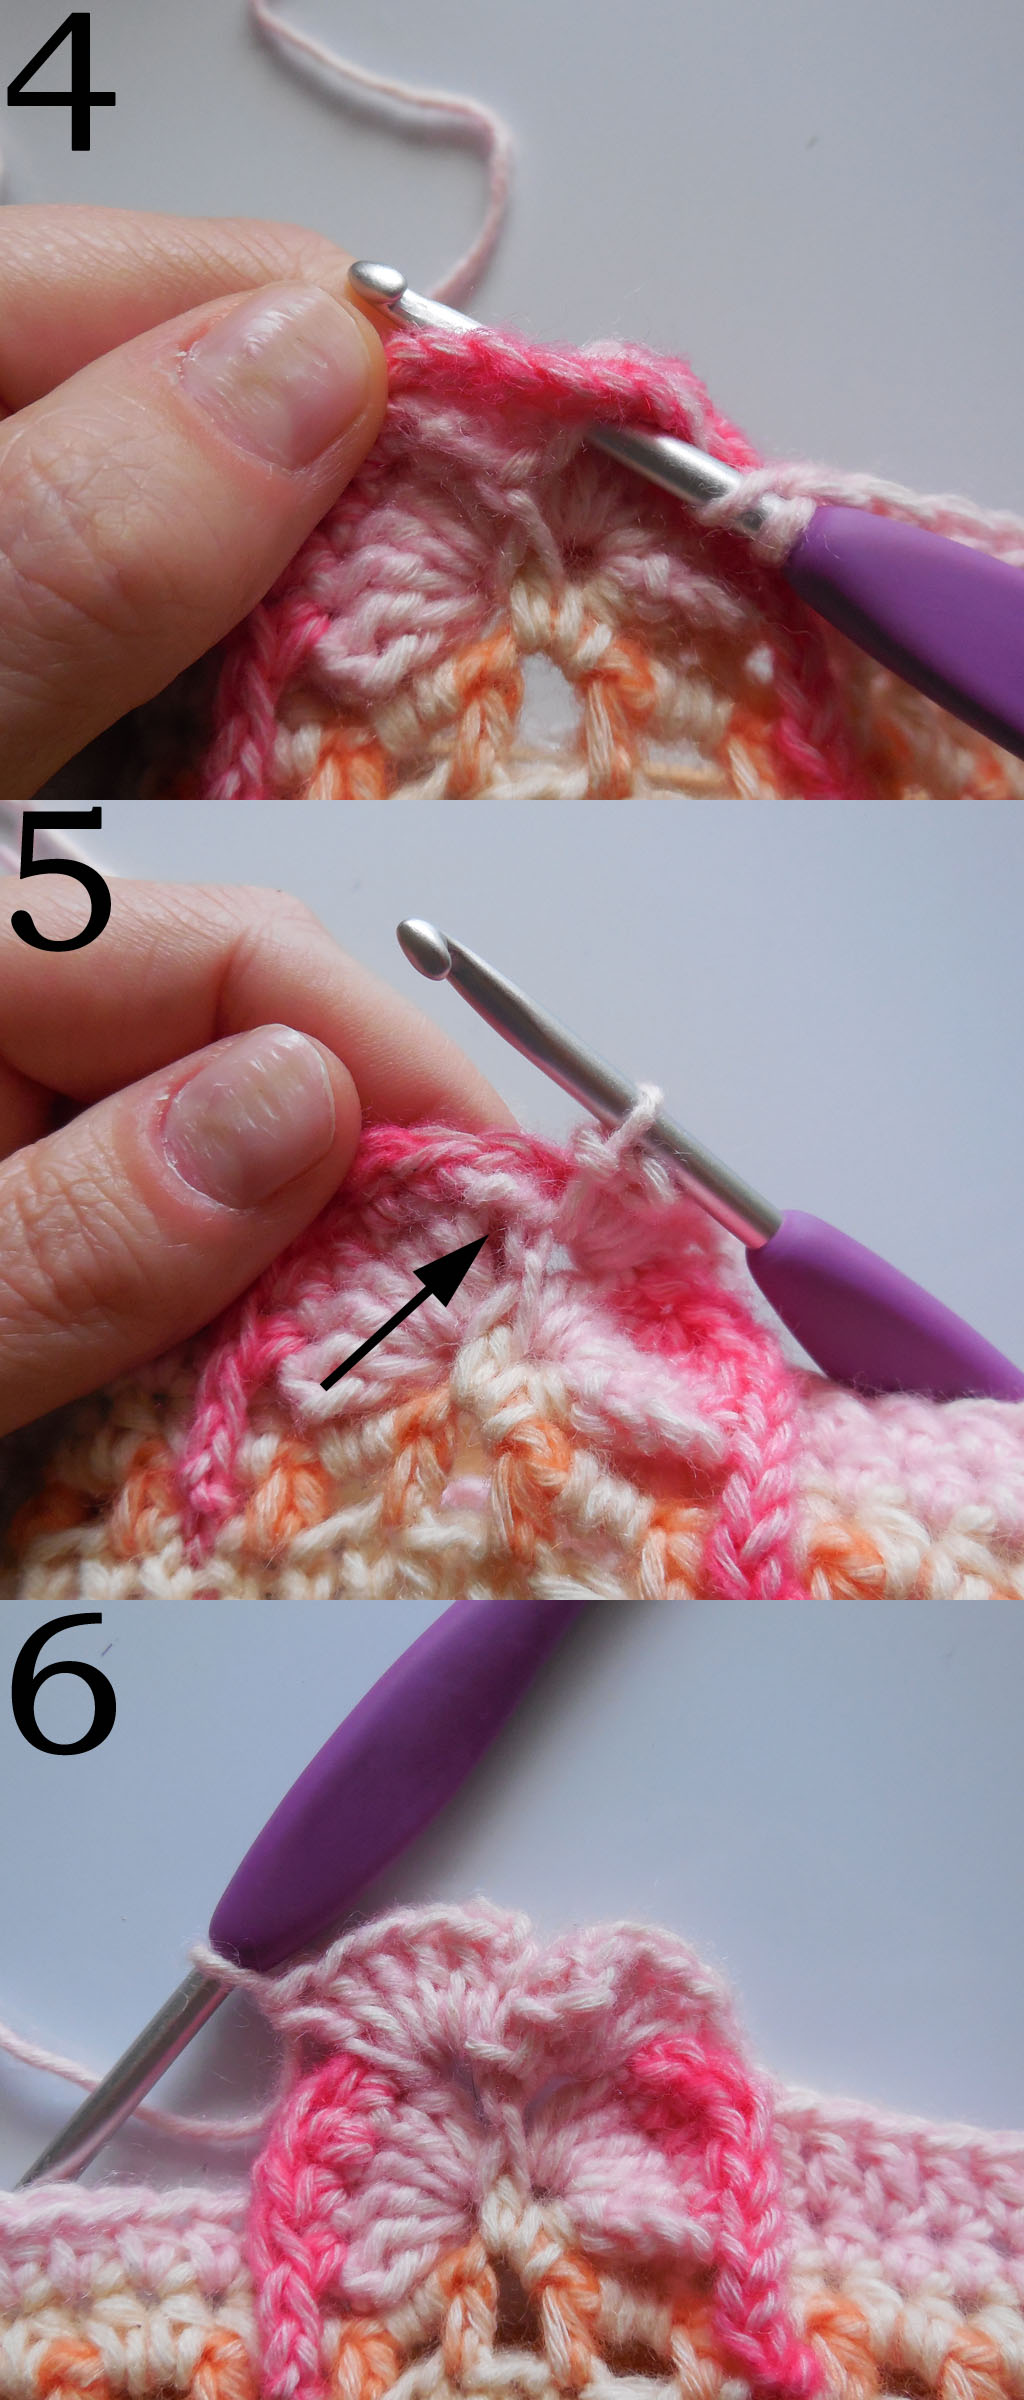
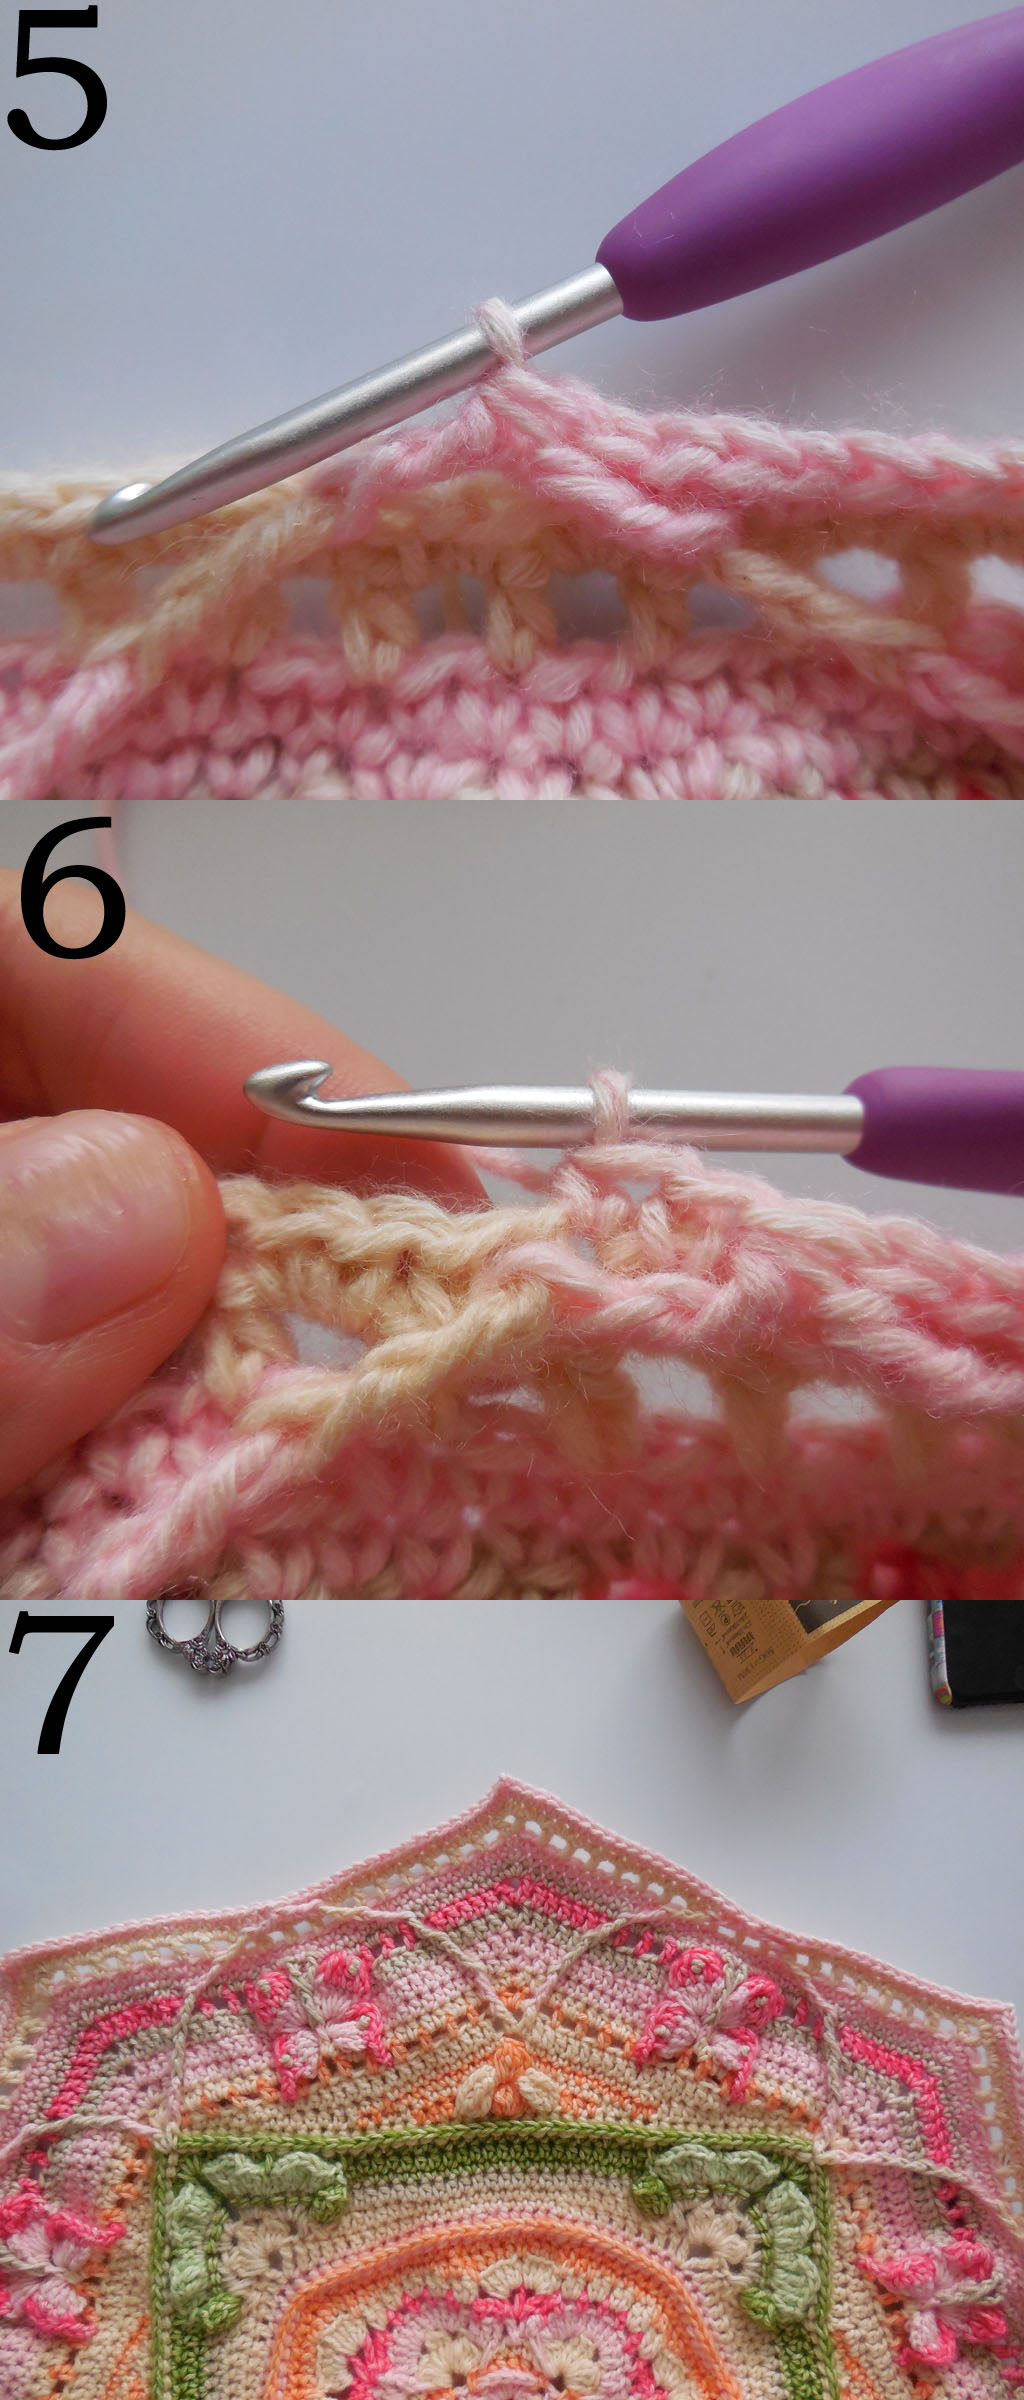
R21
1: Arrow indicates where to start. / Pijl geeft aan waar te starten.
2: Arrow points to first st of R20. / Pijl geeft eerste stk van R20 aan.
3: Arrow indicates the hidden st after ch. / Pijl geeft eerste verstopte stk na l aan.
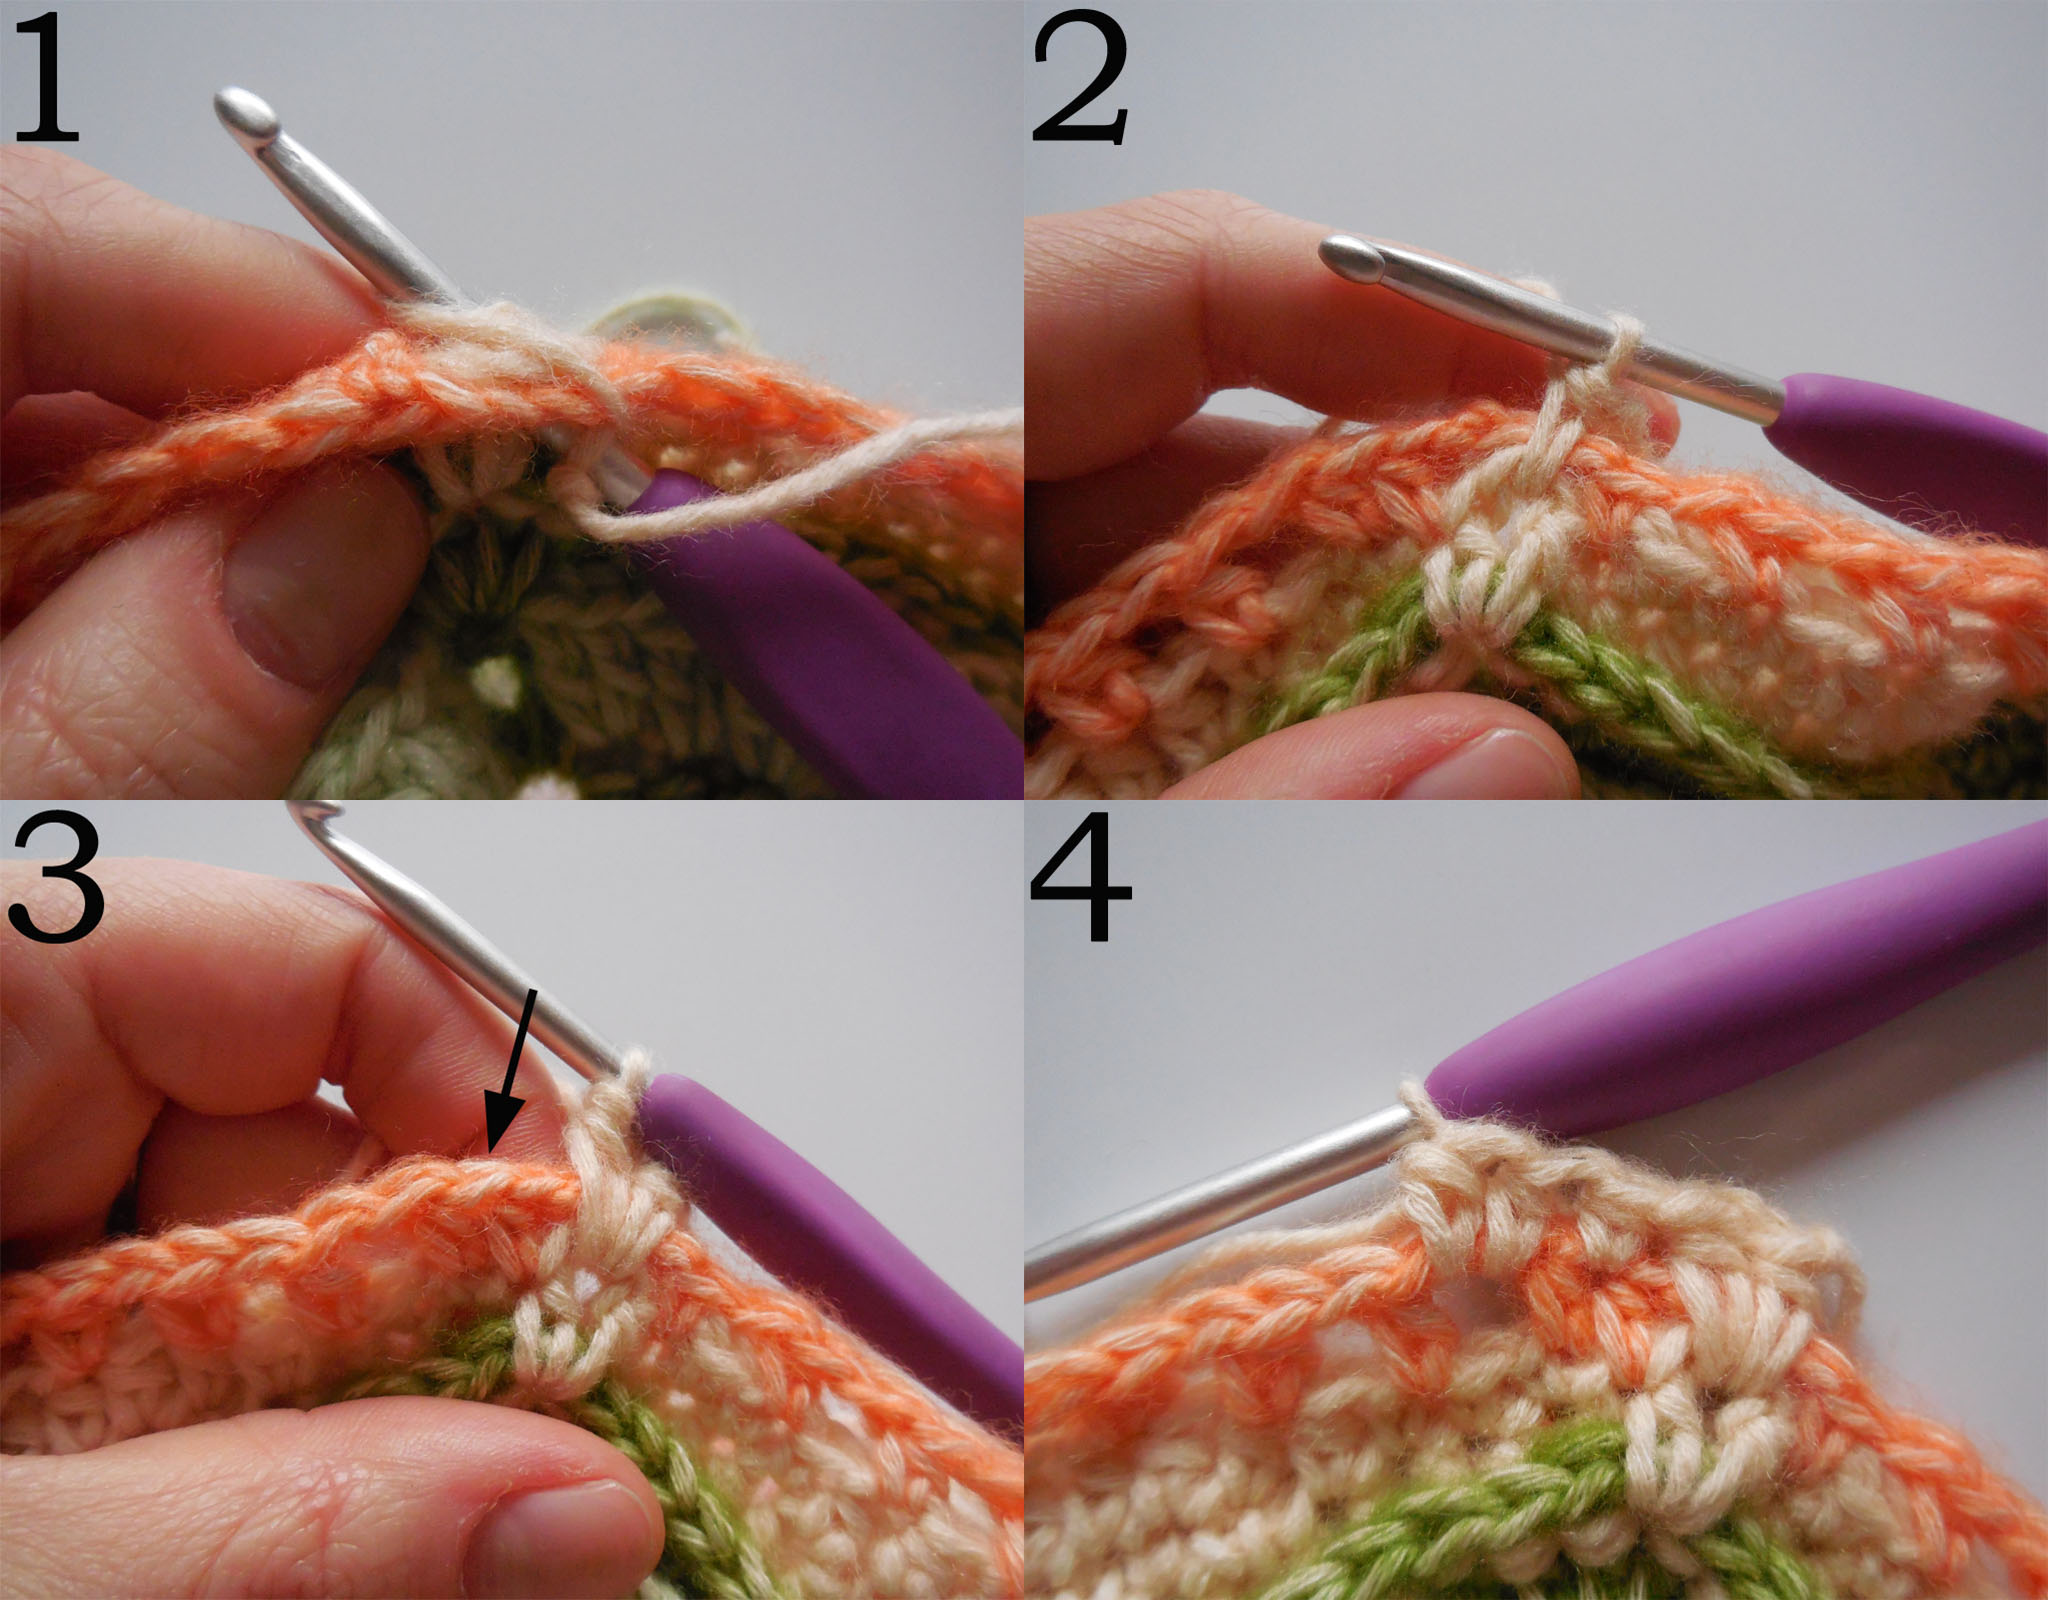
4-10: How to make the 6trtr-cl. This makes the wings of the bee. Make it in front of your work, putting your hook in the skipped stitch from front to back. Fold your work to the back, so you won’t catch any other stitches.
Hoe een 6ddstsam te haken. Dit zijn de vleugels van de bij. Maak de stk vóór de rest van je werk en plaats de haaknaald in de overgeslagen stk van voor naar achter. Vouw de rest van je werk naar achteren, zodat dit niet in de weg zit.
11: Arrow indicates the ch-sp to work into. / Pijl geeft de l-ruimte aan.
12: Arrow indicates the hidden st after the ch-sp.
Pijl geeft de verstopte stk na de l-ruimte aan.
13: One side of R21 finished. / Eén zijde van R21 klaar.
14: Wrong side of work is shown. / Verkeerde kant van deken.


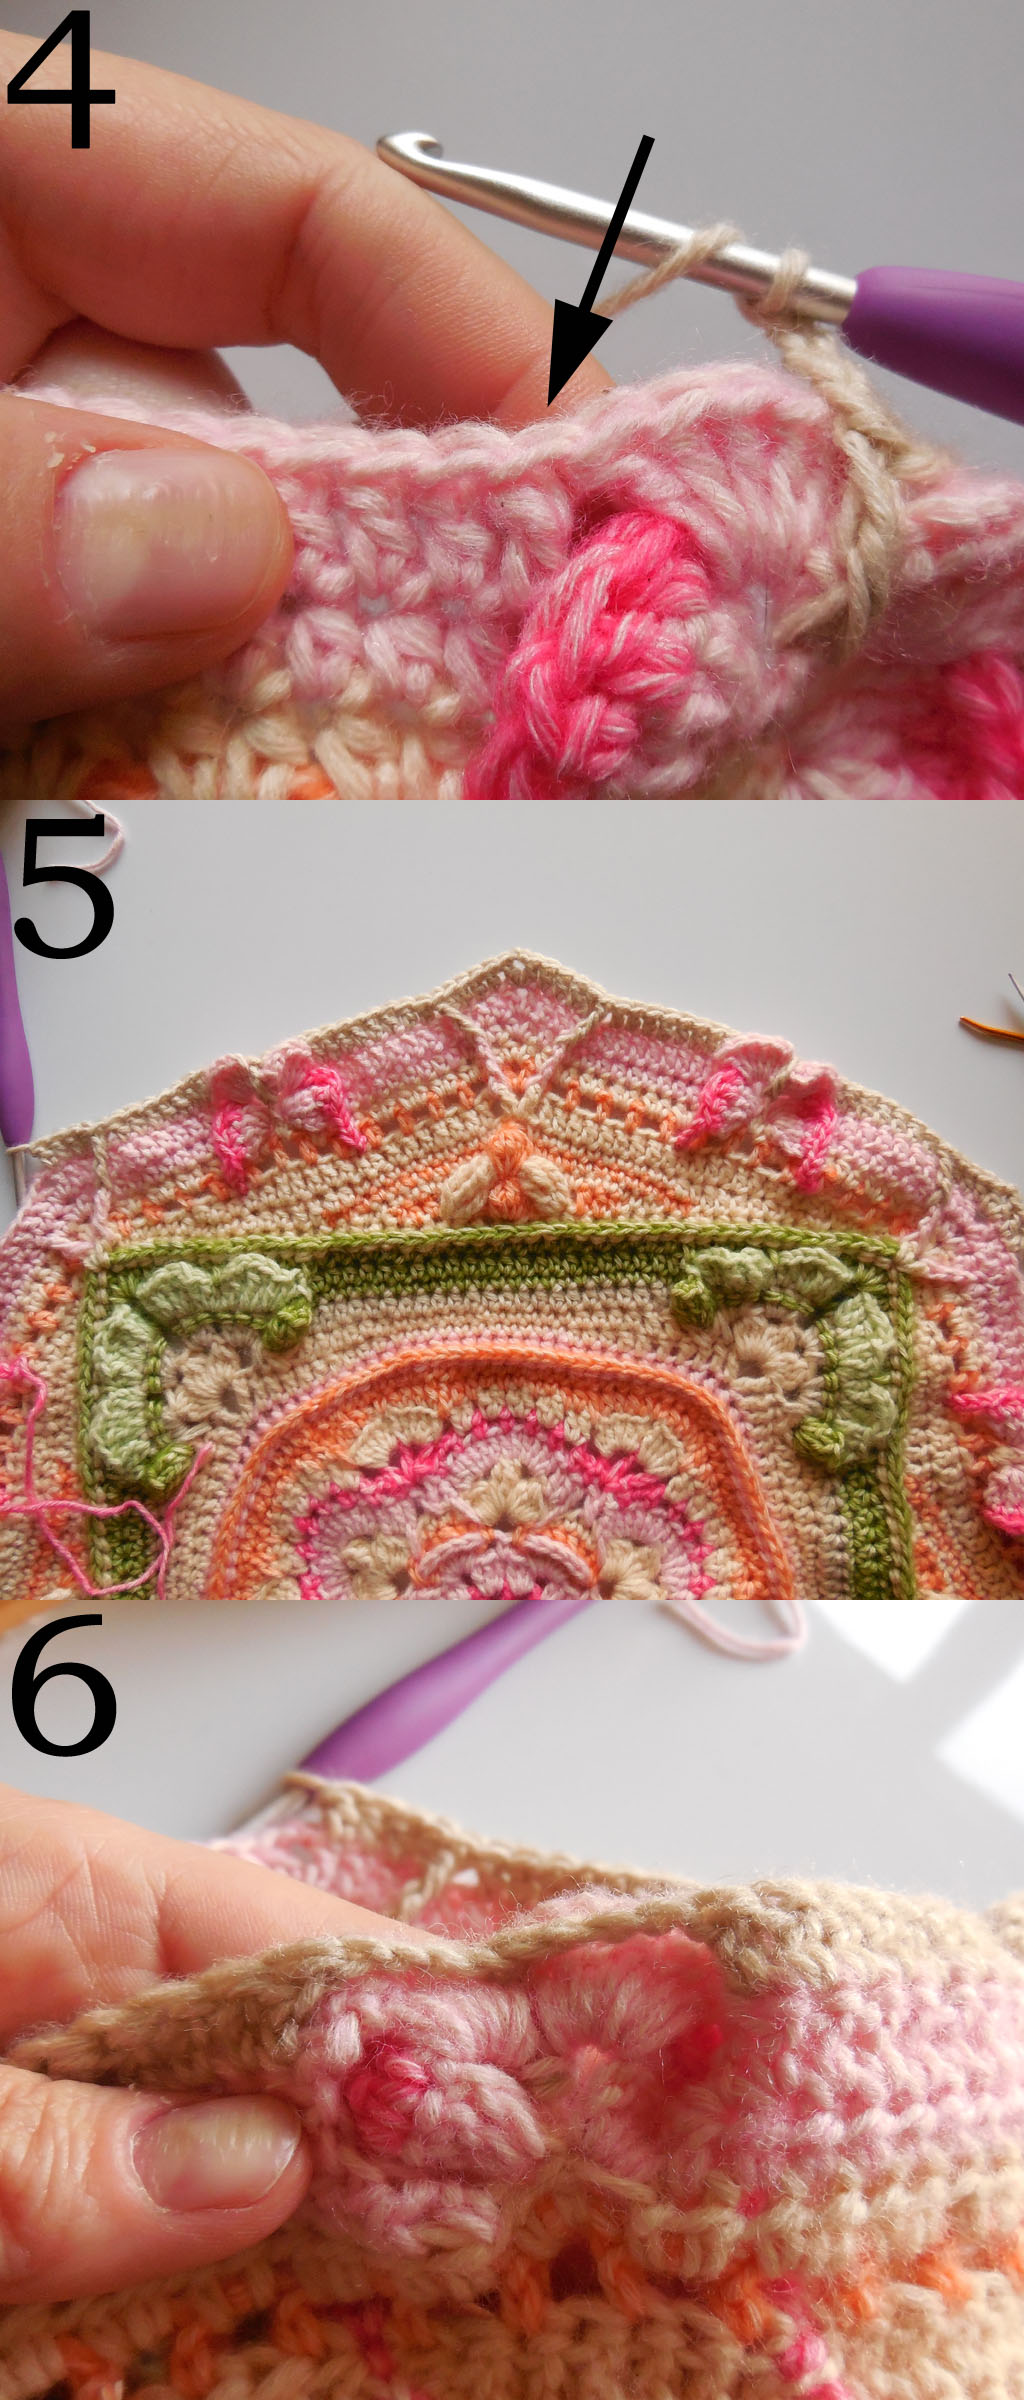
R22
1: First 2 st are made before R21. / Eerste 2 stkn worden gemaakt vóór R21.
2-4: Work the 6tr-bobble into the marked ch, working over the sts of R21.
Werk de 6st-bobbel in de gemarkeerde l, en werk over de stkn van R21.
5: Arrow indicates hidden st after the 6tr-bobble.
Pijl geeft verstopte stk na 6st-bobbel aan.
6: One side of R22 is finished. / Eén zijde van R22 klaar.
R23
1-2: First sts of R23. / Eerste stk van R23.
3: Arrow indicates hidden st. / Pijl geeft verstopte stk aan.
4: One side of R23 finished. / Eén zijde van R23 klaar.
R24
1: Start R24.
2: Hidden st after the corner. / Verstopte stk na de hoek.
3-4: Start after ch5 to turn for next side. The ch5 will be pushed to the back, so it will be hidden behind the rest of your work.
Start na de 5l om de volgende zijde te haken. De 5l wordt naar de achterkant geduwd zodat het achter de rest van je werk zit.
5: R24 finished. / R24 klaar.

R25
1: Arrow indicates where to start. / Pijl geeft aan waar te starten.
2-3: First st is worked over the ch5 of R24.
Eerste stk wordt gewerkt over de 5l van R24.
4: Arrow indicates hidden st after the corner.
Pijl geeft verstopte stk na de hoek aan.
5: Arrow indicates the first st to start in on the next side after the ch3.
Pijl geeft de eerste stk aan na de 3l van de volgende zijde waar je in moet starten.
6: R25 is finished. / R25 is klaar.

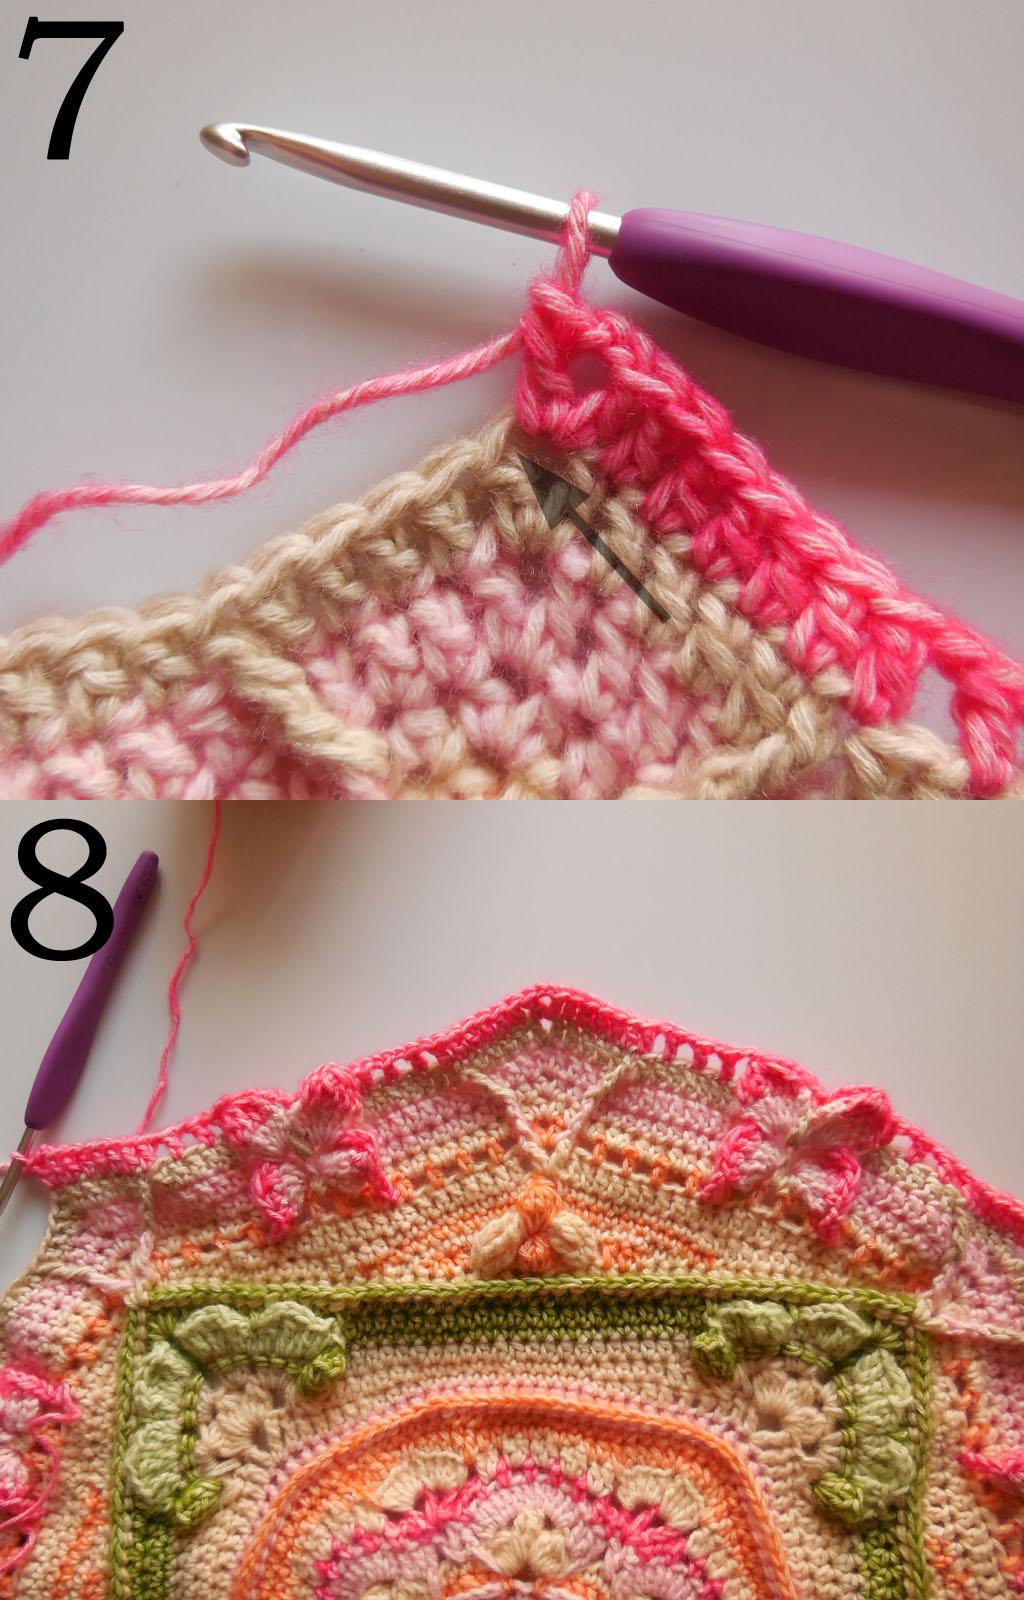
R26
1-2: Work the corner sts over the ch3 and ch5 of the previous rounds.
Werk de hoeksteken over de 3l en 5l van de vorige rondes.
3-4: Arrow indicates the next st to work into.
Pijl geeft de volgende stk aan waar je in moet werken.
5: Arrow indicates the hidden st after the ch-sp.
Pijl geeft de verstopte stk na de l-ruimte aan.
6: Arrow indicates the hidden st after the corner-sp.
Pijl geeft de verstopte stk na de hoek aan.
7: Arrow indicates the last st before the next corner, which is hidden.
Pijl geeft de laatste verstopte stk na de volgende hoek aan.

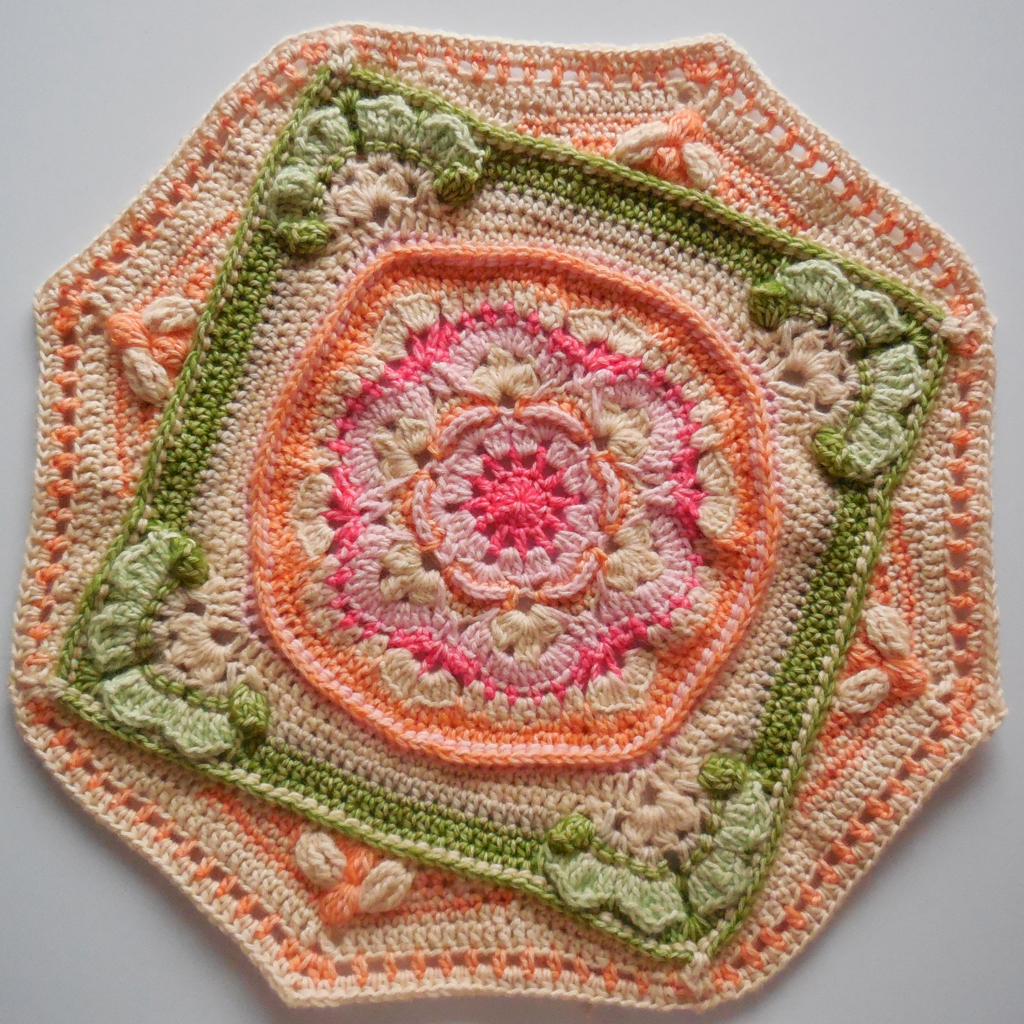
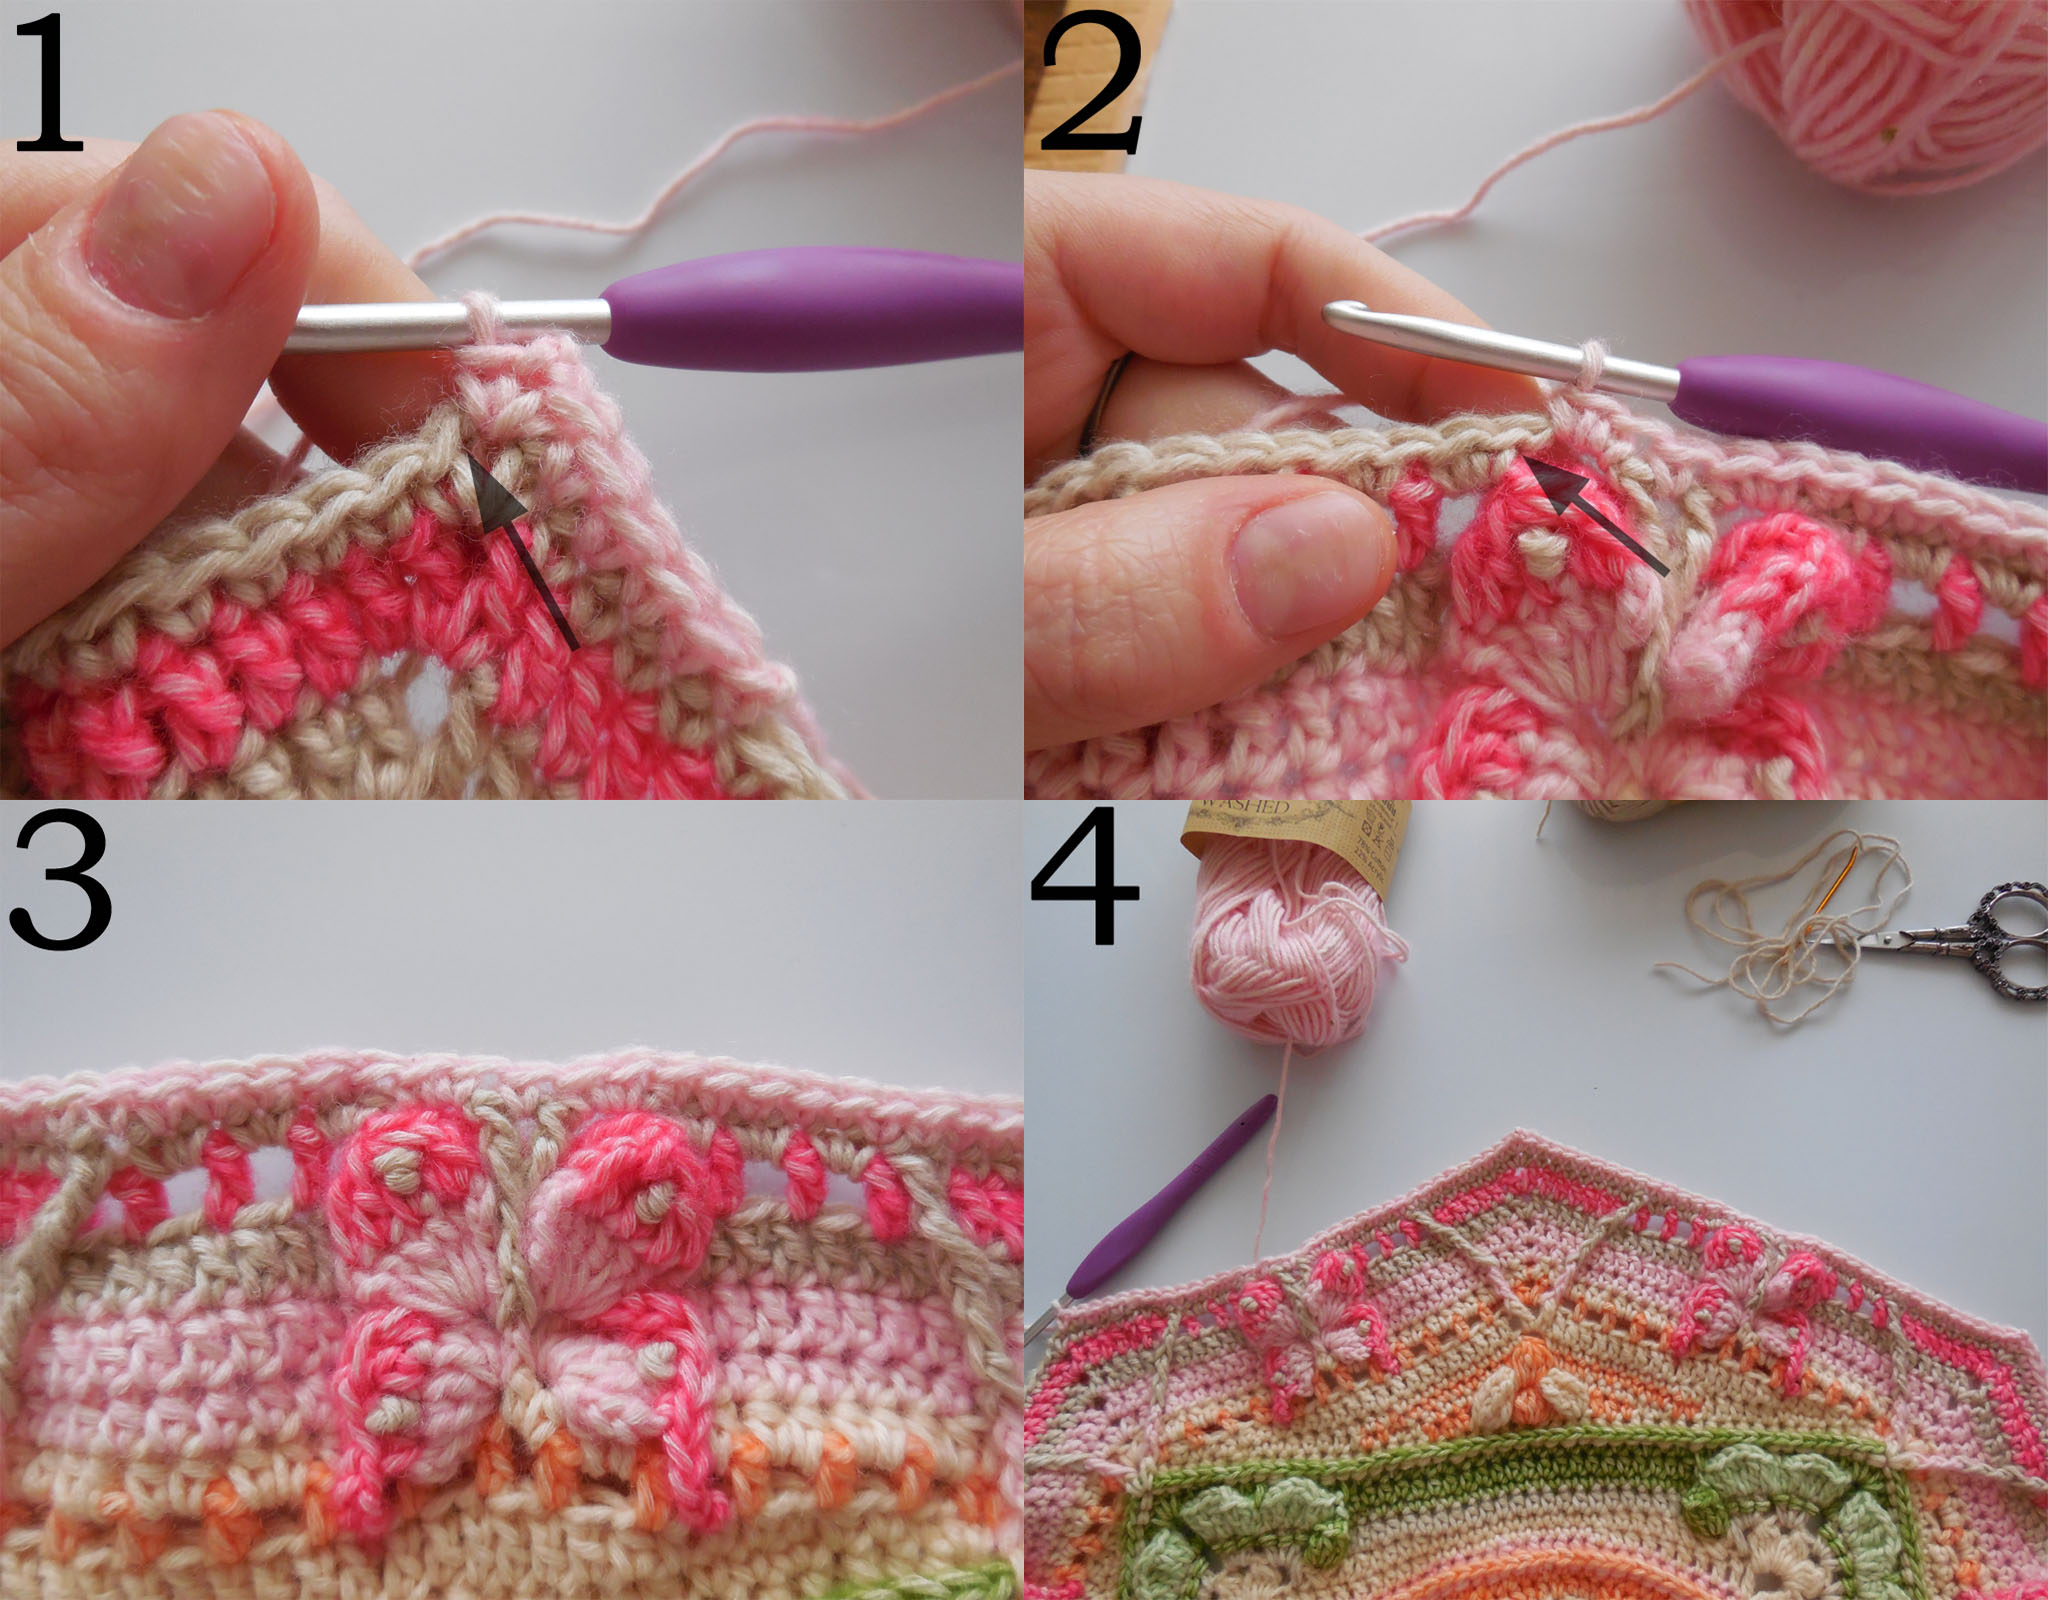
First part of Chapter 2 done / Eerste deel van Hoofdstuk 2 klaar
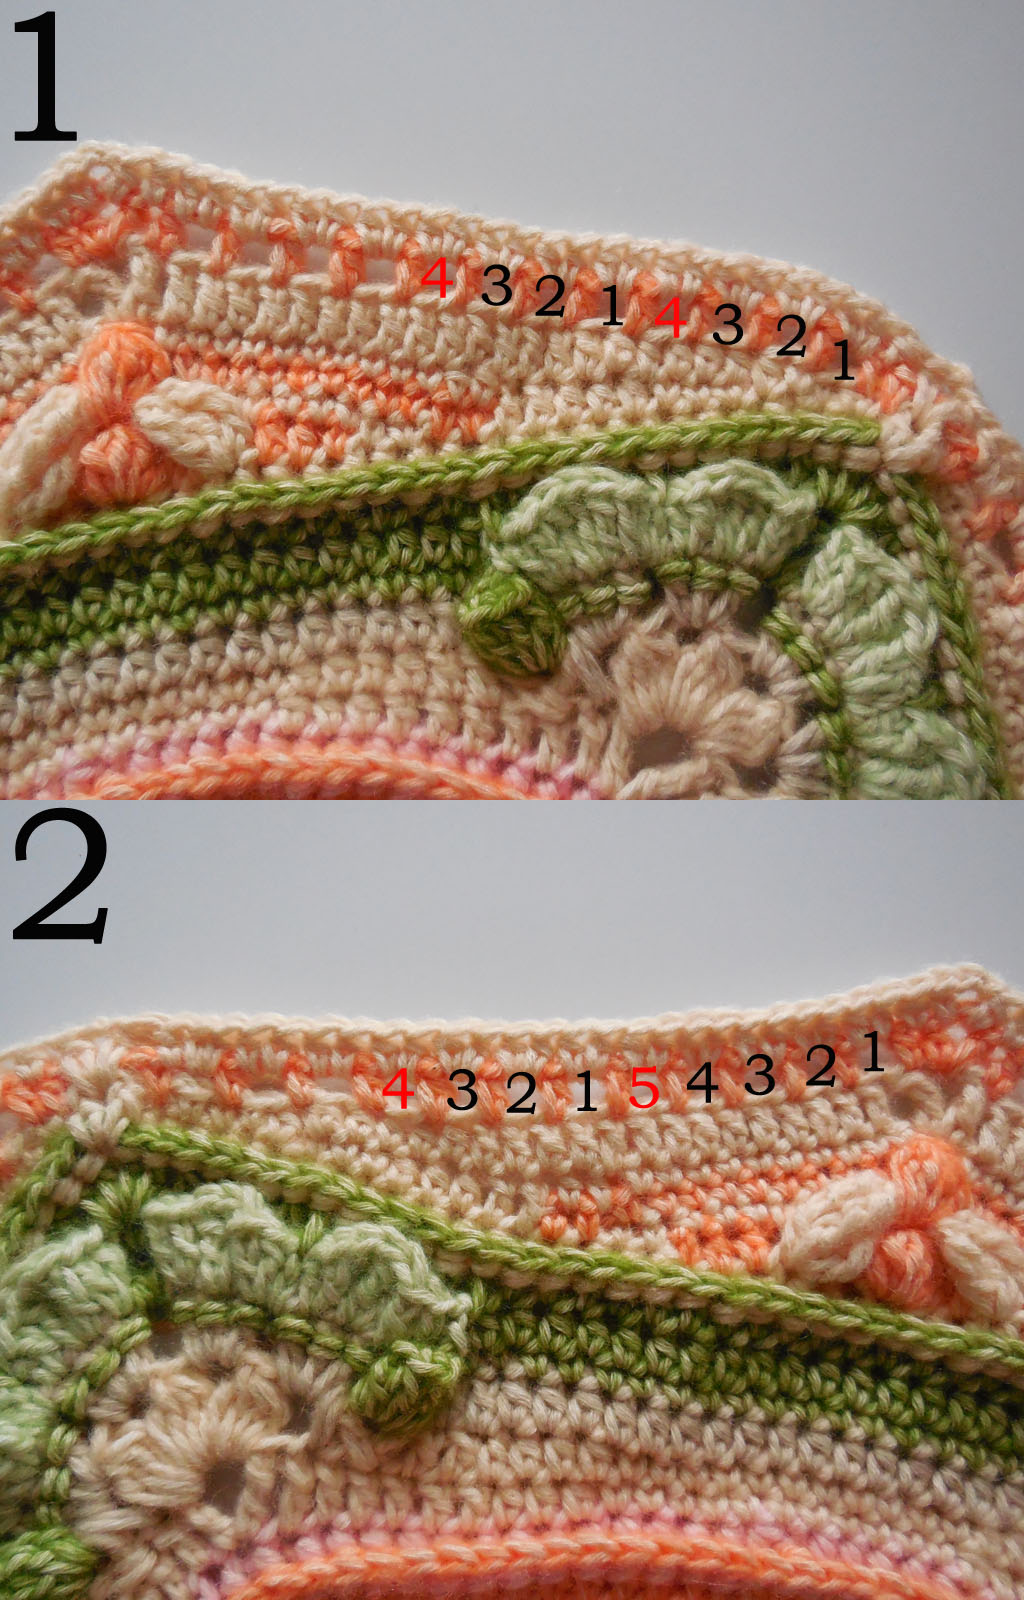
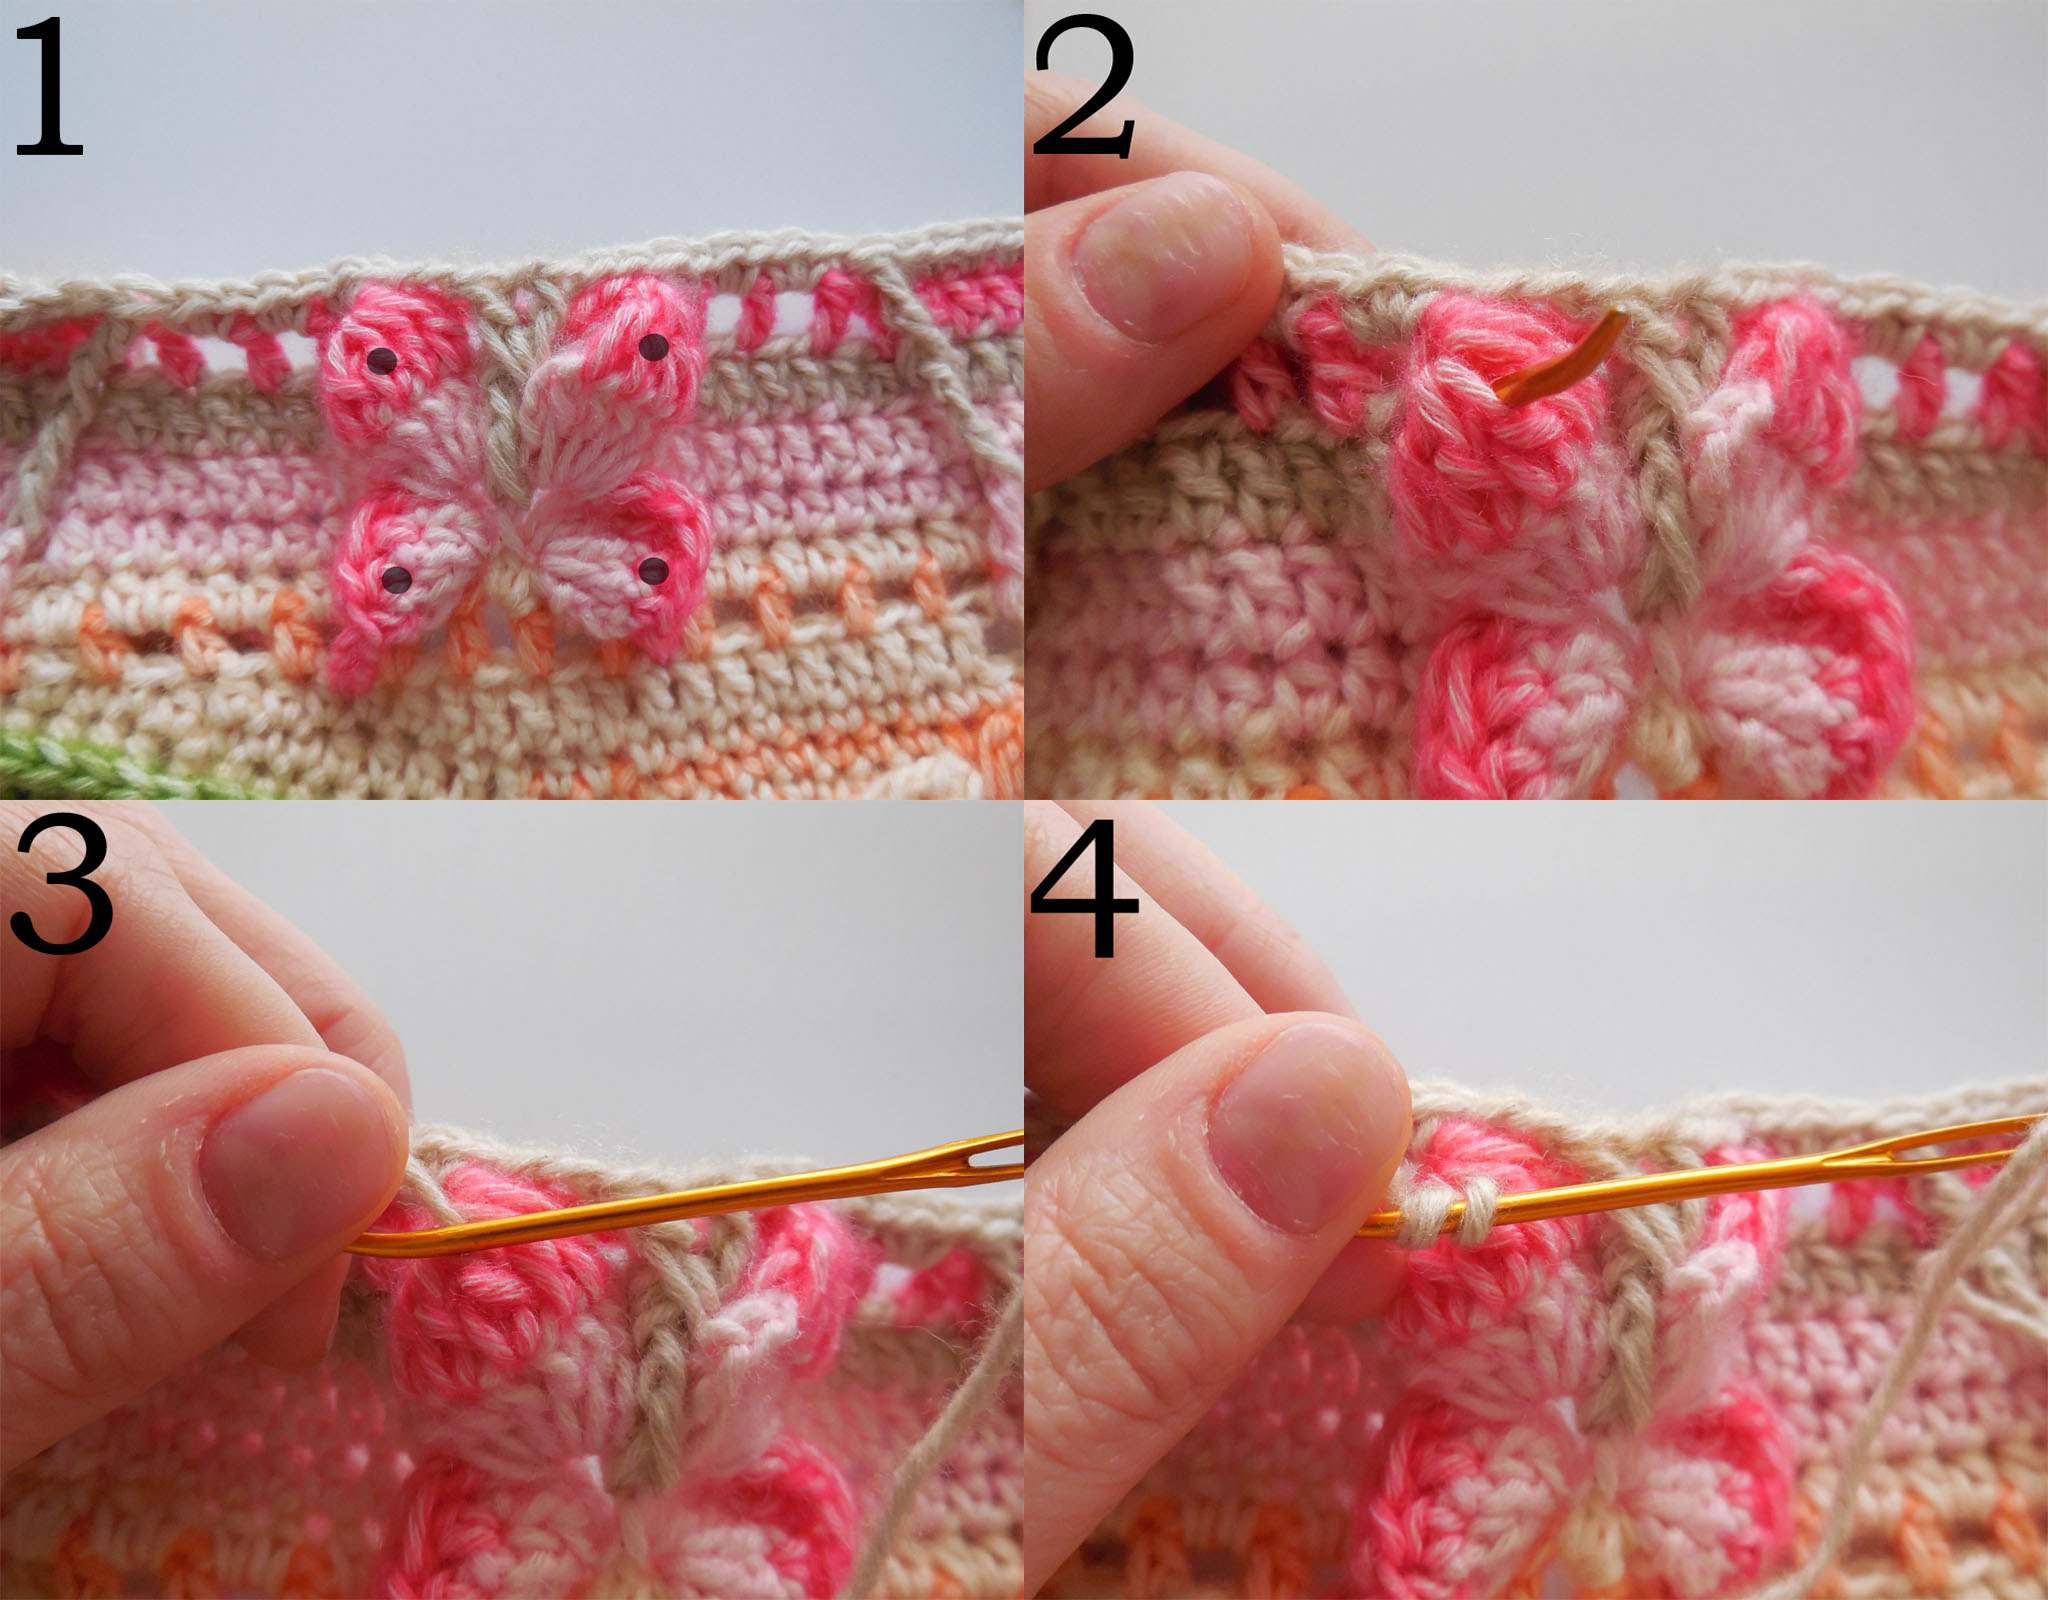
Placing markers for butterflies / Markeerders plaatsen voor de vlinders
1-2: The red numbers indicate where to place the markers.
De rode cijfers geven aan waar je de markeerders dient te plaatsen.
Colour placement for the butterflies / Kleuren bepalen voor de vlinders
In the event that you have chosen your own colors, you might want to determine the colors of the following rounds by using the picture below.
Als je geen kit gebruikt, maar je eigen kleuren hebt gekozen, is het misschien handig de kleuren van de volgende rondes te bepalen aan de hand van onderstaande foto.
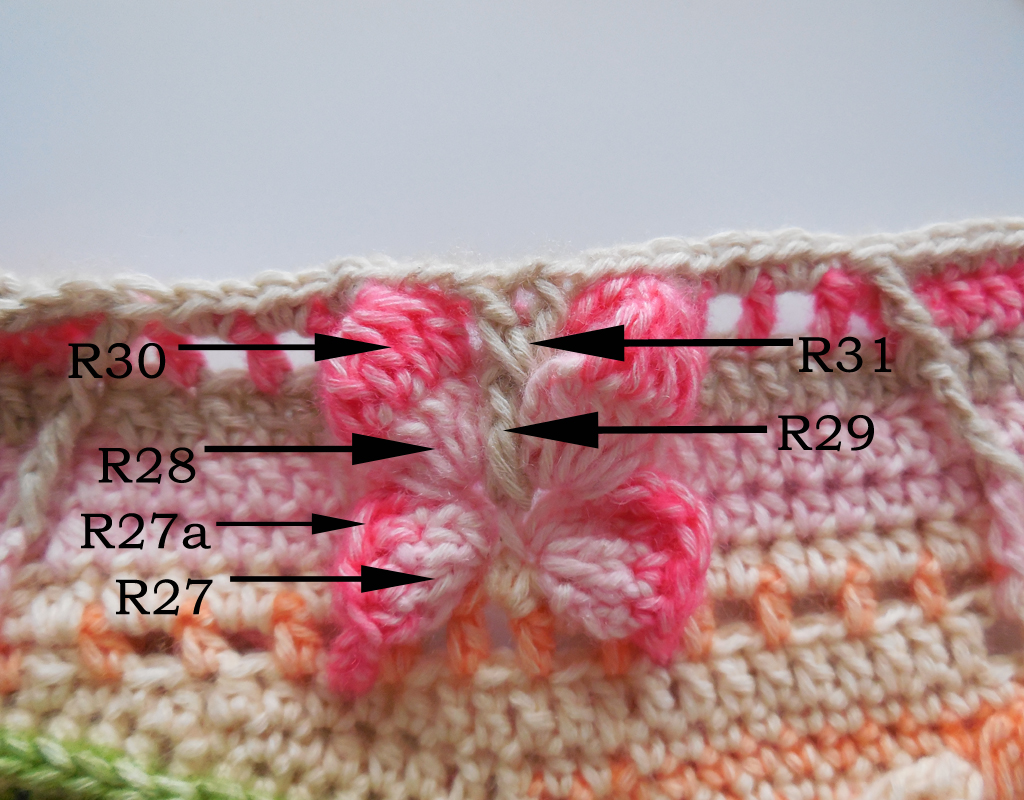
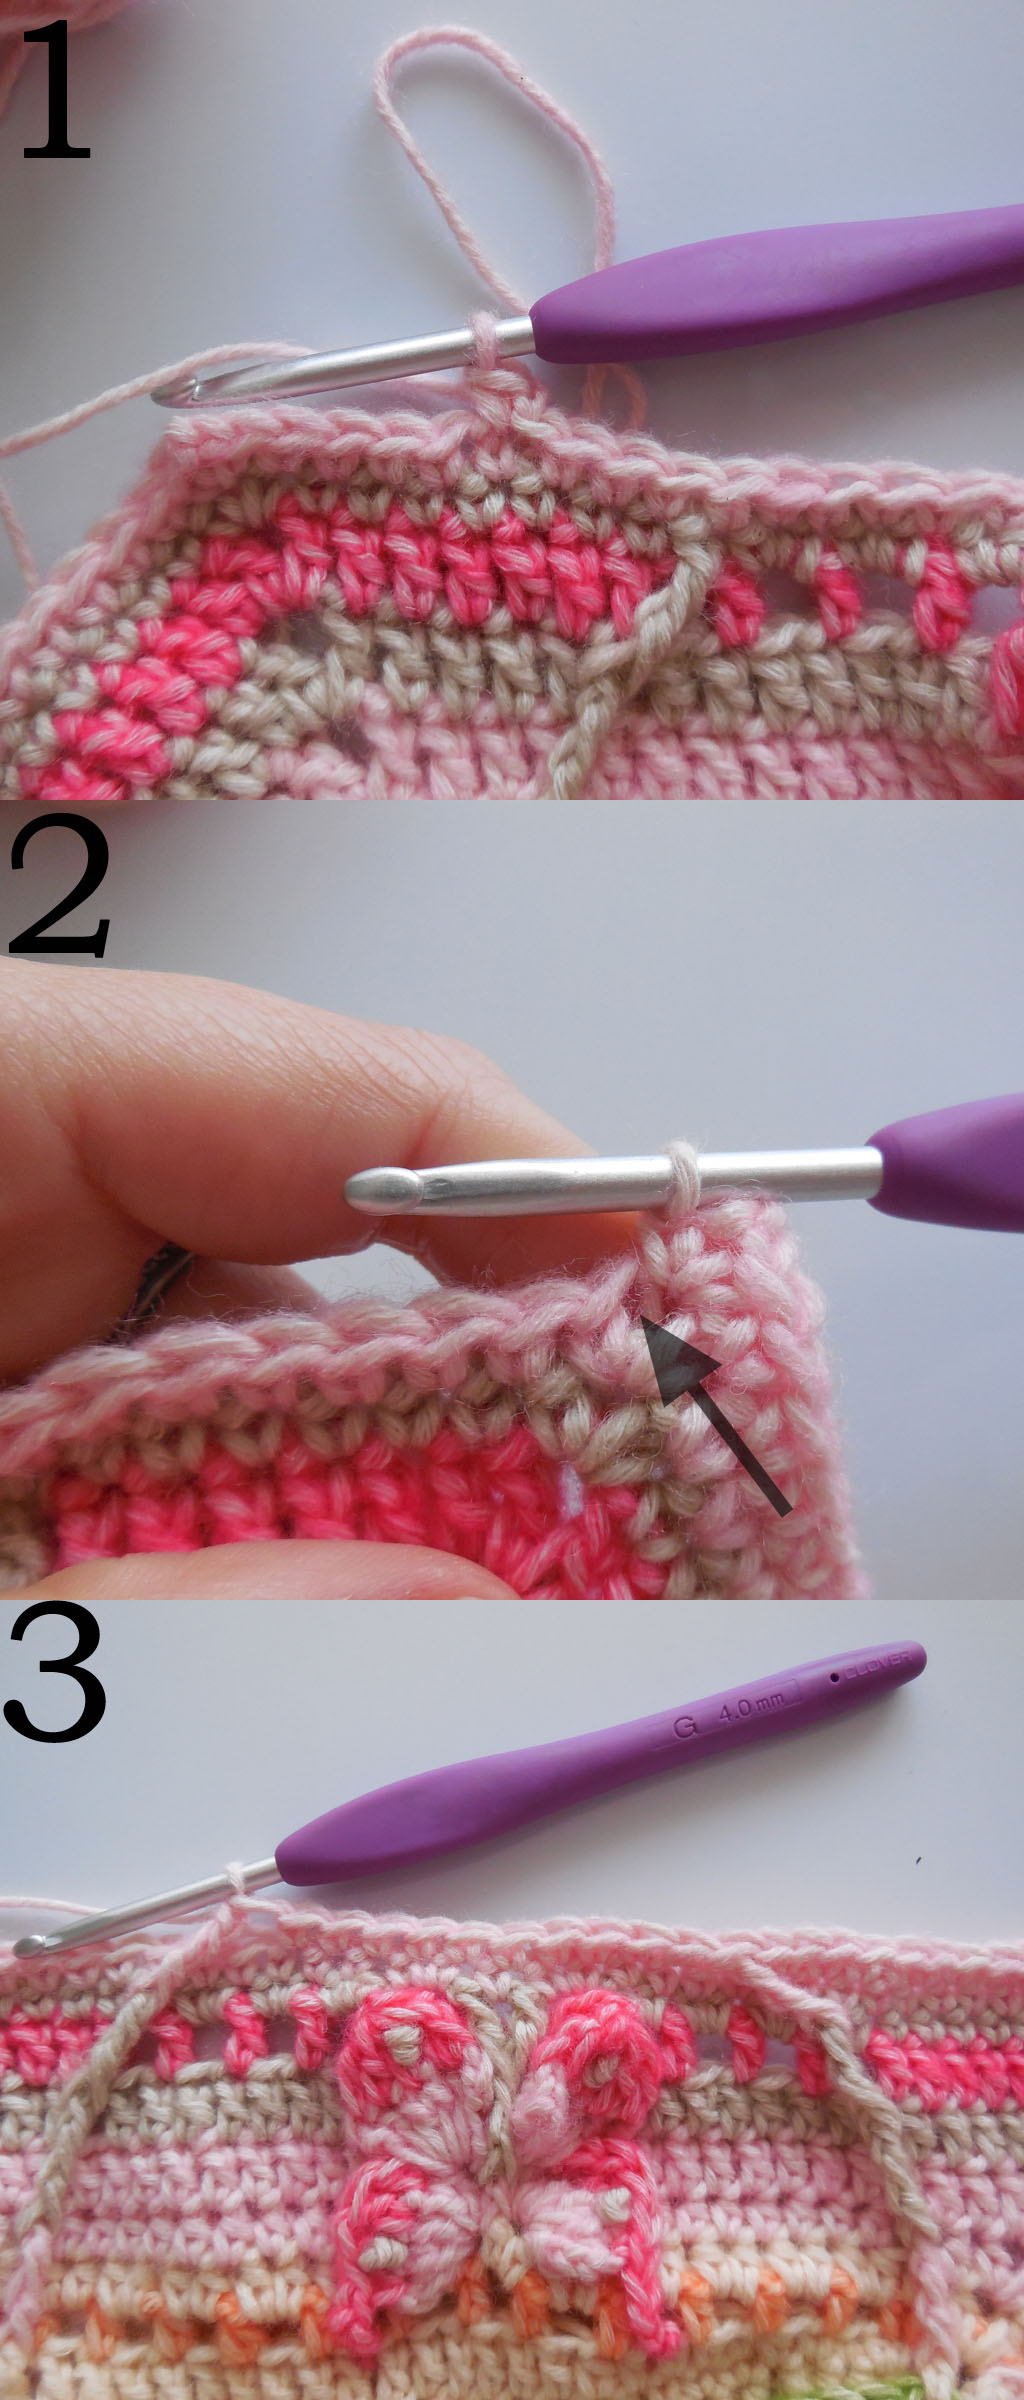
R27
1: Hidden stitch. / Verstopte steek.
2-3: Placement of fpdtr. / Plaatsing van RdstV.
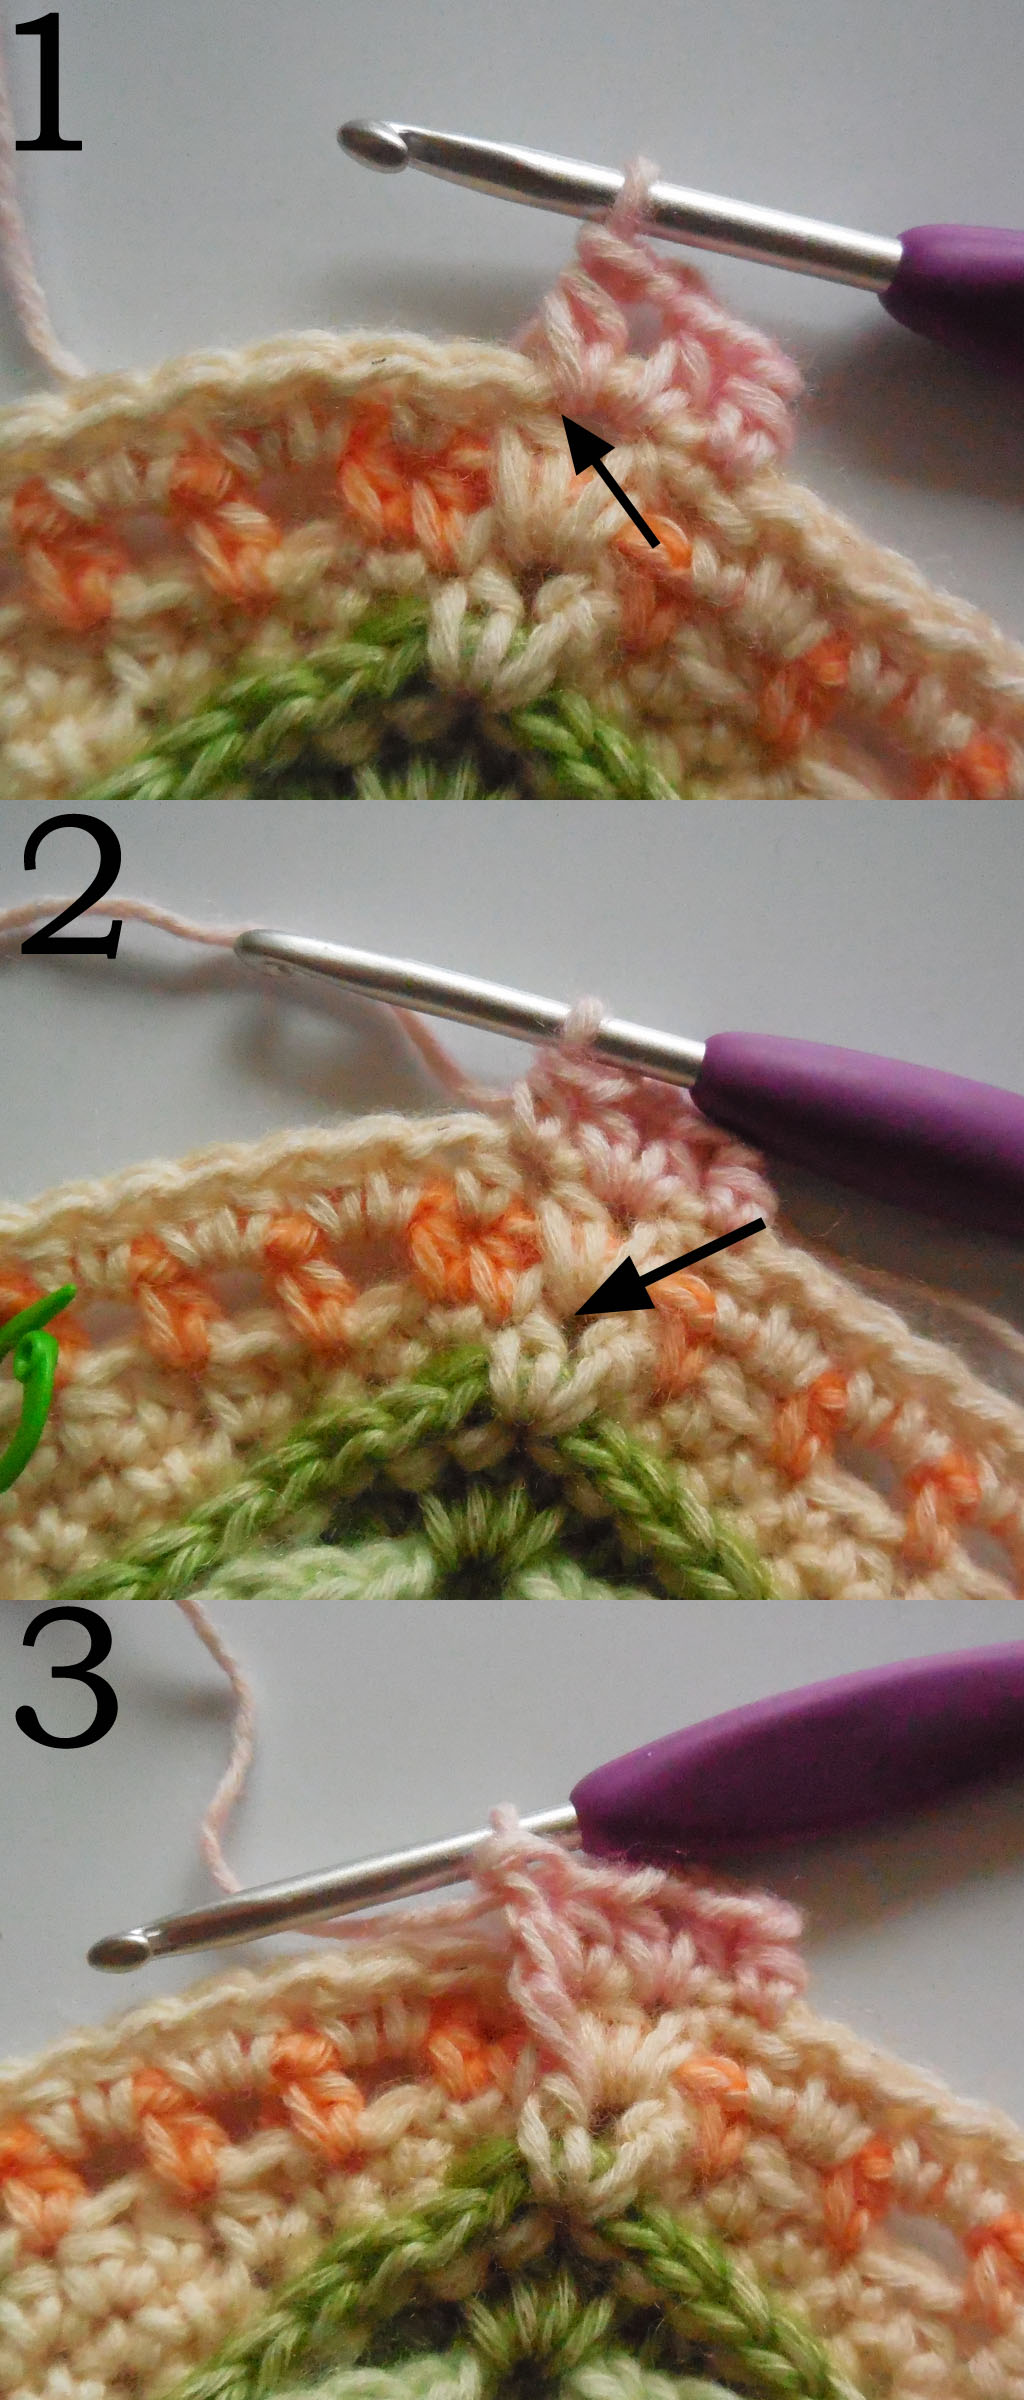
4-5: Placement of 5tr group. Arrow indicates stitch to work a fptr around.
Plaatsing van 5st groep. Pijl geeft aan waar je een RstV om moet haken.
6: Arrow indicates hidden stitch to work next 5tr group into.
Pijl geeft de verstopte stk aan na de 5st groep.
7: Two 5tr groups done. They look a bit scrunchy, but this will be fixed in the next round.
Twee 5st groepen klaar. Ze lijken een beetje verfrommeld, maar dit wordt opgelost in de volgende ronde.
8: Hidden stitch after next corner. / Verstopte stk na de volg hoek.
9: R27 finished. / R27 klaar.
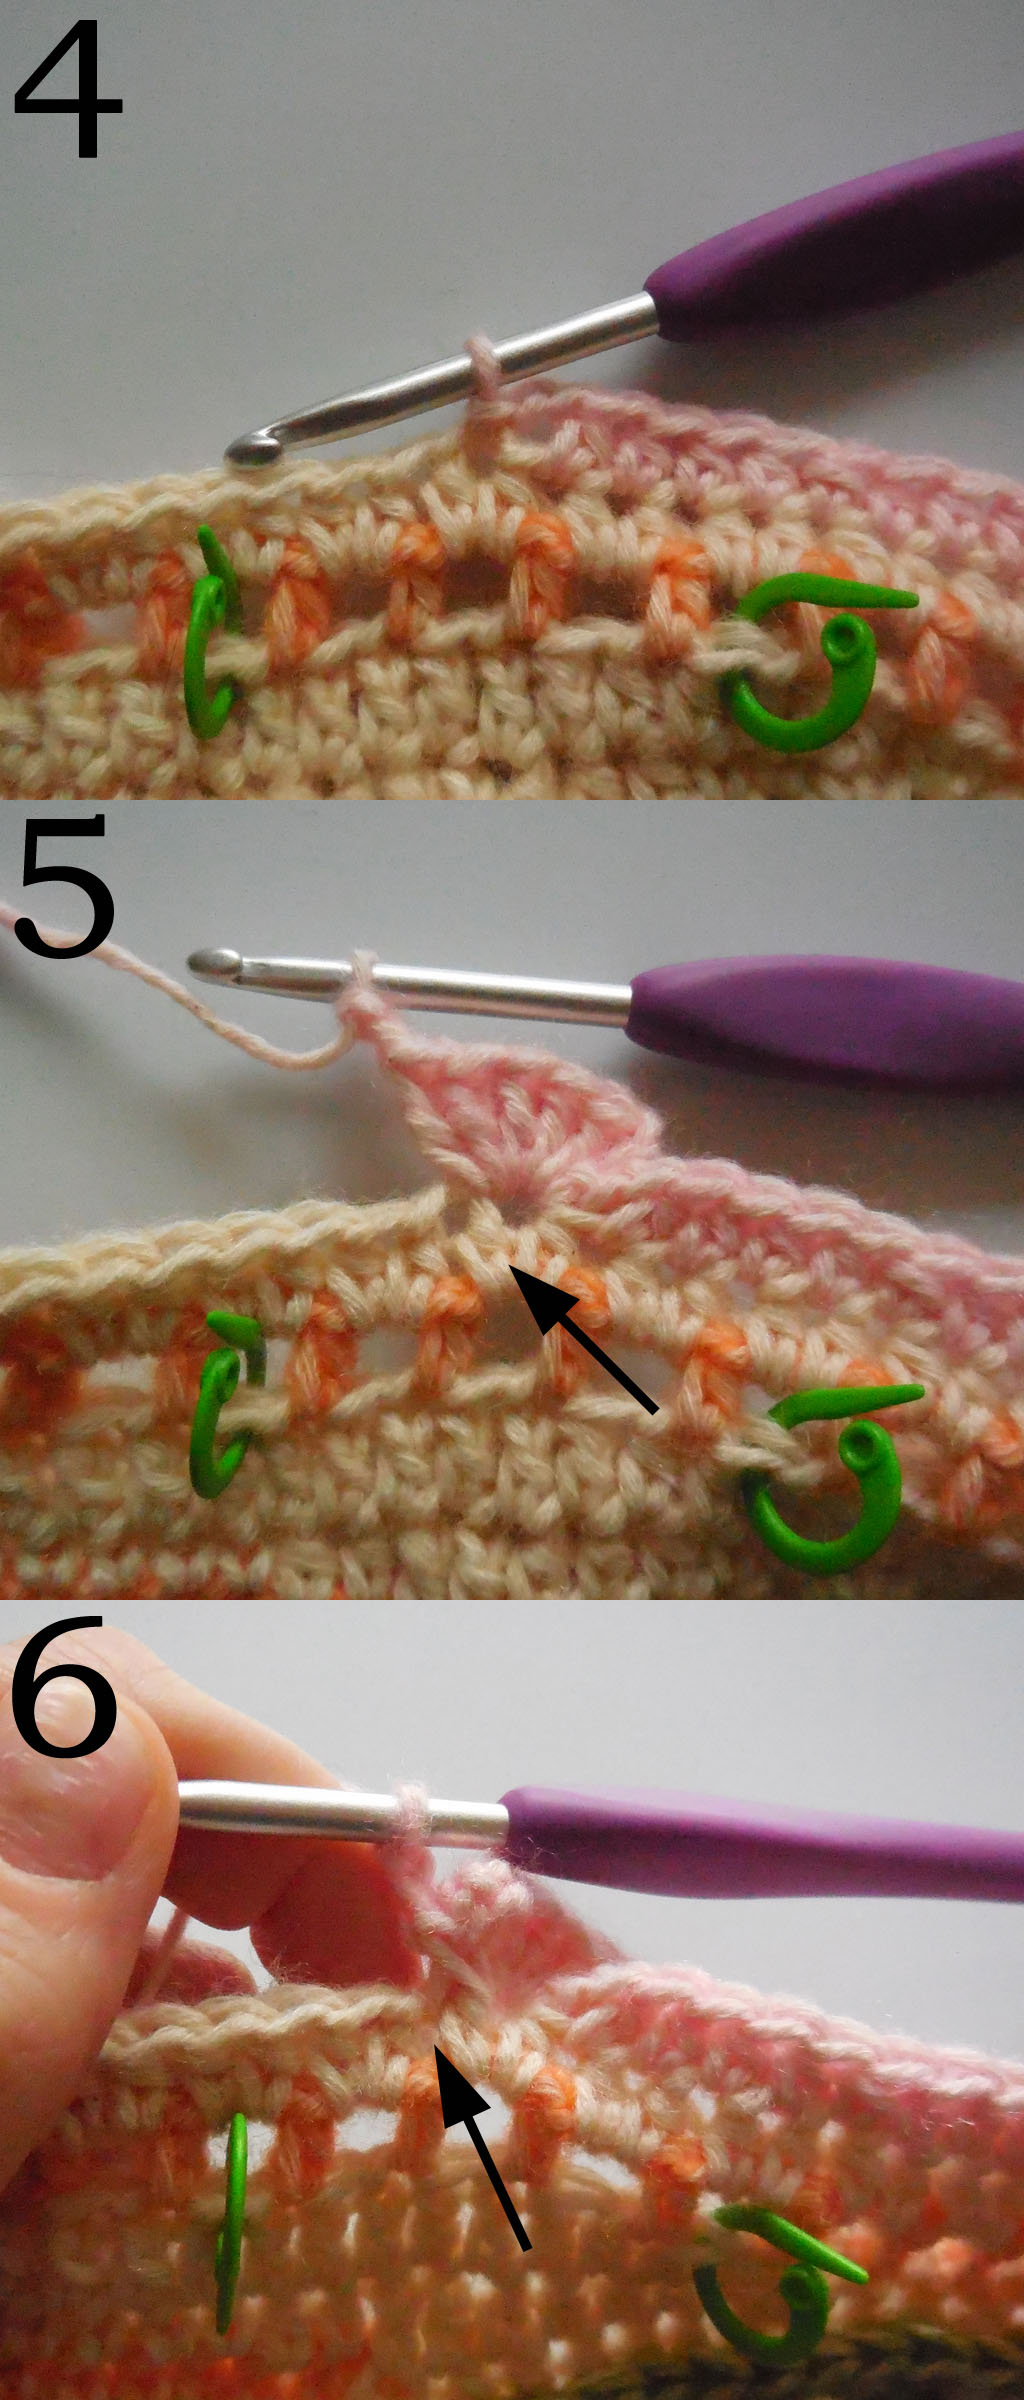
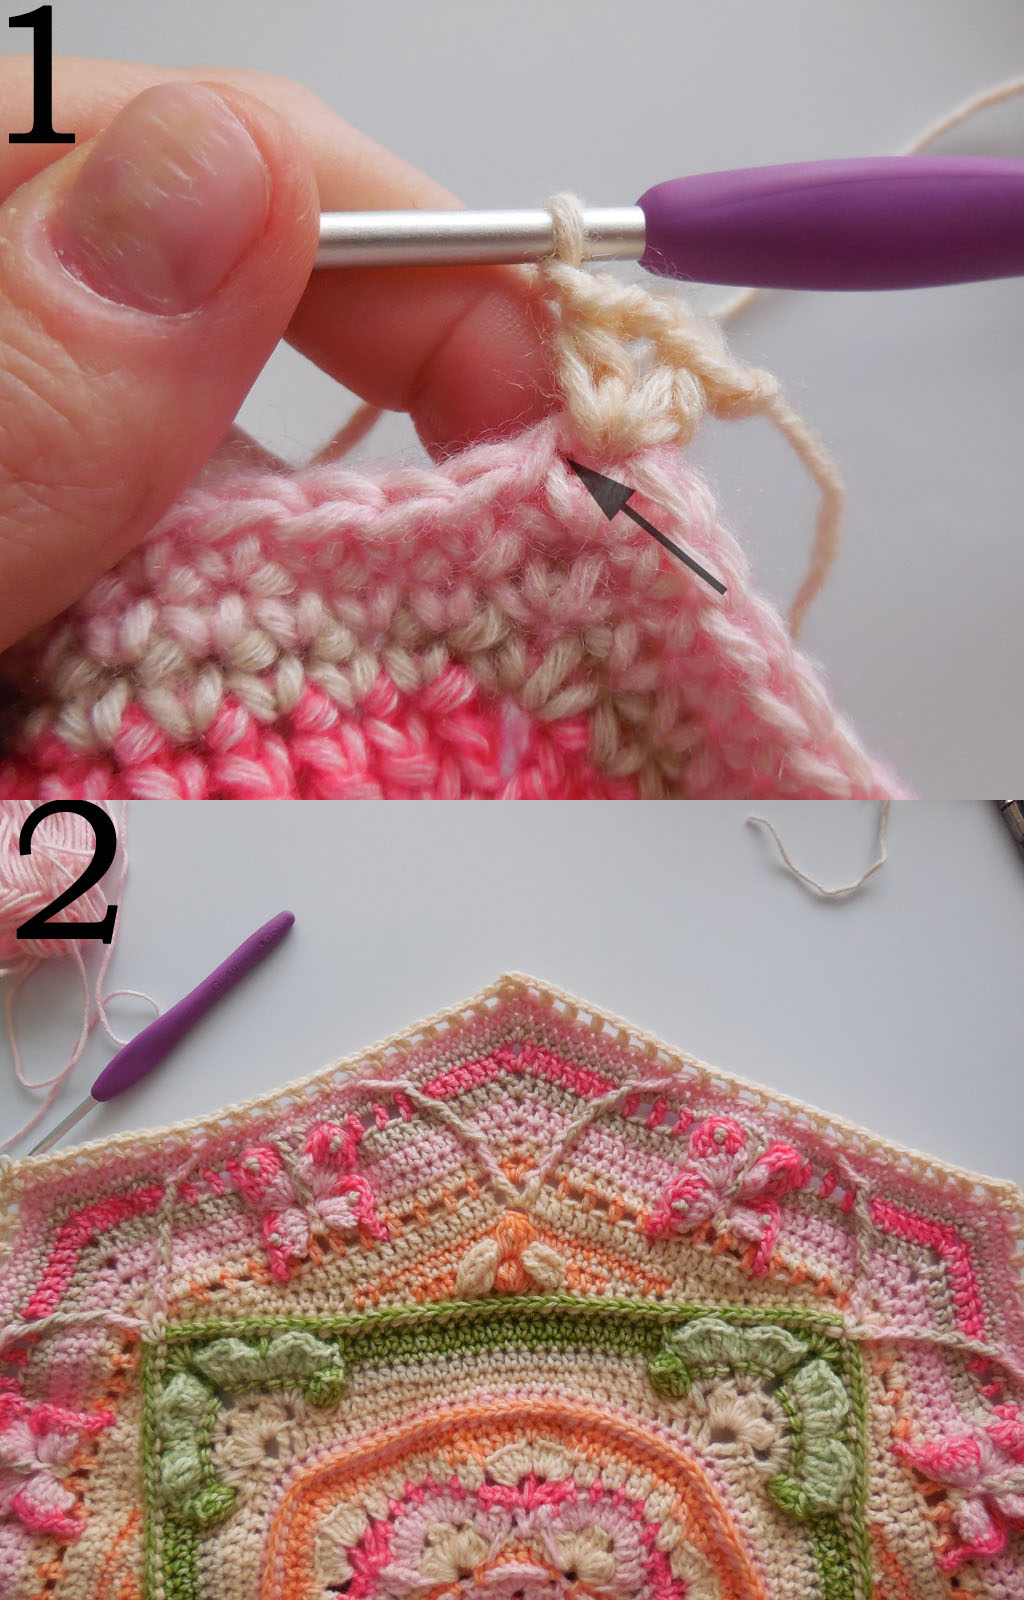
R27a
1: Arrow indicated first stitch of 5tr group. It can be a bit hidden because of the ch3 in front of it.
Pijl geeft de eerste stk na 5st groep aan. Deze kan wat verstopt lijken door de 3l ervoor.
2: First bottom wing done. / Eerste onderste vleugel klaar.
3: Arrow indicates the next stitch to work into.
Pijl geeft volgende stk aan.
4: Bottom wings finished. / Onderste vleugels klaar.
5: Wrong side of butterfly. / Verkeerde kant van vlinder.

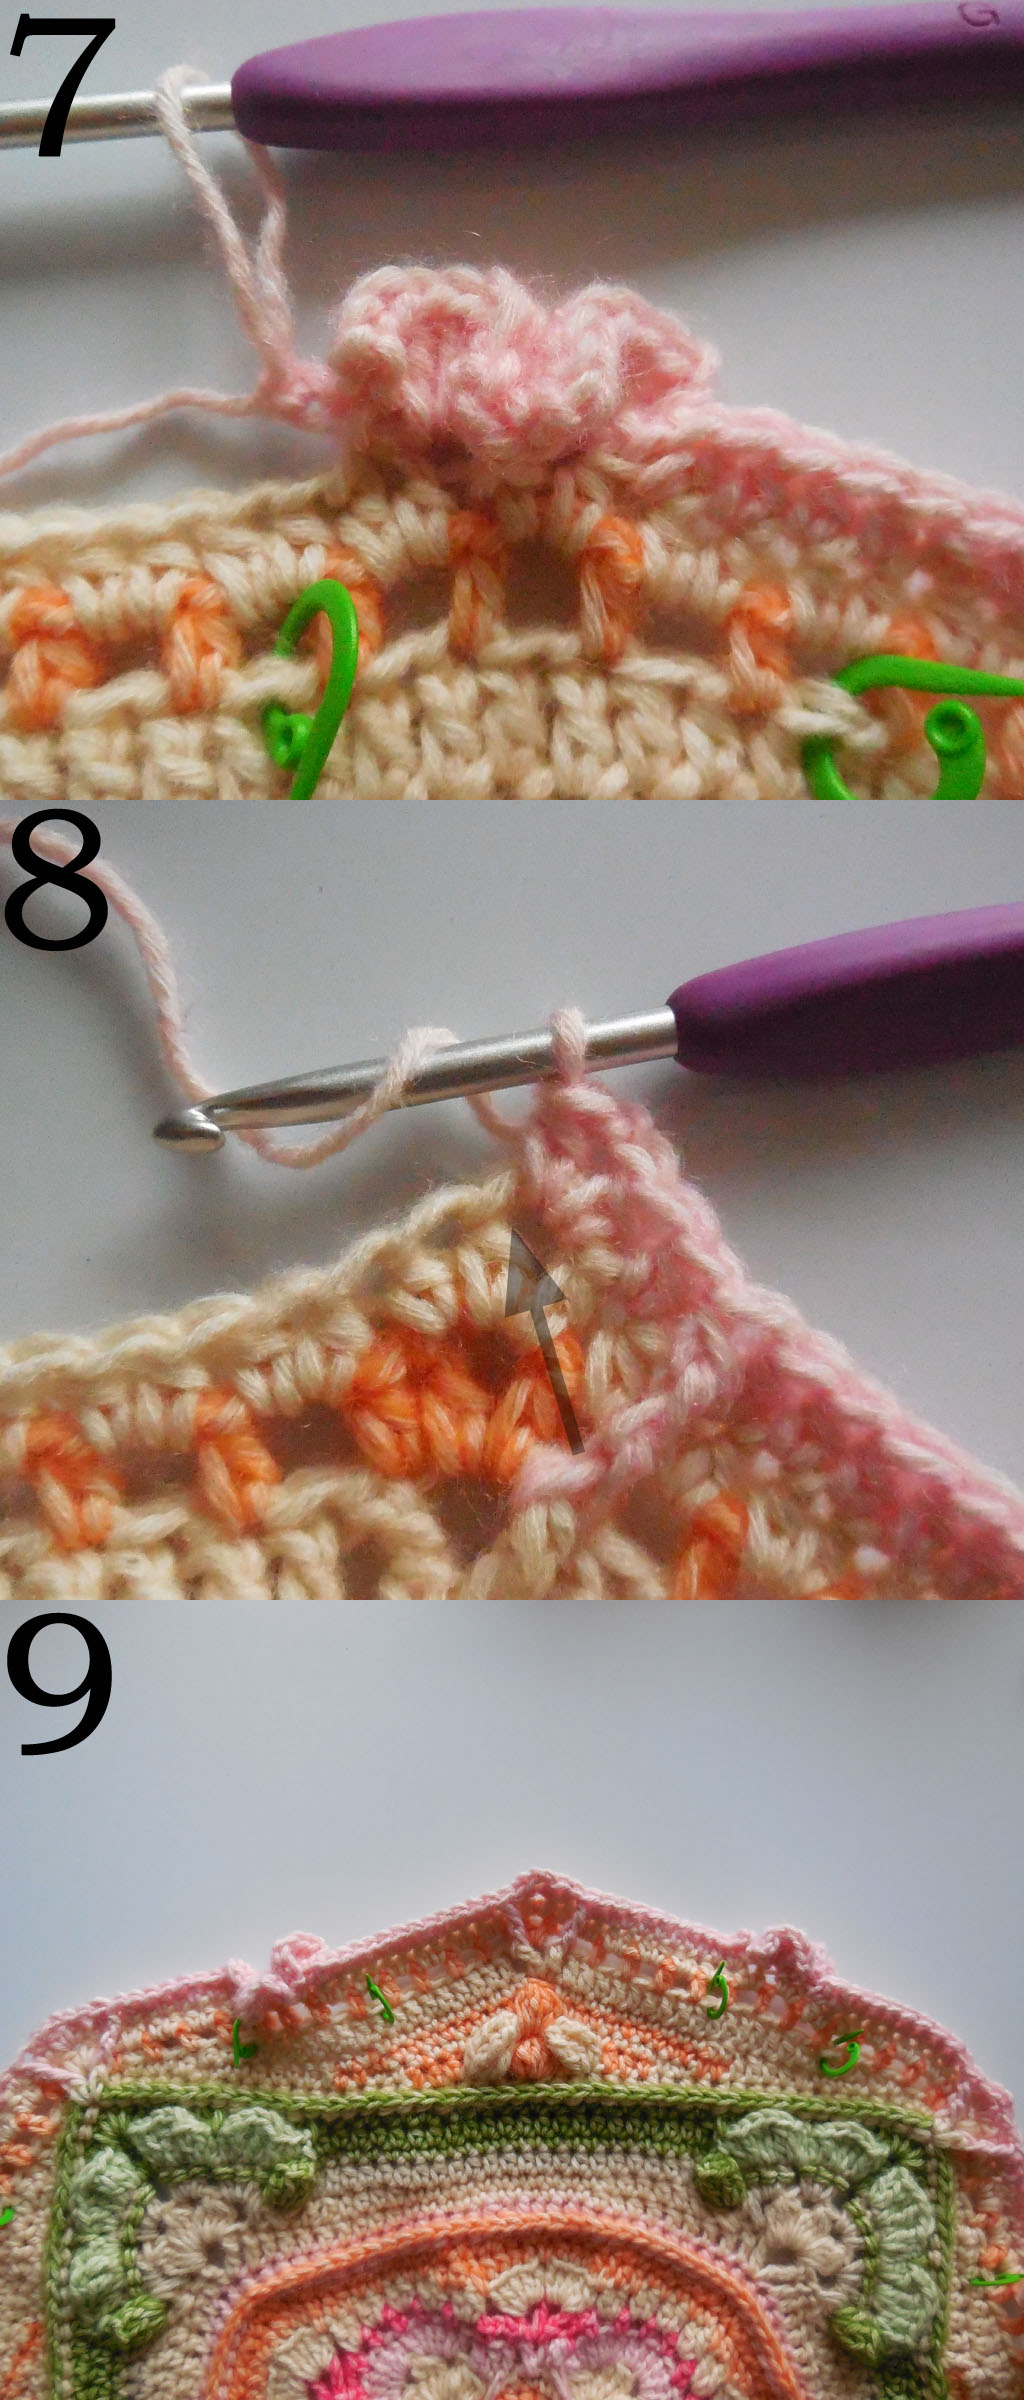
R28
1: Hidden stitch. / Verstopte steek.
2: Last stitch before butterfly can be a bit hidden.
Laatste stk voor de vlinder kan wat verstopt zijn.
3-4: Arrow indicates space to work into.
Pijl geeft de ruimte aan waar je in moet werken.
5-6: Arrow indicates second space to work into.
Pijl geeft de tweede ruimte aan waar je in moet werken.
7: Arrow indicates first stitch after the butterfly.
Pijl geeft de eerste steek na de vlinder aan.
8: R28 finished. / R28 klaar.

R29
1: Hidden stitch. / Verstopte stk.
2: Placement of fpdtr. / Plaatsing RdstV.
3: placement of fptr. / Plaatsing RstV.

4: Arrow indicates first stitch after butterfly.
Pijl geeft eerste stk na vlinder aan.
5: R29 finished. / R29 klaar.
6: Wrong side of the butterfly. / Verkeerde kant vlinder.
R30
1: Arrow indicates first stitch of the butterfly.
Pijl geeft eerste stk van vlinder aan.
2-4: How to make the 5tr-cl. / Hoe haak je de 5stsam.
5: Stitch worked into fptr. / Steek gehaakt in de RstV.
6: Arrow indicates hidden stitch after butterfly.
Pijl geeft de verstopte steek na de vlinder aan.

7: Hidden stitch. / Verstopte steek.
8: R30 finished. / R30 klaar.
R31
1: Hidden stitch. / Verstopte steek.
2: Placement of fpdtr. / Plaatsing van het RdstV.
3: Working into the ch1-sps. / In de 1l-ruimtes haken.
4: Working the fptrs around the middle fptr.
De RstV’s haken rondom het middelste RstV.
5: Placement of fpdtr. / Plaatsing van RdstV.
6: Arrow indicates where to work into after fpdtr.
Pijl geeft aan waar je in moet werken na het RdstV.
7: R31 finished. / R31 klaar.
R31a
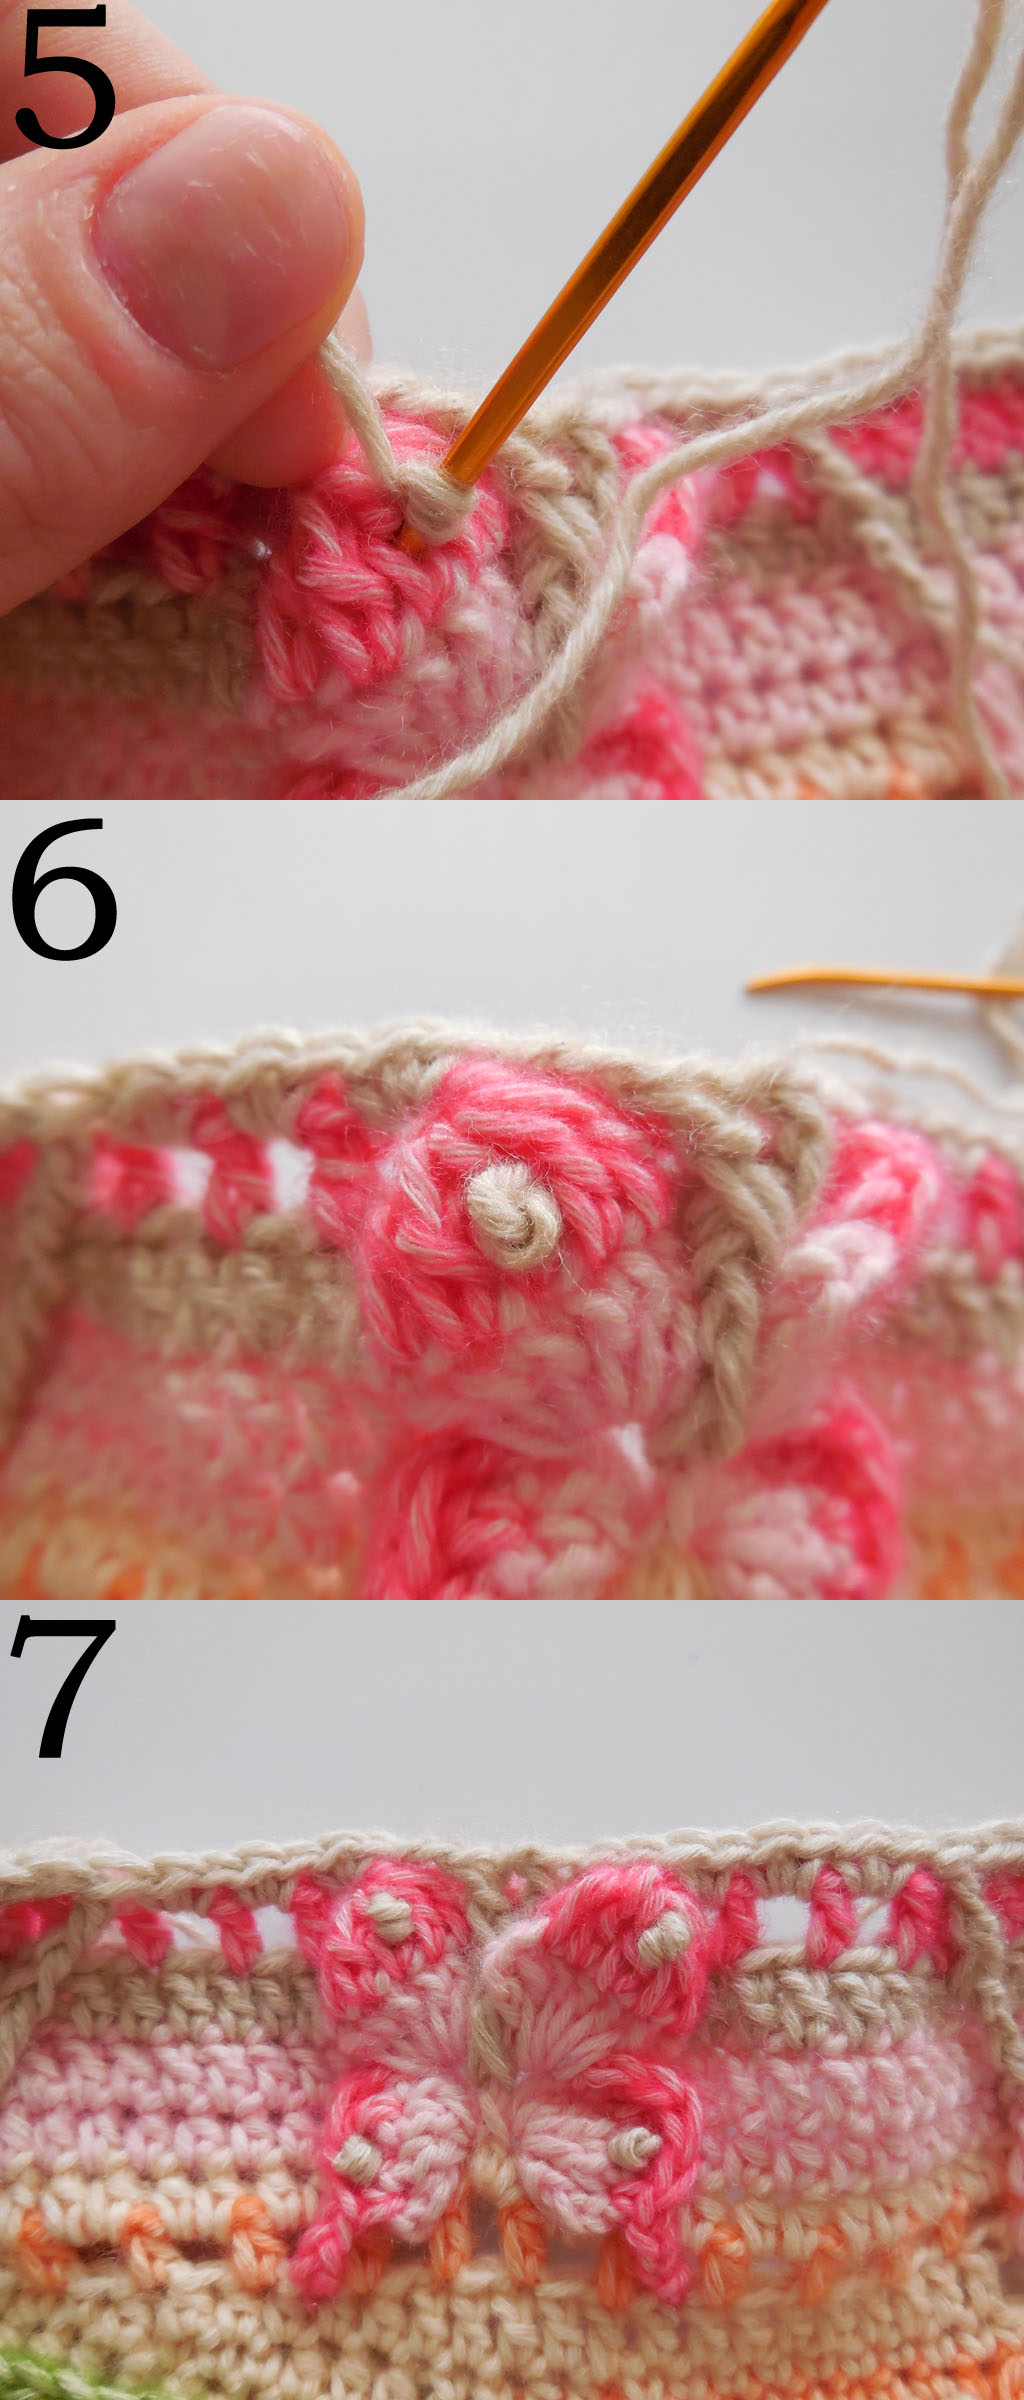
1: Placement of french knots. / Plaatsing Franse knopen.
2-6: How to make a french knot. / Hoe maak je een Franse knoop.
7: All four french knots finished. / Alle 4 knopen klaar.
R32
1: Hidden stitch. / Verstopte steek.
2: First stitch after ch-sp can look a bit hidden.
Eerste steek na l-ruimte kan een beetje verstopt lijken.
3: Close up of finished round. / Close-up R32.
4: R32 finished. / R32 klaar.
R33
1: First stitch. / Eerste steek.
2: Hidden stitch. / Verstopte steek.
3: Placement of the fpdtrs. / Plaatsing van de RdstV’s.
R34
1: Hidden stitch. / Verstopte steek.
2: R34 finished. / R34 klaar.
R35
1: Start of the round. / Start van de ronde.
2: Arrow indicates the ch-sp to work into after the fpdtr. It is a bit hidden by the fpdtr and you need to push the stitch aside to make it easier to work into the ch-sp.
Pijl geeft de l-ruimte aan na het RdstV. Hij is een beetje verstopt en als je de steek opzij duwt is het makkelijker om in de l-ruimte te werken.
3: The stitch is now worked into the ch-sp.
De steek is in de l-ruimte gehaakt.
4: R35 finished. / R35 klaar.
R36
1: Hidden stitch. / Verstopte steek.
2-5: Working the fpdtr2tog. / In het RdstVsam haken.
6: It’s a bit tricky to work into the stitch that also has the front post stitch around it, so be aware about that.
Het is een beetje lastig om in de steek te werken waar al een reliëfsteek omheen is gemaakt.
7: R36 finished. / R36 klaar.

R37
1-3: Making a puff-st. If you want to have a nice bobbly puff, make sure to raise the loops high enough.
Maak een puff-s. Als je een dikke puff wilt, trek de lussen dan goed hoog op.
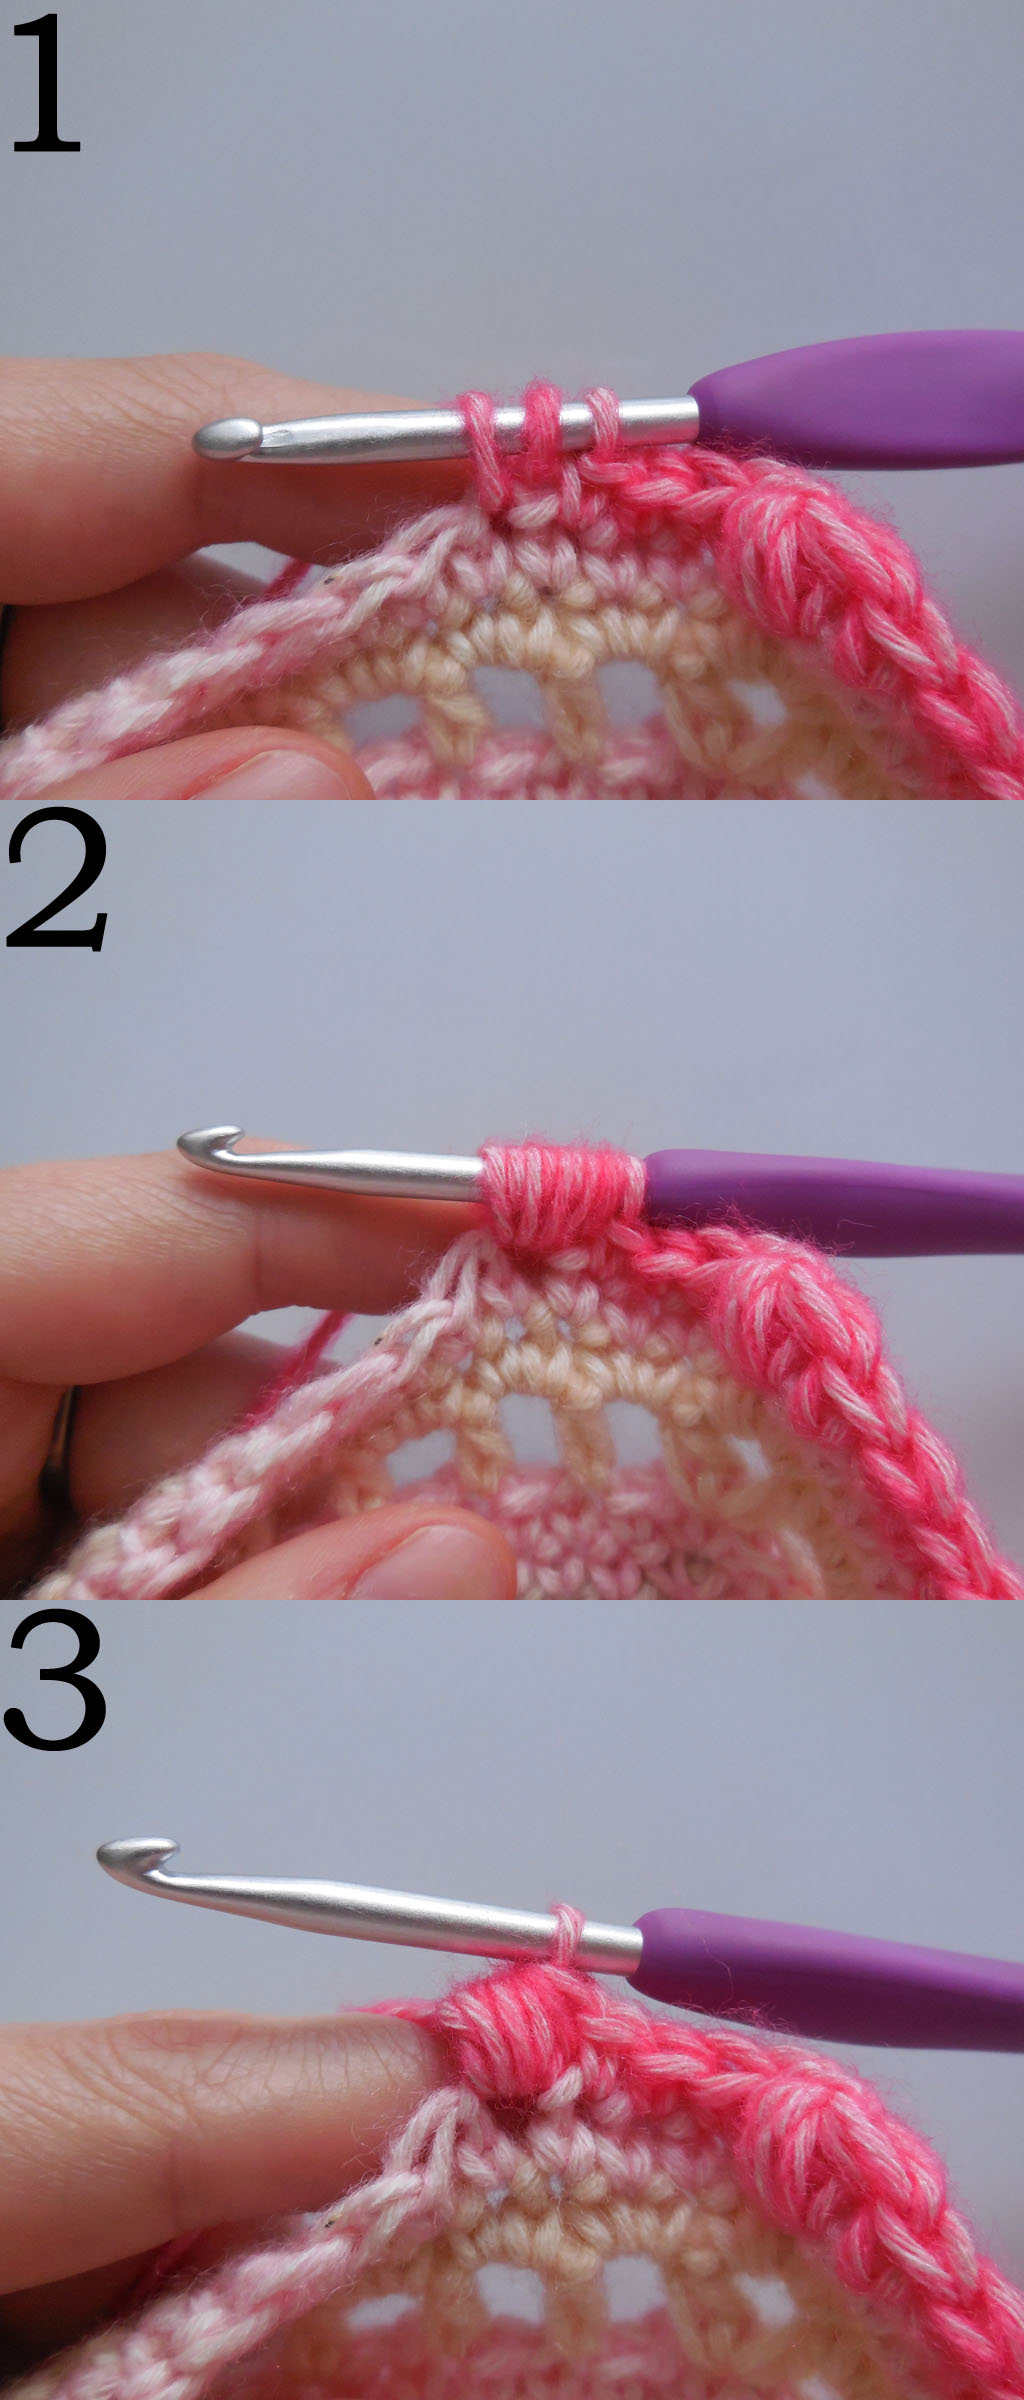
4: The puff-st consists of the actual stitch and the ch1. Do not mistake one for the other.
De puff-s bestaat uit de steek en de 1l, dus haal die twee niet door elkaar.
5: Hidden stitch after the puff-st. The puff-st can cover the stitch next to it quite easily, so be aware of it.
Verstopte steek na de puff-s. De puff-s kan de volgende steek heel makkelijk verstoppen, dus let daar op.
6: R37 finished. / R37 klaar.
R38
General tip for puffing up the puff stitches: When making the stitch after the puff, pull it a little bit tighter than usual and simultaneously push the puff to the front with your finger.
Algemene tip voor het ‘op-puffen’ van de puff-steken: Als je de steek na de puff haakt, trek deze dan een beetje strakker aan dan normaal en duw de puff tegelijkertijd naar voren met je vinger.
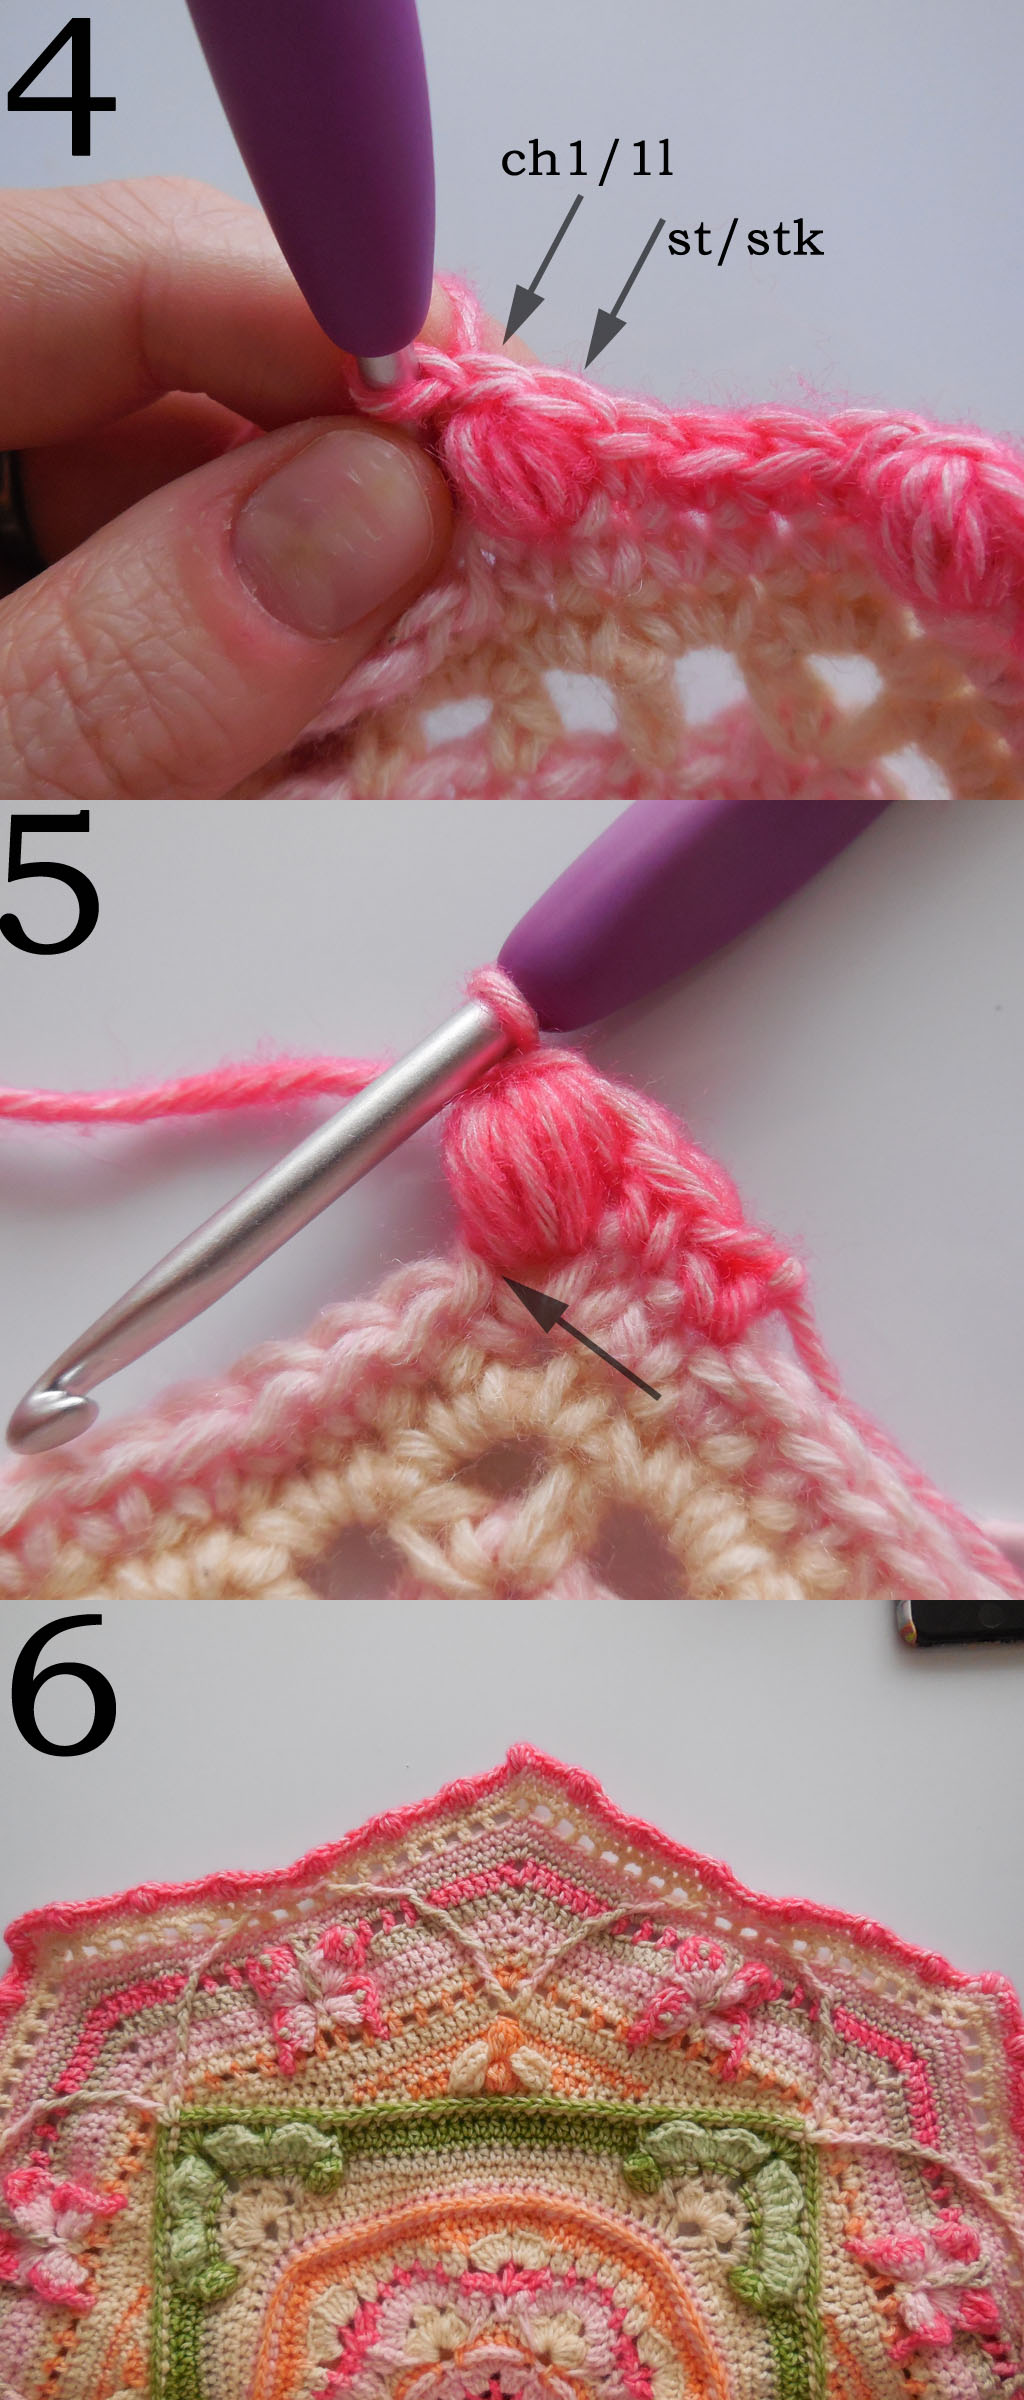
1: Arrow indicates the space to work the 2 stitches into.
Pijl geeft de ruimte aan waar je de 2 steken in haakt.
2: Corner made. / Hoek gemaakt.
3: Arrow indicates the hidden stitch. / Pijl geeft de verstopte steek aan.
4: First arrow indicates the ch1 of the puff-st that you need to skip, the second arrow indicates the next stitch to work into.
Eerste pijl geeft de 1l van de puff-s aan die je moet overslaan, de tweede pijl geeft aan waar je de volgende steek in moet haken.
5: R38 finished. / R38 klaar.
That’s Chapter 2 finished! : D / Daarmee is Hoofdstuk 2 klaar! : D
I hope you enjoyed this part : ) If you want to share your progress or if you need help with the pattern, go to the Scheepjes Facebook group.
Ik hoop dat je het leuk vond dit deel te haken : ) Als je je voortgang wilt delen of als je hulp nodig hebt met het patroon, ga dan naar de Scheepjes Facebook groep.
************************************************************************
If you don’t want to miss any updates on the CAL, please be sure to follow the Scheepjes Facebook page and follow me on Facebook, Instagram (@aspoonfulofyarn) or subscribe via email at the bottom of this page.
Als je geen enkele update over de CAL wilt missen, volg dan de Scheepjes Facebook pagina en volg de A Spoonful of Yarn Facebook, of Instagram (@aspoonfulofyarn), of schrijf je in via email aan de onderkant van deze pagina.
************************************************************************
*Affiliate disclaimer
This post contains affiliate links. When you click this link and purchase something, I will get a small commission, but it will not cost you extra money. This way you can support my blog and I can keep making free patterns.
Deze post bevat affiliate links. Als je op deze link klikt en iets koopt, krijg ik een kleine commissie. Op deze manier kan je mijn blog steunen, terwijl het jouw niks extra’s kost. Hierdoor kan ik doorgaan met het maken van gratis patronen.